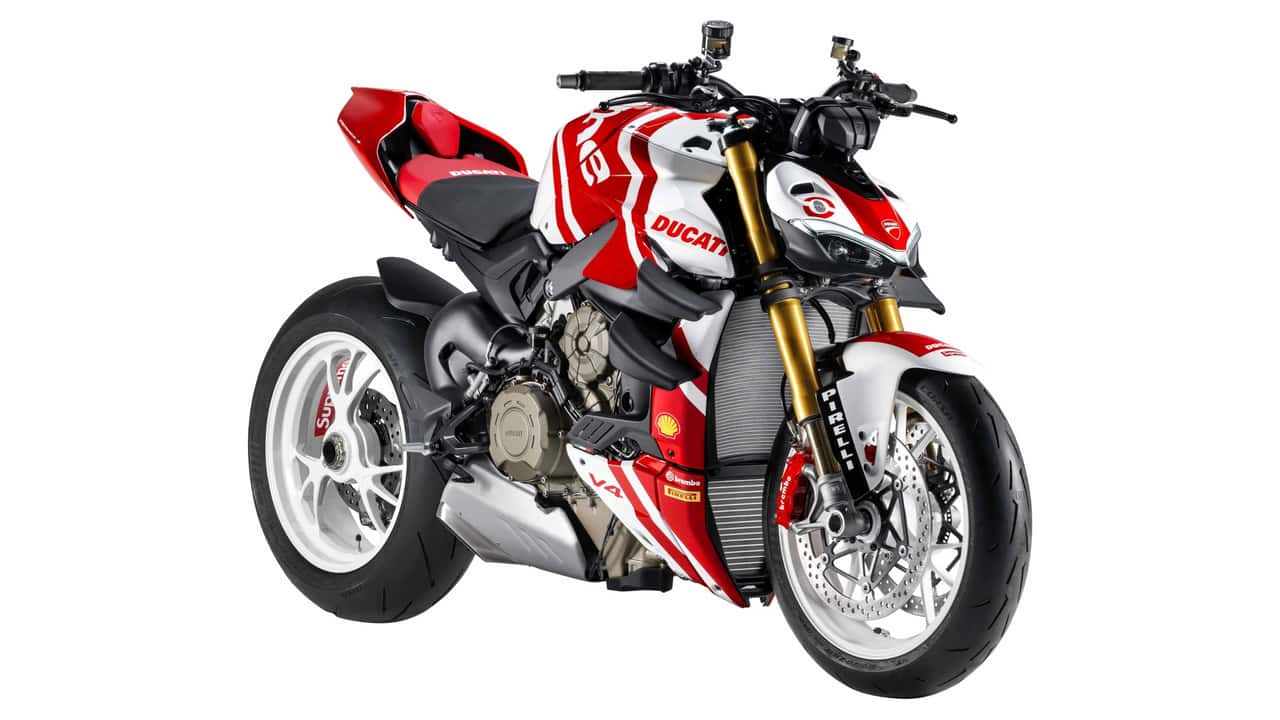
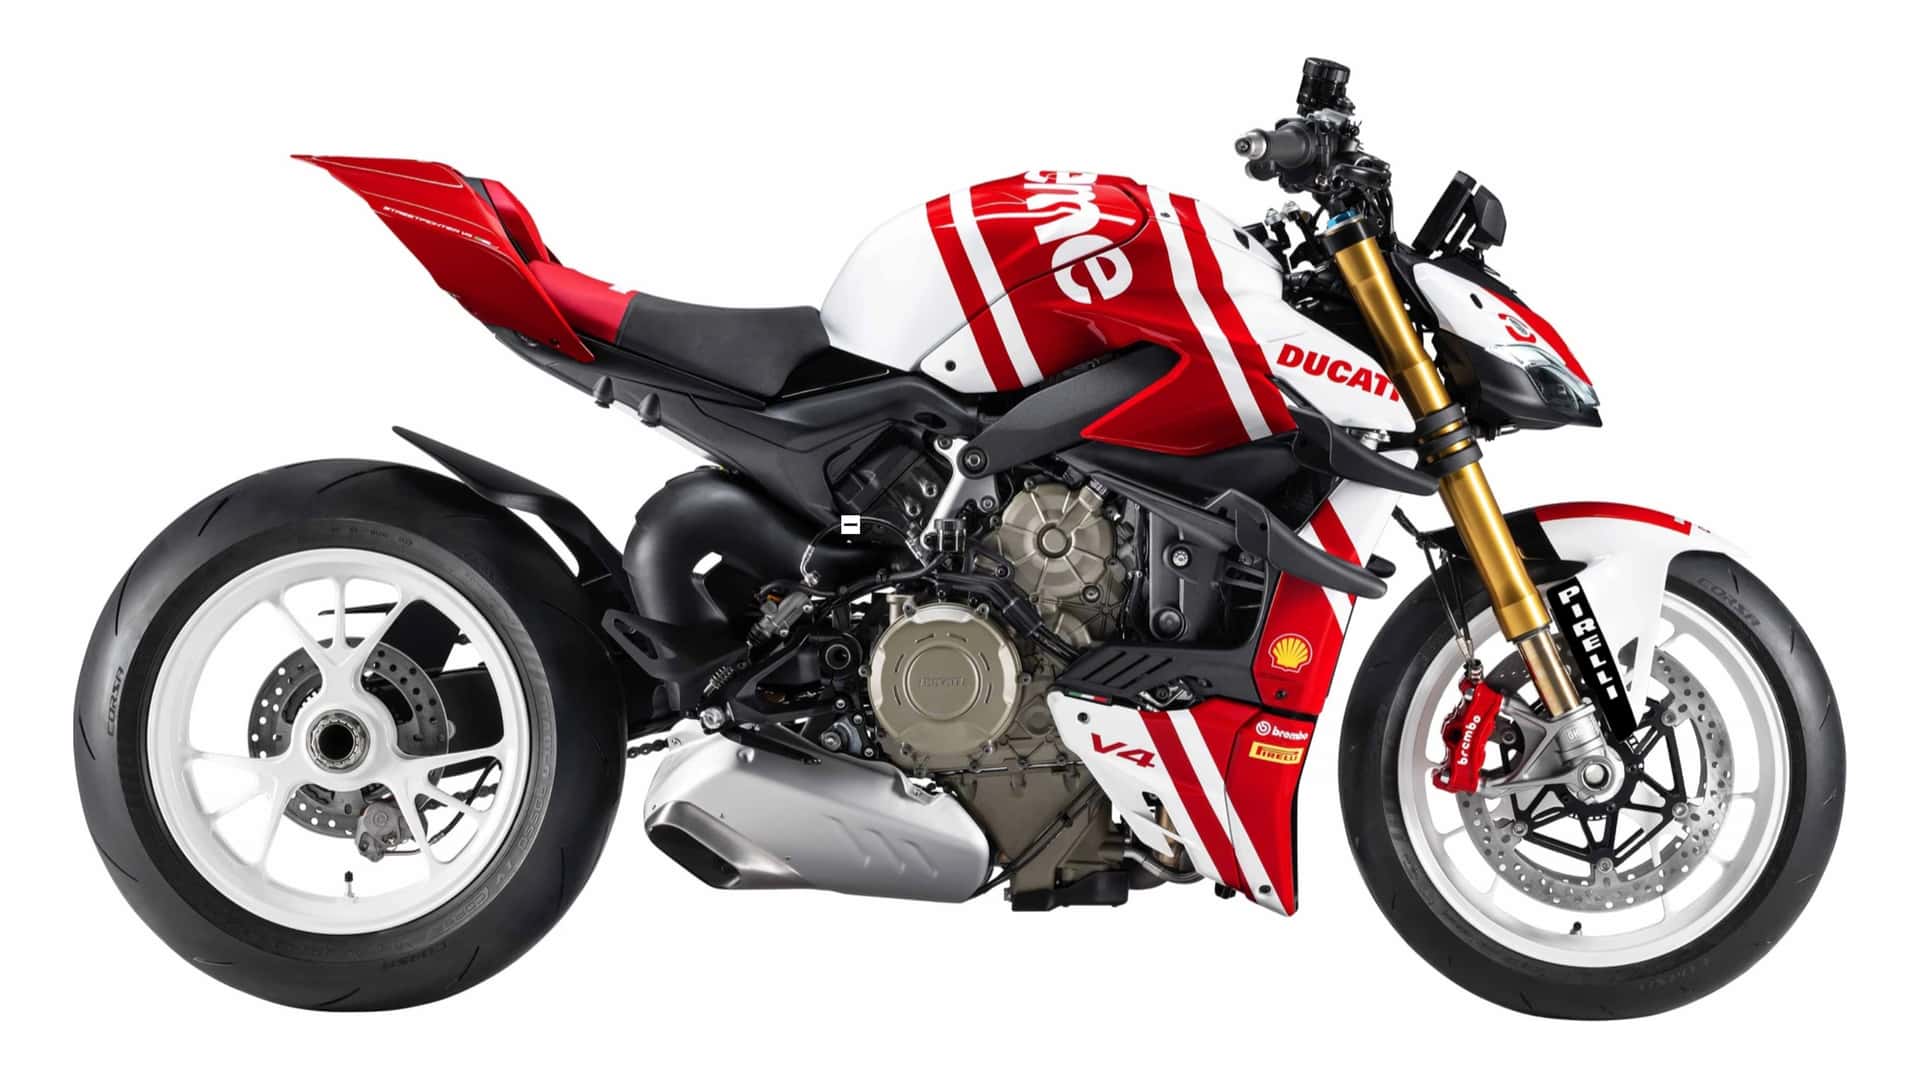
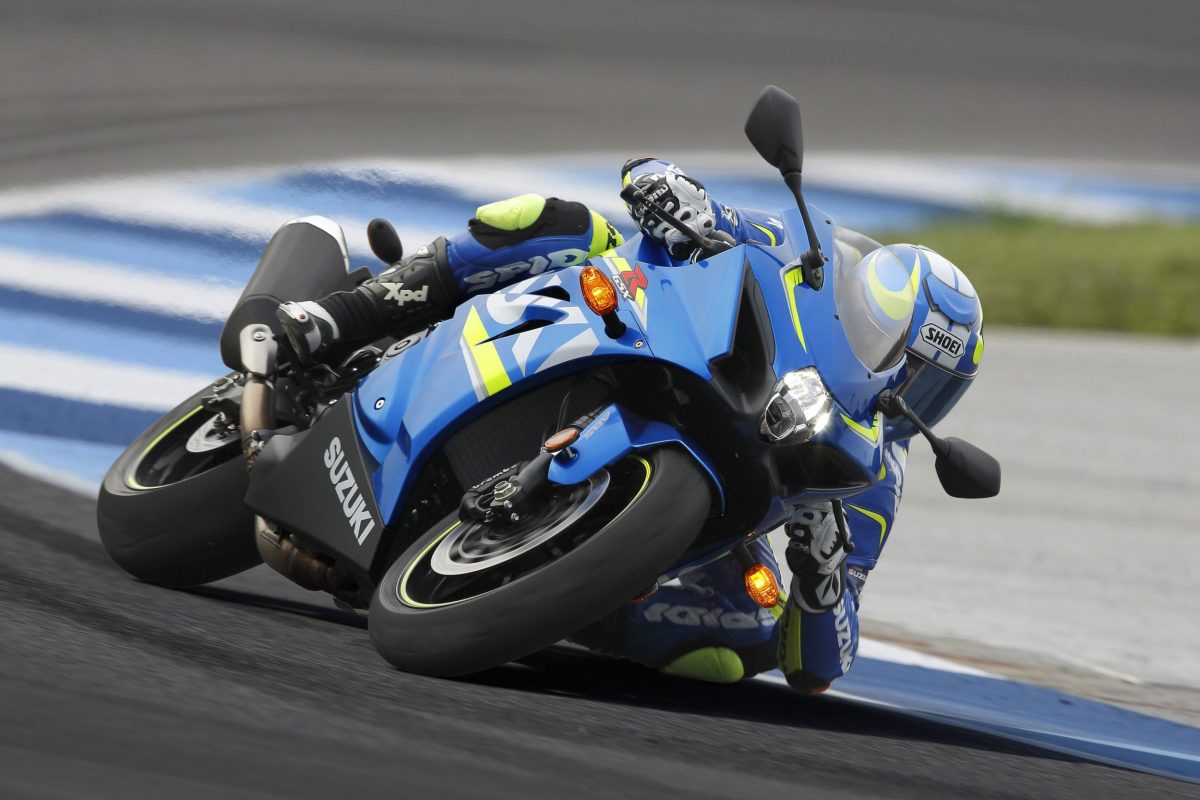
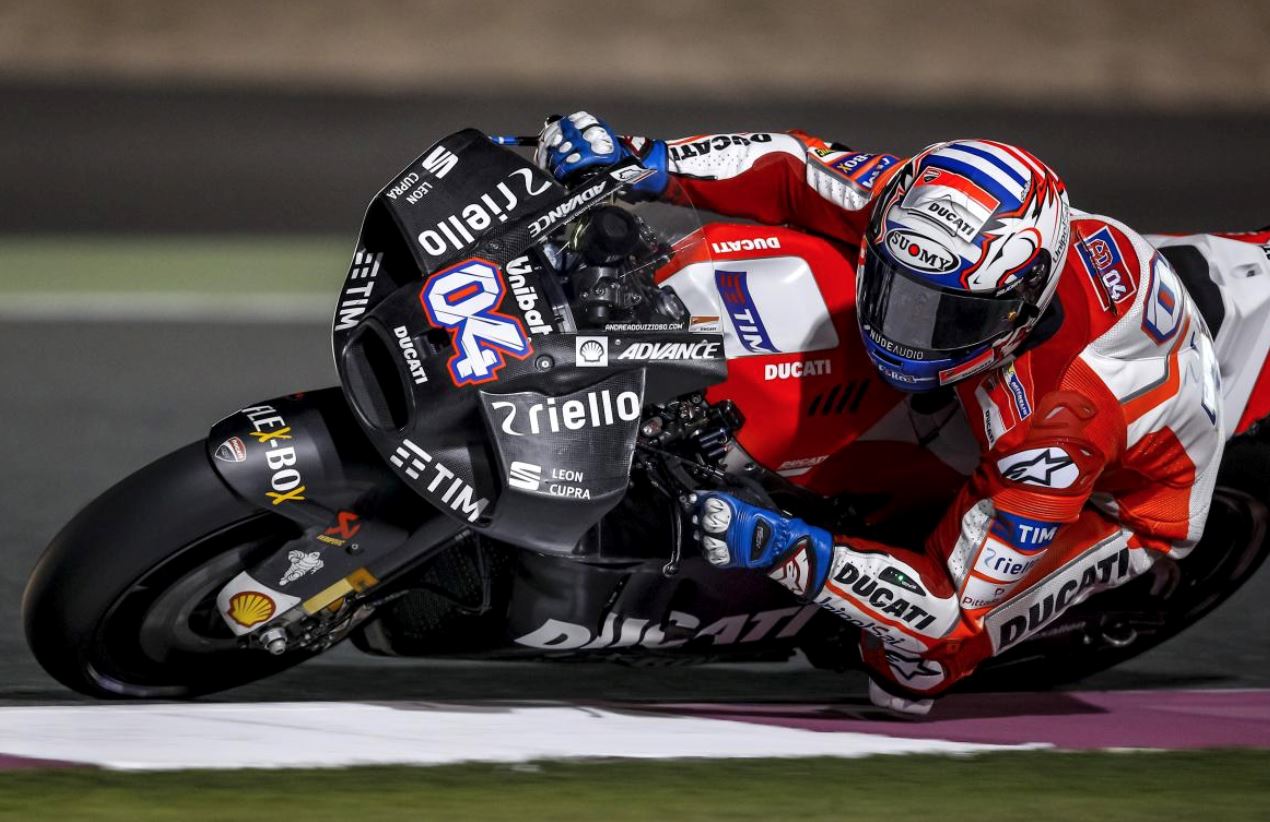
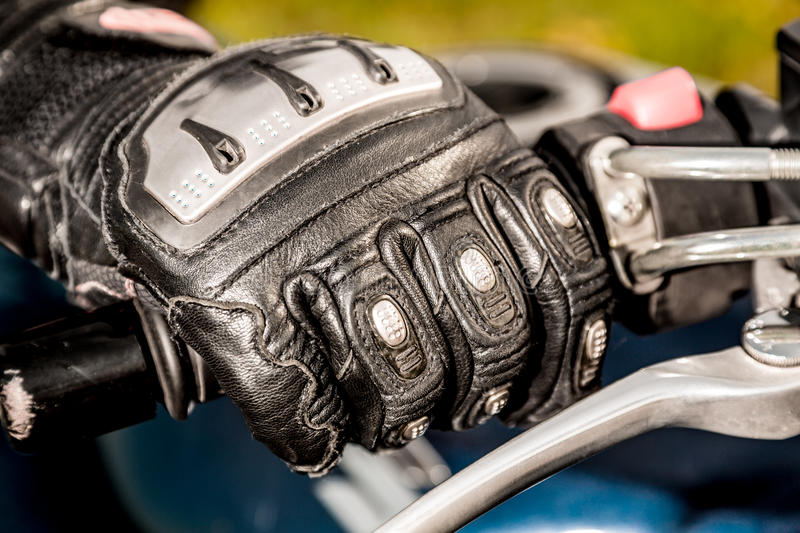
Motosikal Ducati Streetfighter V4 S pun sudah merupakan “taikor” yang paling berkuasa di kalangan motosikal hypernaked dengan enjin tanpa turbo/supercharger. Tetapi Ducati sekarang sering bekerjasama dengan pembuat-pembuat otomobil serta penghasil produk gaya hidup bagi menghasilkan model-model yang lagi mengancam, seperti Ducati Streetfighter V4 S Supreme Edition ini.
Pembuat pakaian jenama Supreme pula tidak pernah segan daripada menghasilkan gaya fesyen yang menyelah. Oleh itu, motosikal ini dipenuhi dengan logo-logo serta corak Supreme.
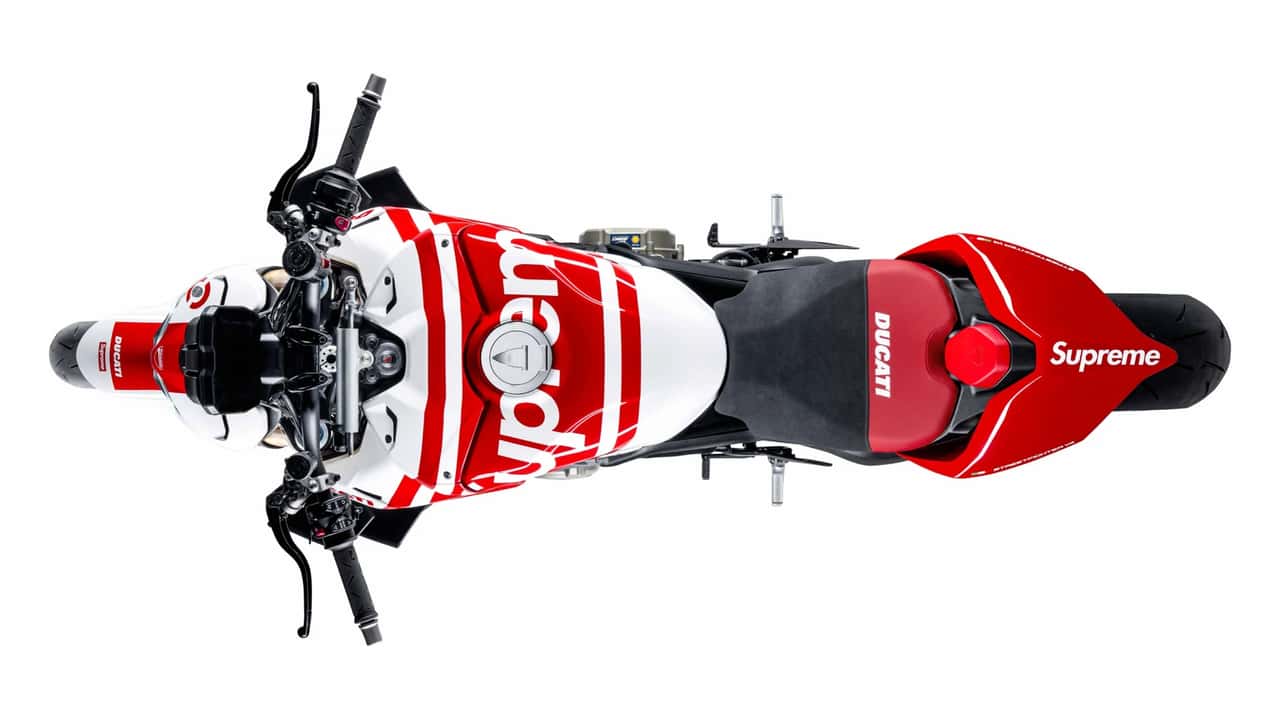
Penggunaan logo serta warna seperti ini membuatkan sebuah motosikal yang sudah agak agresif kepada sesuatu yang lebih garang lagi. Mula-mula sekali anda akan melihat corak warna dan kemudiannya kepada logo Supreme yang amat besar yang diletakkan daripada sebelah kiri ke sebelah kanan tangki. Selain daripada itu, terdapat juga logo di bahagian ekor motosikal, serta pada rim-rim yang dicat warna putih.
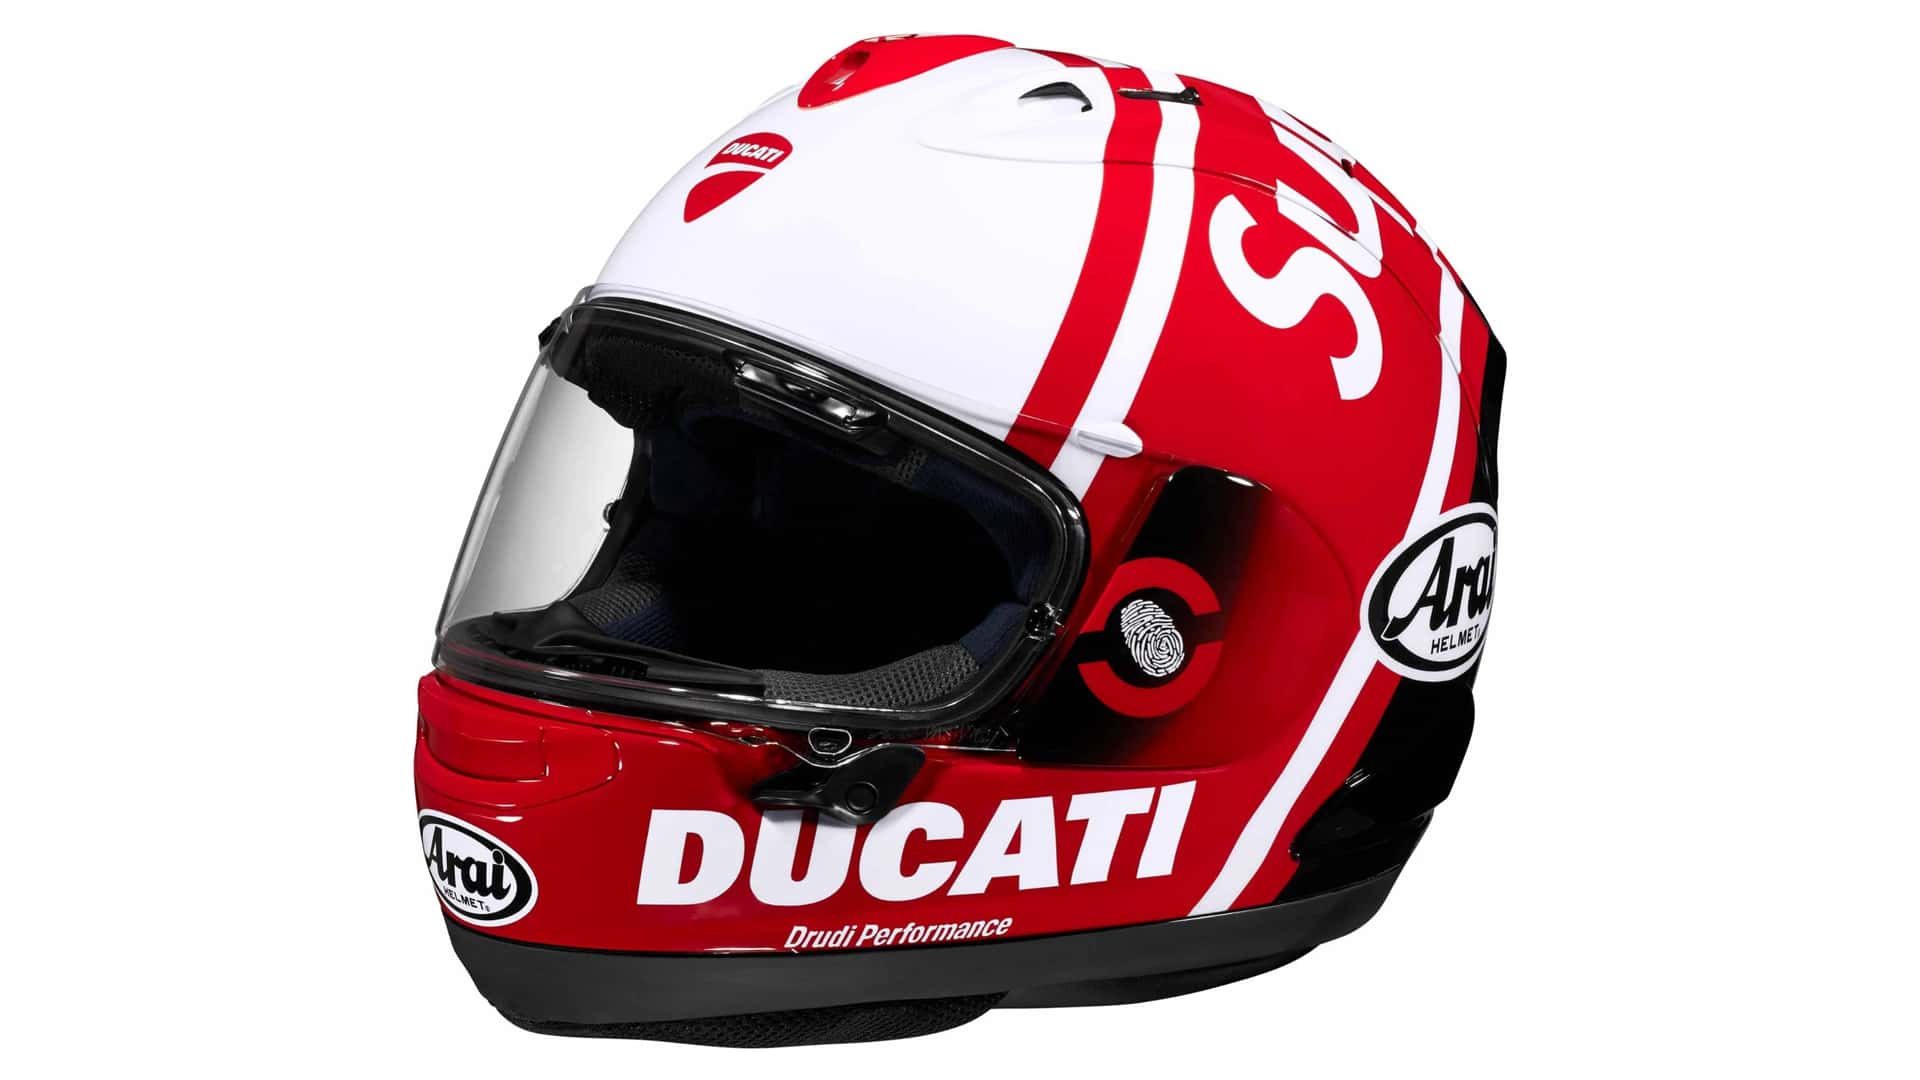
Tambah lagi, pembli motosikal ini turut boleh menambahkan sebuah topi keledar Arai Corsair-X (dikenali sebagai RX-7X di sini) yang juga menggunakan warna Supreme. Corak topi keledar ini dihasilkan khas sebagai pelengkap untuk motosikal Ducati Streetfighter V4 S Supreme Edition ini.
Namun, kesemua aspek dan ciri mekanik serta elektronik kekal sama, termasuklah enjin Desmosedici V4 Stradale yang amat berkuasa: 208hp dengan tork 133.4Nm.
Bahagian casisnya terdiri daripada fork depan Öhlins NIX 30 berukuran 43mm dengan kawalan elektronik, manakala monoshoknya merupakan Öhlins TTX 36 juga dengan kawalan elektronik. Sistem breknya terdiri daripada kaliper Brembo Stylema Monoblock (yang berwarna merah) di depan dan kaliper terapung tunggal di belakang.
Terdapat juga segala ciri kawalan elektronik seperti kawalan cengkaman selekoh, kawalan “wheelie,” kawalan gelongsoran, kawalan lepasan, serta macam-macam lagi seperti pada model-model Ducati yang berprestasi tinggi.
Ducati belum mengumumkan harga motosikal ini dan di pasaran manakah ia akan dijual.
The Ducati Streetfighter V4 S already rules the roost as the most powerful non-aspirated hypernaked beast, with 208hp on tap. But the trend of cooperation with automobile manufacturers and lifestyle product makers certainly ups the style quotient to 11. Check out this Ducati Streetfighter V4 S Supreme Edition.
The apparel maker Supreme does not shy away from making bold statements. Hence the liberal use of their famous screaming red and white logos and colours on the bike.
Needless to say, it turns a er… head turning design to something extremely loud. One cannot miss the huge Supreme logo draped over fuel tank from one side to the other, plus another logo on the tail cover just to remind the rider that this is not his cousin’s Streetfighter V4 S. And oh, the wheels are painted in white without forgetting the Supreme logo, too.
Additionally the buyer may go the whole nine yards and complete the look with an Arai Corsair-X (known in Malaysia as the RX-7X) helmet, also resplendent in Supreme’s colours. This limited edition helmet was made exclusively for the Ducati Streetfighter V4 S Supreme Edition.
Mechanical and electronic aspects and features remain unchanged, including the aforementioned beasty Desmosedici Stradale V4 engine that kicks out a whopping 208hp and 133.4 Nm of torque.
The chassis consists of electronically controlled 43mm fully adjustable Öhlins NIX 30 forks up front and an Öhlins TTX 36 electronic rear shock. The anchors are twin Brembo Stylema Monoblock calipers in front (finished in red) and a floating caliper at the rear.
The entire electronic suite is featured here such as cornering traction control, wheelie control, slide control, launch control, and all sorts of other “controls” as expected of a high performance Ducati.
There is no word yet on how much the bike will sell for and availability in which markets.
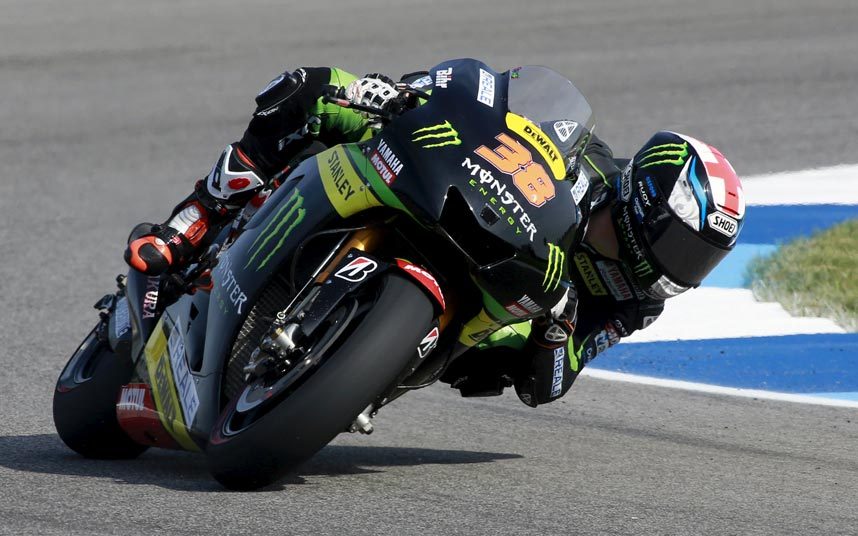
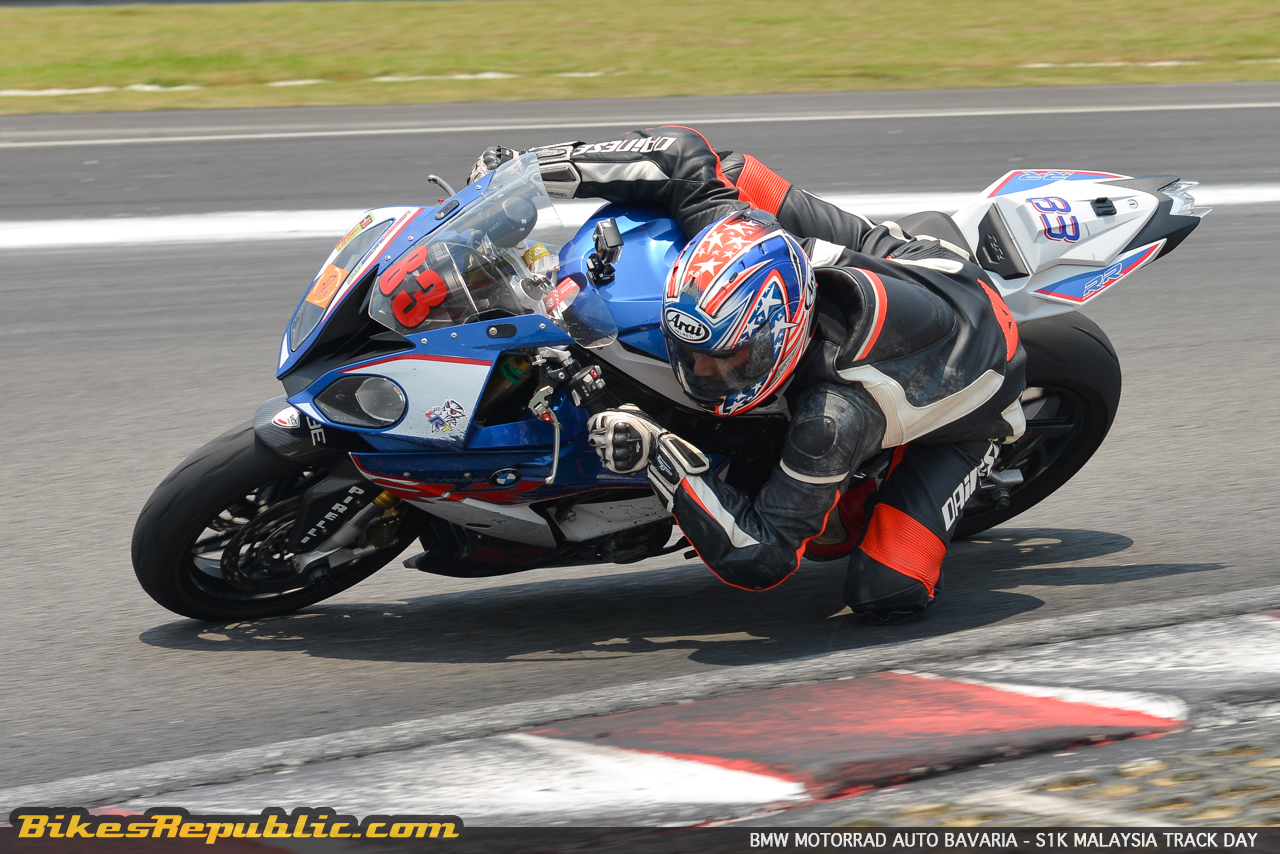
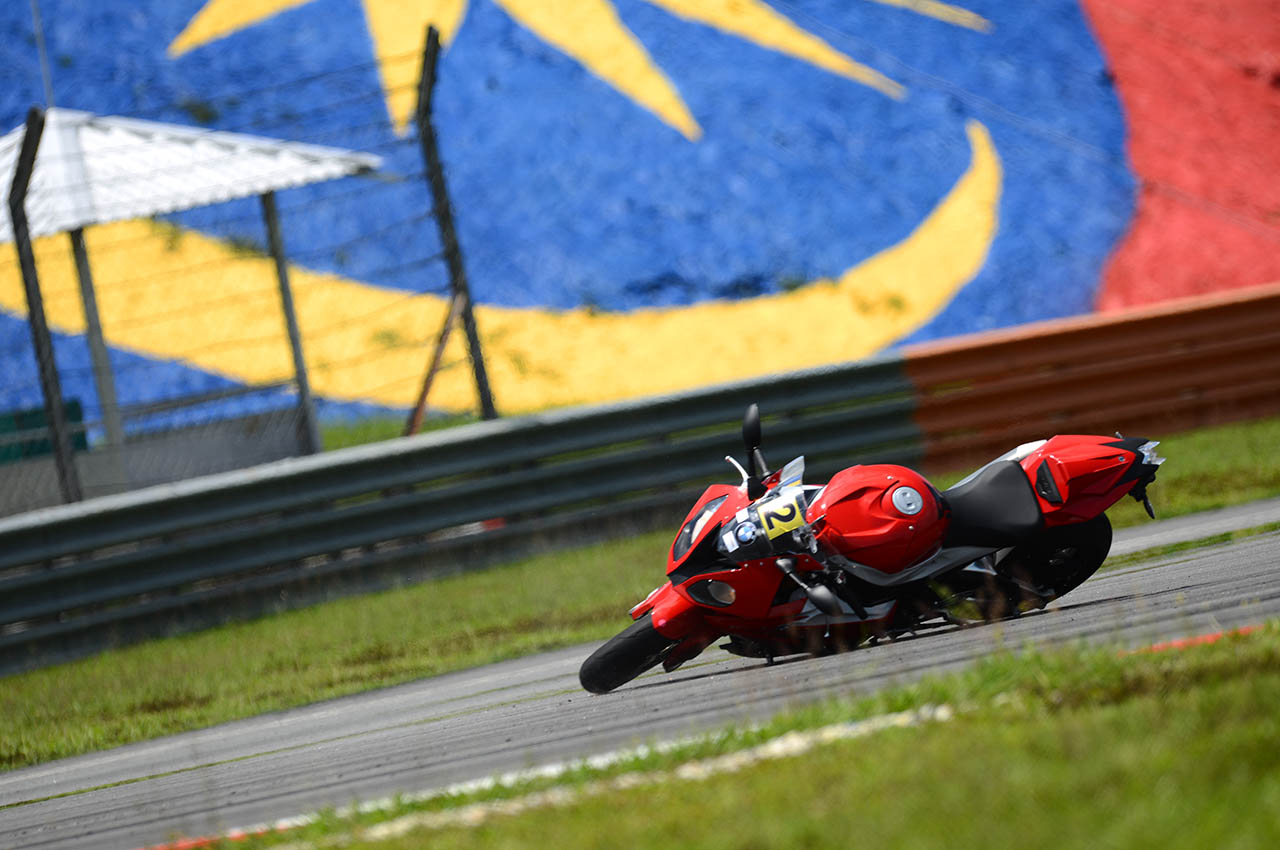
The kneedown cornering technique is essential on the track.
Done right, it provides confidence and safety.
Remember to keep it natural and relaxed.
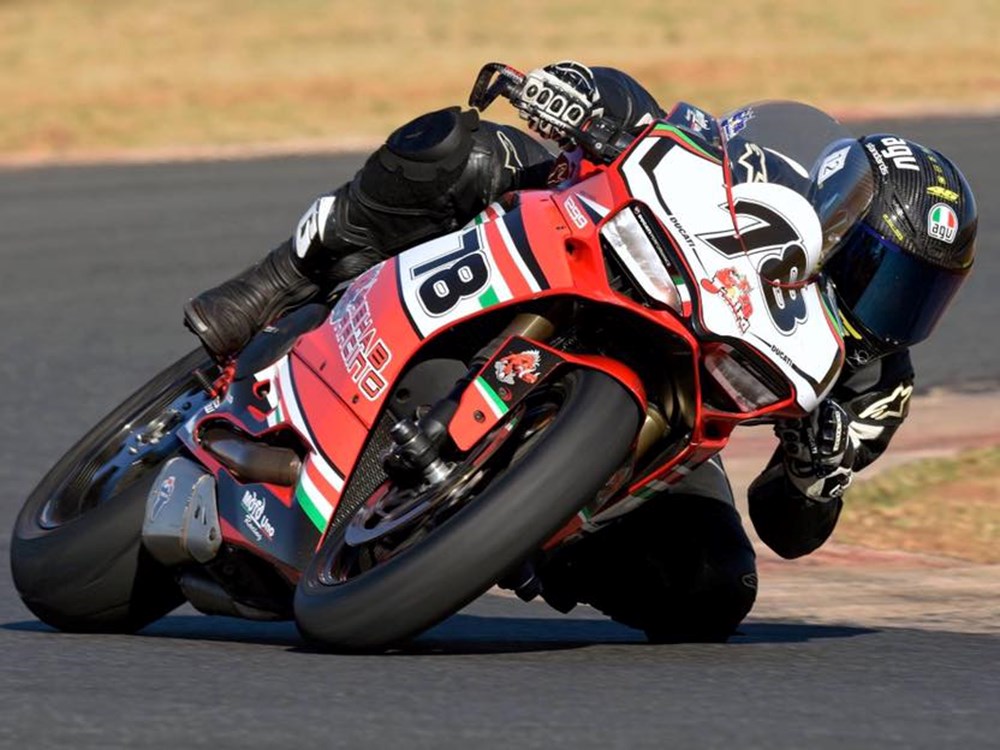
It’s pretty much elbow down cornering style for pro riders these days, but the basic cornering technique starts from the kneedown technique.
Getting a kneedown technique is beneficial towards motorcycle control in a corner. It’s useful to gauge how far you’re leaned over and push the bike up slightly if the front tyre starts to slide. Hanging off and putting a kneedown also lessens the bike’s lean angle, hence using a slightly fatter part of the tyre rather than putting all your faith on the very edge.
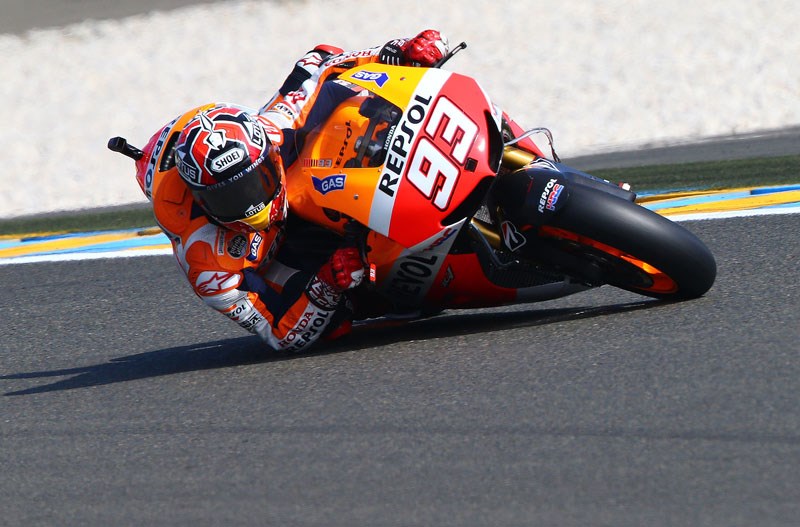
Marquez kneedown and elbow down – Courtesy of MotoGP.com
But before we proceed further, please take note that we do not encourage the technique on public roads. Please ride responsibly and explore your limits at the track.
1. Gear
Obviously, you need riding gear that has knee sliders; you’re required to don a racing leather suit on the track anyway. Please don’t try to attempt this on public roads by taping knee pucks to your jeans.
2. Location
Yes, yes, we’ve mentioned this many times but it needs to be drilled in. The track. Only at the track. If you’re riding a sub-500cc machine, you could head to ELITE or the Sepang International Kart Circuit. As for the bigger bikes, we only have the Sepang International Circuit, unfortunately.
3. Getting it Right
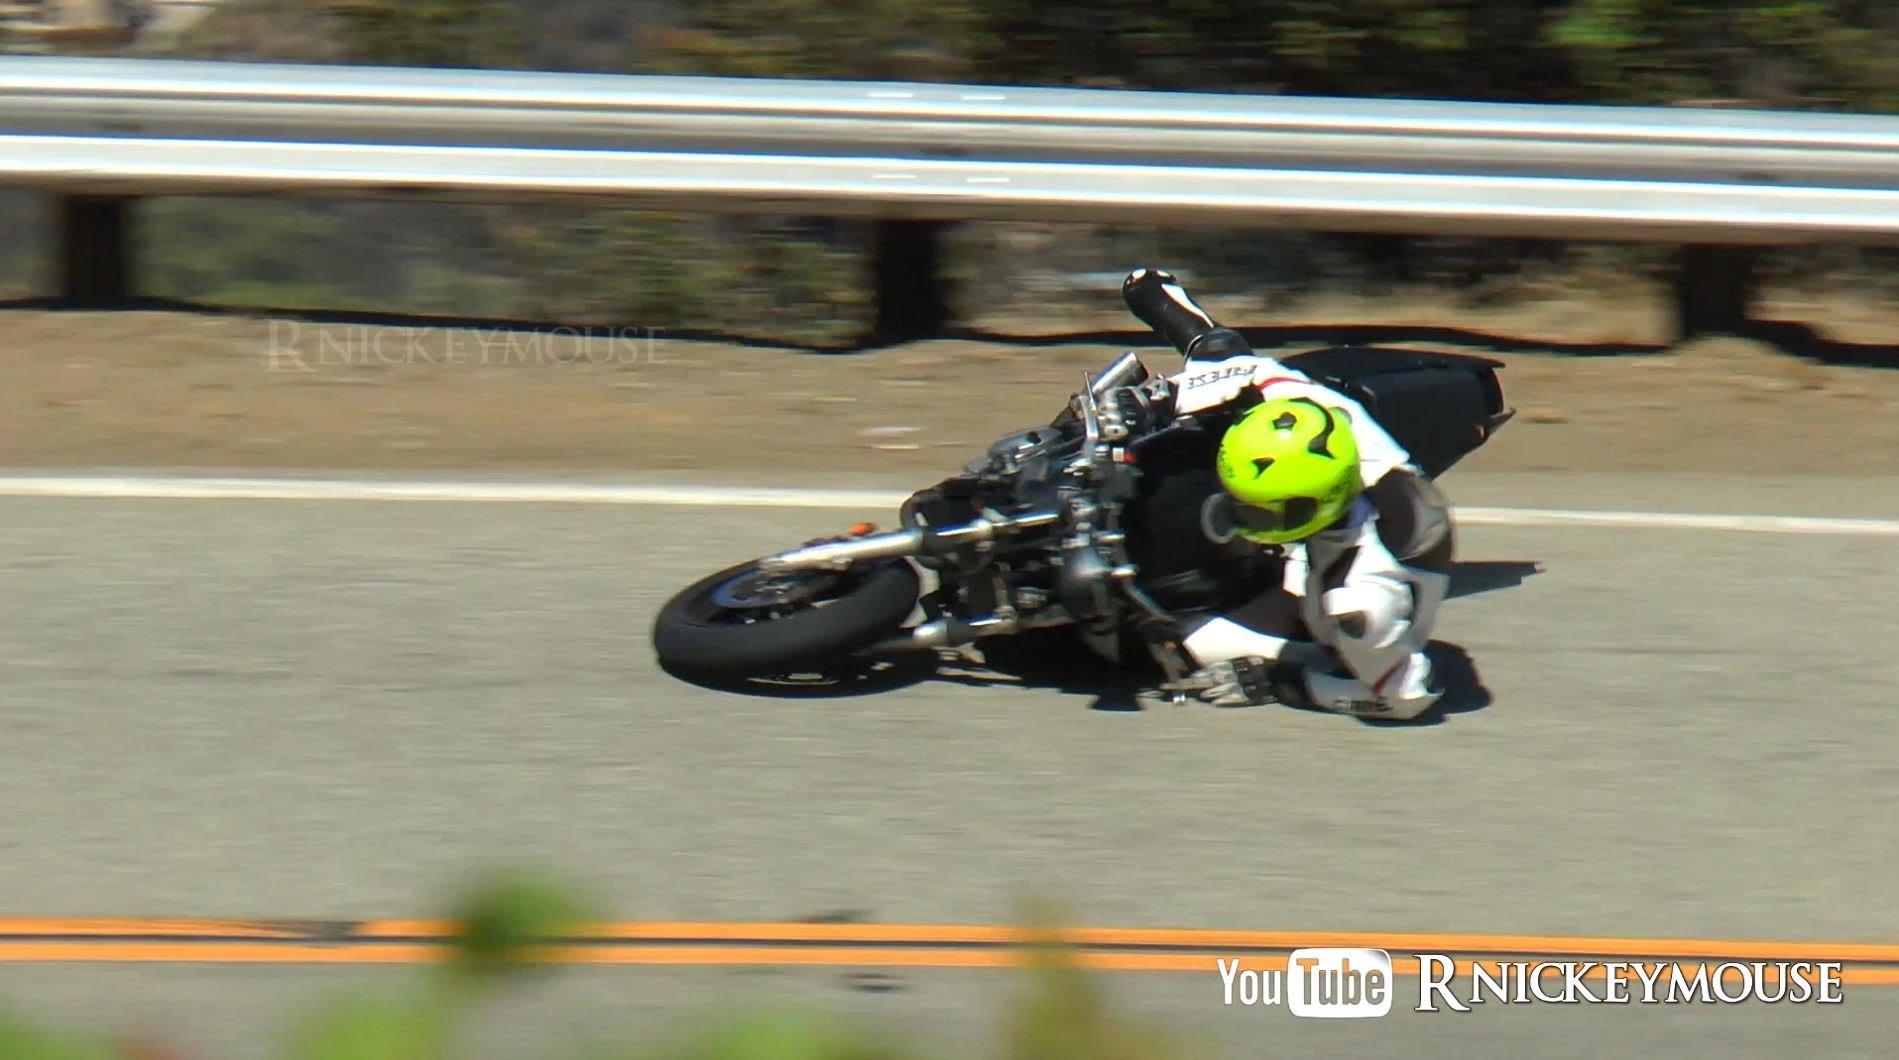
Lowside crash due to too much speed – Courtesy of RNikeyMouse
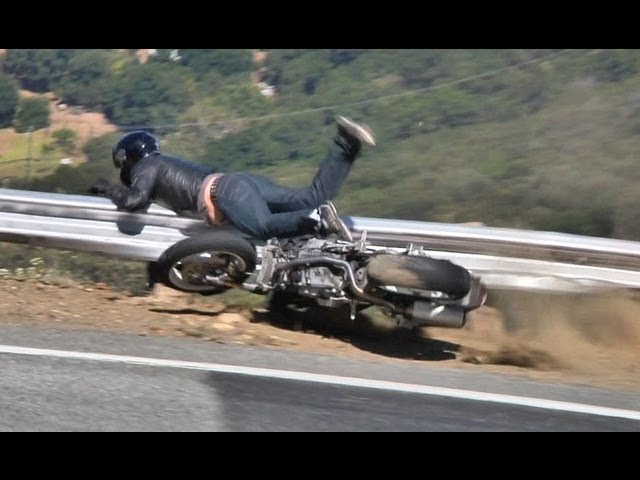
Don’t just banzai into a corner at the highest speed possible without analyzing the processes. It’s true that the modern motorcycle and its components including tyres (even sport-touring tyres) are usually up to the job. However, mistakes are compounded until the point of no return, risking injury and damaging your bike.
4. Look through the corner
You go where you look – Courtesy of MotoGP.com
Remember that you go where you look. The first part of cornering is to look through the corner and trace an imaginary line through it. If you’re used to staring downwards on the streets, now is the time to learn the correct visual techniques. Remember: Look up, look through and look wide, look at where you want to go. You’ll be amazed at how relaxed you’ll feel.
5. Hang off early
Hang off early – Courtesy of tv3.it
As you approach the corner move your butt off the seat and your upper body off the centre line of the bike. You should use the tank and bike’s midsection to support yourself. Stick the knee out, stay there and don’t squiggle around anymore. Hang off in a position that is comfortable to you because you could always modify your body position as your experience picks up. Don’t hang off too much, either, as forcing it will have you contorted all over the bike, making you feel uncomfortable and rob your confidence.
Always hang off early compared to shifting your body only when you’ve started to turn the bike in. Doing the latter will destabilize the bike, causing you to lose confidence and back off, hence robbing your chance of a clean kneedown.
6. Set your speed
Set your speed and gearing before entering the corner – Courtesy of Moto.GP
Set your speed using the brakes, instead of relying too much on engine braking. Select the gear which gives you a smooth rolling speed through the turn as well as to provide the punch out of the corner. Too low a speed or gear will bleed off too much speed causing the bike to stand up and forcing you to throttle up too soon.
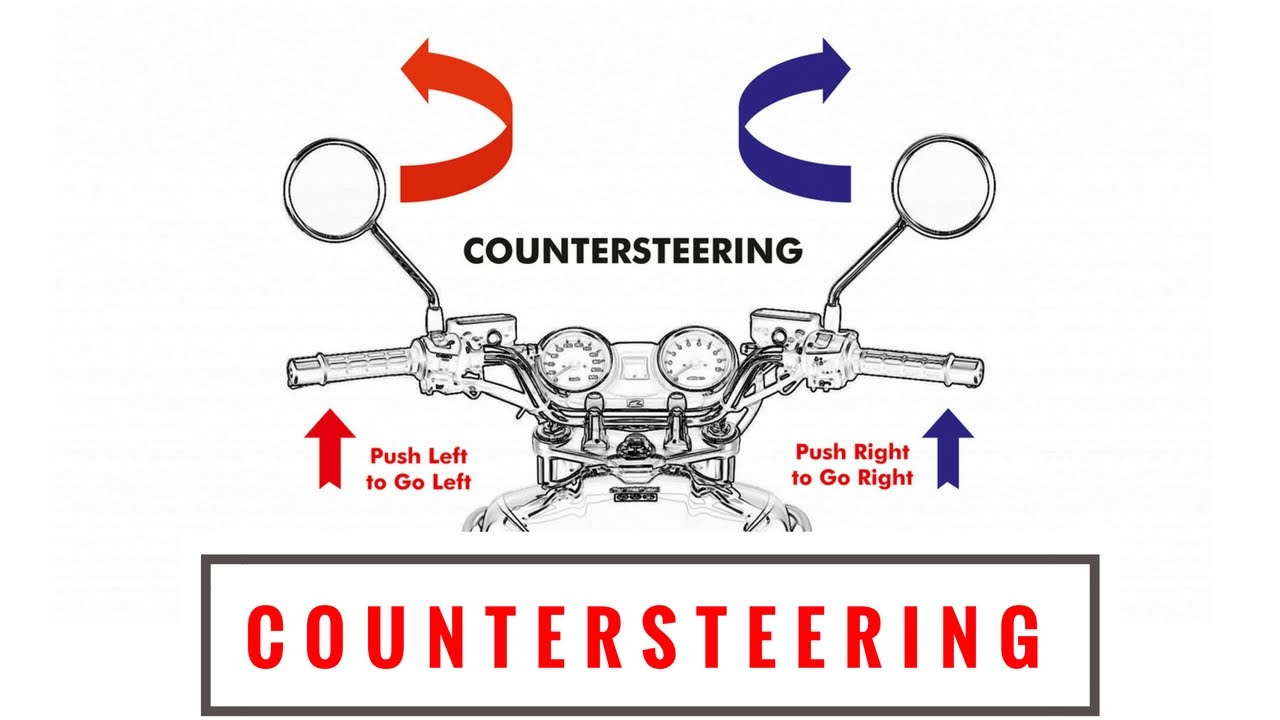
7. Countersteer
Remember to countersteer
When you reach your turn in point, countersteer (push left to turn left, push right to turn right) and let your body and motorcycle lean into the turn. Point your chin and elbow into the turn.
8. Steady with the throttle
Roll on your throttle control steadily without being greedy. Too much throttle too soon at extreme lean angles will overwhelm the rear tyre’s contact patch. Shutting the throttle or rolling on and off will destabilize the bike – just one smooth, continuous throttle opening.
9. Skrrrth…
Congrats! A successful kneedown – Courtesy of Suzuki
Soon enough you shall hear the sound of plastic scraping the road. Congrats! You’ve got a knee down.
10. What’s next?
Once you’ve gotten a knee down, you don’t have to keep holding it down. Instead, just stay relaxed and natural to sample the feel of the tyres, suspension and bike as a whole at that angle. If you determine there’s still more grip to go, add a little more speed on the next lap. If the tyres are already squirming, you should either go slower or use a little less lean angle the next time around.
There you go, it’s not too difficult. Just remember to apply the correct techniques and stay relaxed. Don’t fret if you couldn’t get it down the first time, instead concentrate on your braking point, entry speed, line and body positioning first rather than charging in kamikaze style. Get those factors right and the speed will come.
Body positioning on a motorcycle affects its handling.
It also affects the rider’s comfort.
Always remember to keep the arms and upper body relaxed.
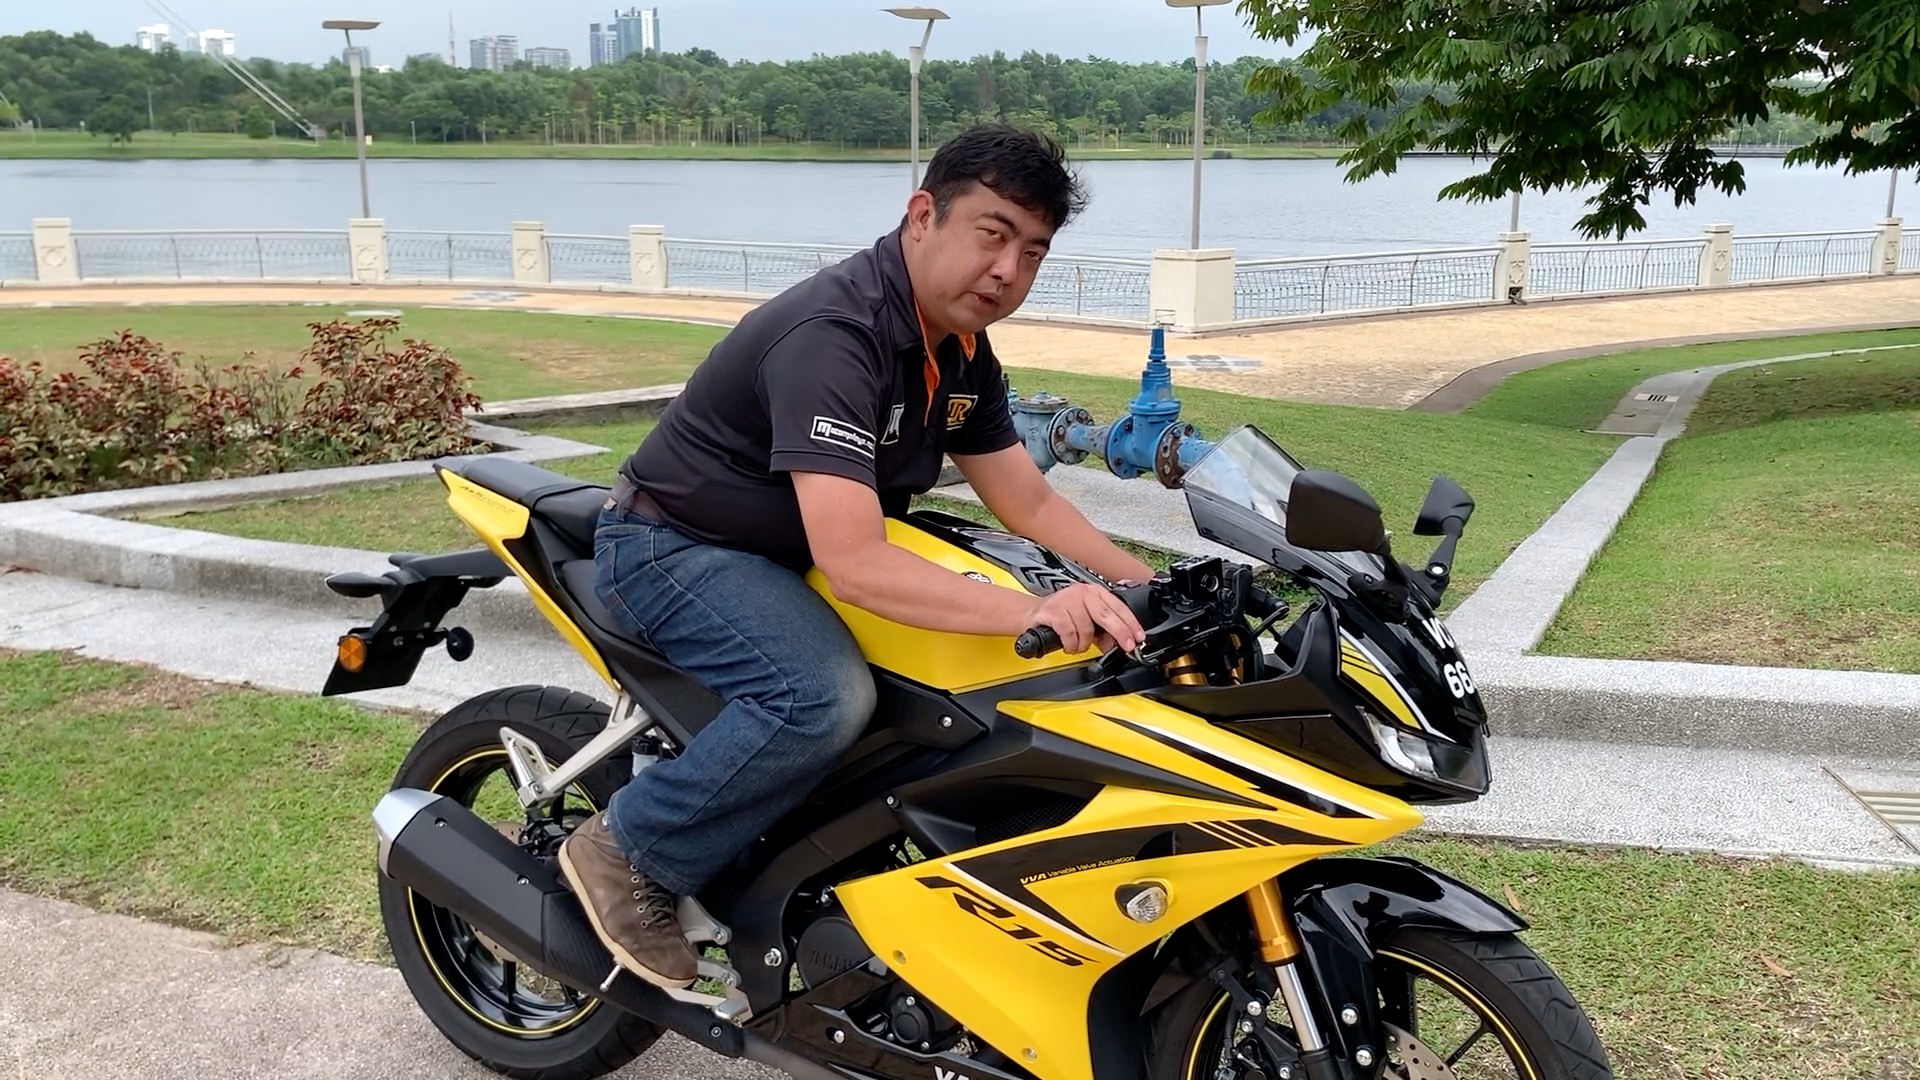
We loved the Yamaha YZF-R15 when we reviewed the lightweight sportbike, only to hear that there were complaints that “it’s not comfortable” due to its riding position.
We were truly surprised by the remark as the R15’s clip-on handlebars are actually quite high up, comparing to those on larger-capacity sportbikes such as the Yamaha YZF-R1, and even more extreme Ducati Panigale.
MotoGP is where manufacturers develop new technologies and ideas.
A few GP bikes were different, resulting from the development.
Why is MotoGP so important, anyhow? MotoGP and its 500cc GP forebear are the apex of prototype motorcycle racing, where manufacturers explored different ideas and technologies to trump their competition. In growing markets, MotoGP is a very important outlet for branding in order to sell more bikes on Monday.
And since MotoGP is the platform where new technologies are tested, some of those will trickle down to consumer bikes sooner or later. In fact, technologies such as ride-by-wire, traction control, fuel injection, suspension, tyres, chassis, bodywork and aerodynamics; right down to lubricants, fuel, coolant, brake fluid, were all derived from lessons learned in MotoGP at one point or another.
Here are ten GP motorcycles that went against the grain and we regarded as being “different,” so as to speak.
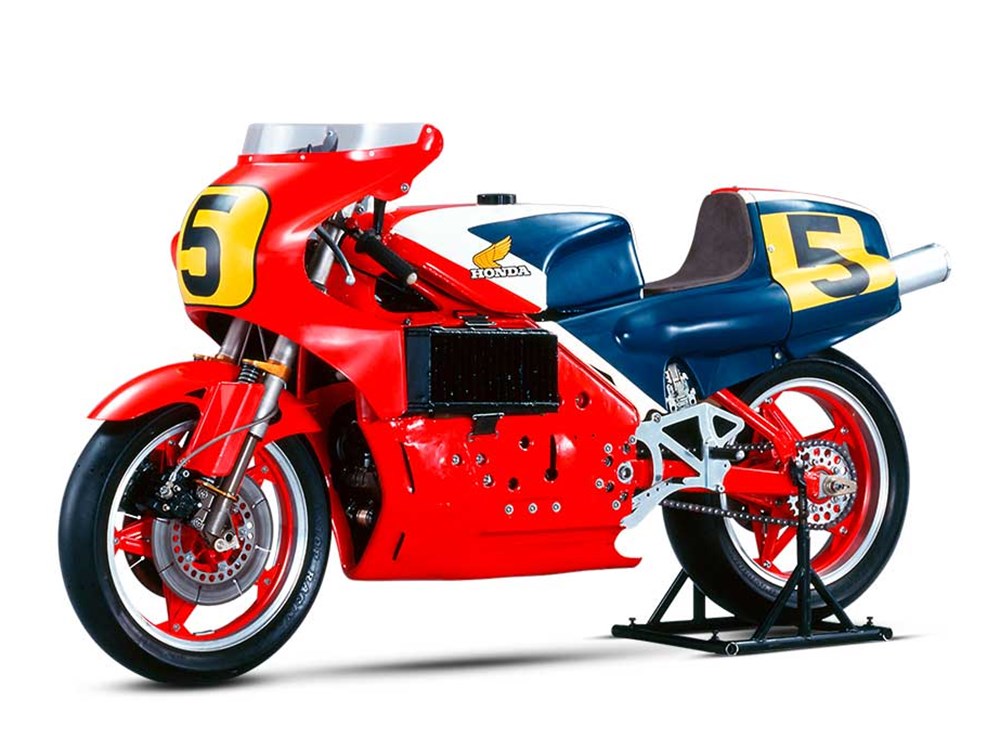
1. Honda NR500 (1979)
Honda has always been the purveyor of new ideas in GP racing. They had wanted their return to 500cc GP racing with a bang. As the regulations limited machines to a 500cc ceiling, regardless if two-stroke or four-stroke, other manufacturers had chosen the two-stroke route for higher specific power output. Honda, on the other hand, had always preferred four-strokes.
Courtesy of motorcyclenews.com
In order to compete toe-to-toe with the two-stroke beasts, Honda devised the NR500 four-stroke V4 with oval pistons, eight valves per cylinder and two conrods per piston; in order to mimic a V8. The engine revved to a manic 20,000 RPM. It didn’t end there as the frame was a monocoque where the lower fairing panels we actually structural mounts for side radiators.
The bike was over-complex and didn’t do well despite valiant efforts by Freddie Spencer. Honda resorted to the two-stroke format in 1984. The oval piston technology went on to power the NR road bike (click here for our article on the Honda NR).
2. Kawasaki KR500 (1980)
The Ducati Panigale’s frameless technology, called the monocoque, wasn’t the first bike to utilize the technology. The concept had begun years before in 1980 with Kawasaki KR500. The steering head and swingarm pivot structures were welded directly to the aluminium fuel tank which was effectively the bike’s main structure. The idea continued into 1981 before Kawasaki settled on a massive aluminium backbone and conventional fuel tank from 1982.
Courtesy of www.rallystar.net
So, you could probably say that the monocoque idea couldn’t work for GP and MotoGP bikes. A hard lesson learned by Ducati 20-odd years on.
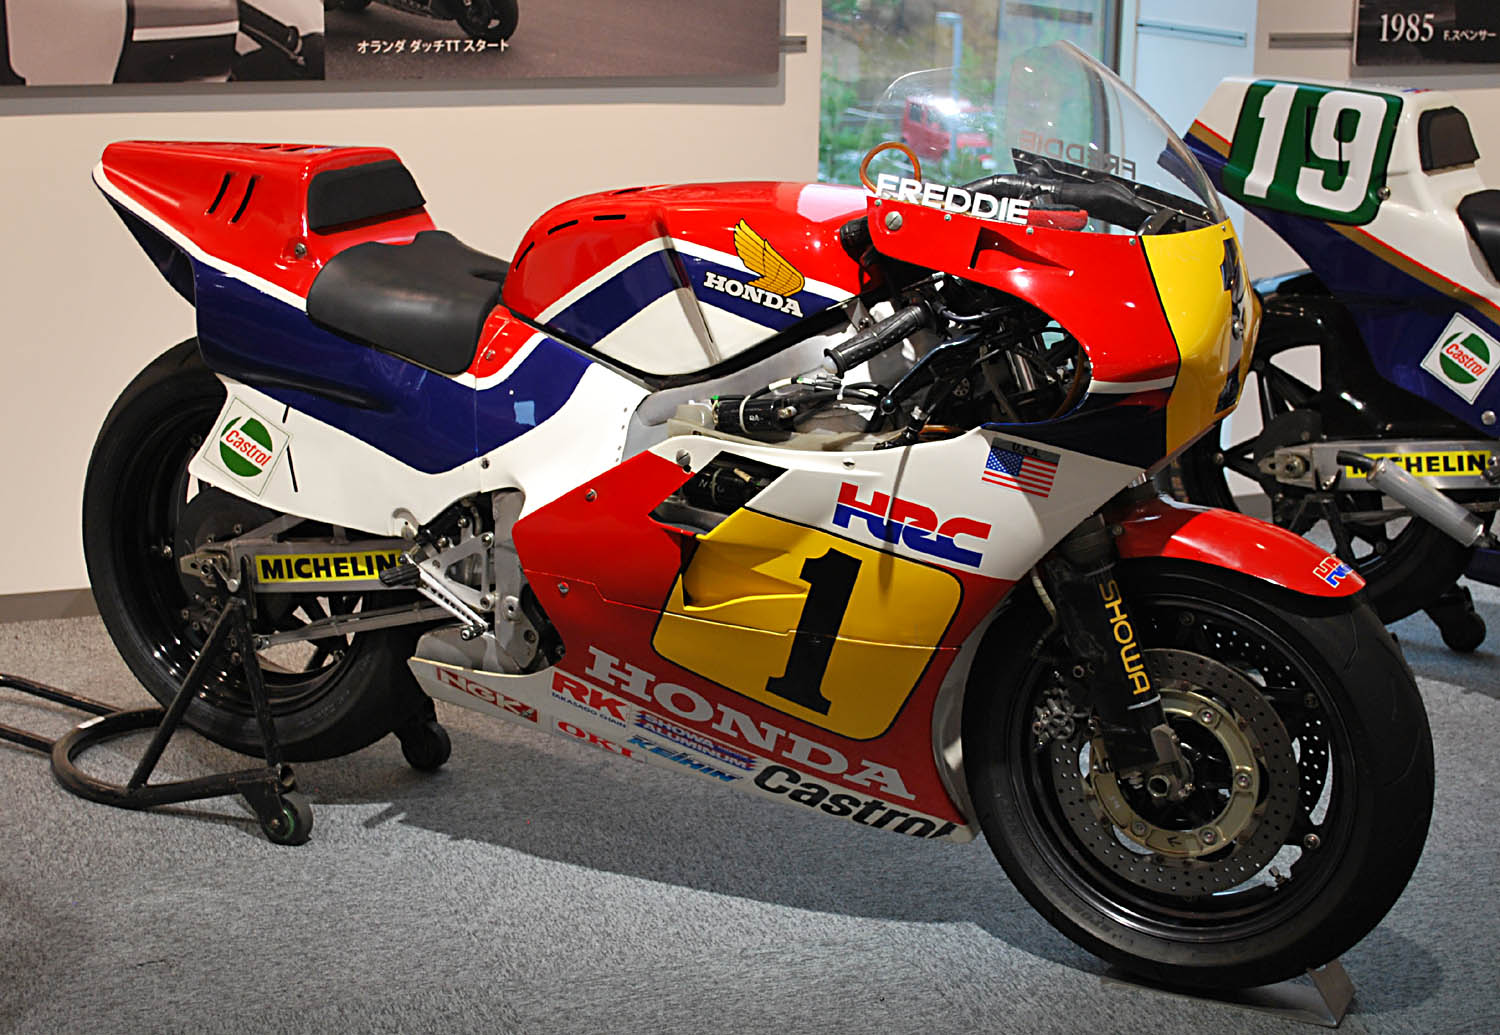
3. Honda NSR500 (1984)
The revered “NSR500” name may have won a great number of races and championships, but it didn’t have an easy start. The first NSR500 in 1984 had its fuel tank mounted under the engine and the exhausts were routed over the top.
Courtesy of wikipedia.org
Honda wanted the bike to have a lower centre of gravity and that the bike’s handling remained linear as the tank emptied. Factory rider, Freddie Spencer had to wrestle with the bike, although he did win the bike’s second race. He returned to the previous year’s 3-cylinder NS500 for the rest of the 1984 season.
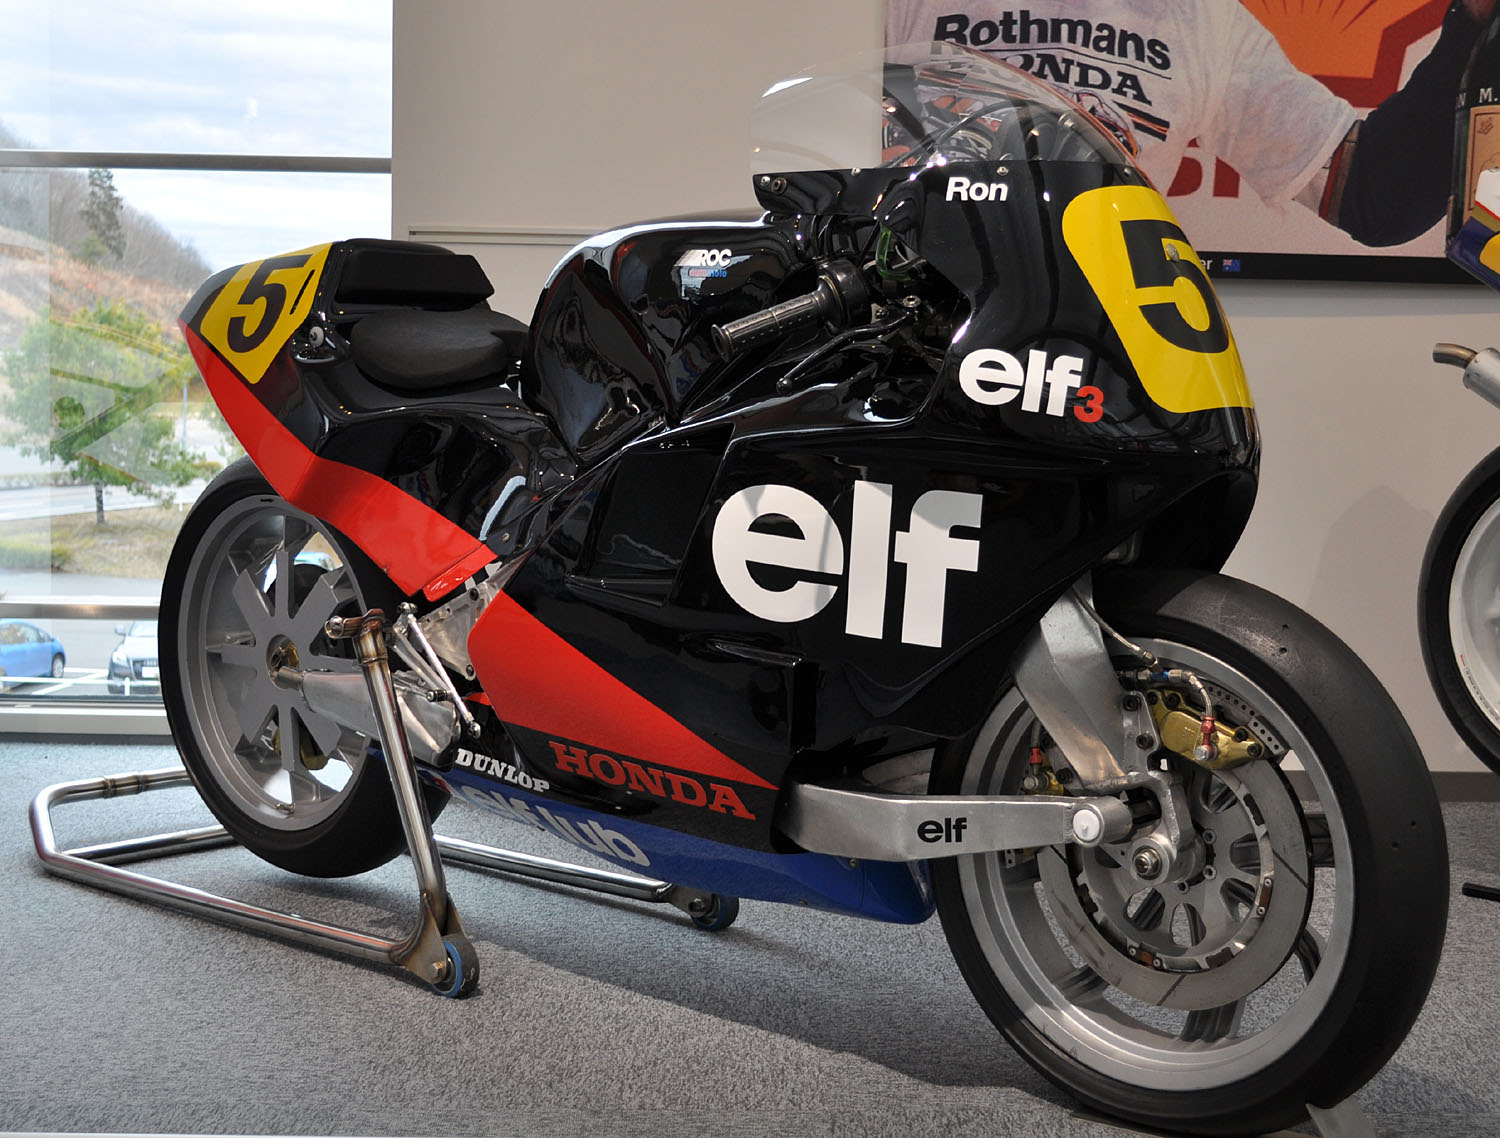
4. Elf-4 (1987)
Fans of 500cc GP in the 80’s would surely remember a black bike with the word “Elf” emblazoned on it, between 1984 to 1988. However, it wasn’t the logo that was most attractive, it was because the bikes had no conventional forks for the front end.
Courtesy of lastflag.com
Instead, each of the Elf-Hondas had a hub-centre steering swingarm at the front. The project was born to explore the technology in place of hydraulic forks. The most notable iteration was the 1987 Elf-4 which Ron Haslam rode to fourth place in the championship.
5. Aprilia RSW2 (1994)
The small Noale-based manufacturer, Aprilia, had much success in the 125cc and 250cc two-stroke GPs, it was inevitable that they stepped up to the 500cc GP class in 1994.
Aprilia saw that the qualifying times of 250cc bikes were often faster than those of the 500cc bikes, and the company figured that they could be competitive if they ran a 410cc V-Twin racer, called the RSW2. Being less than 500cc meant that the RSW2 would qualify for a minimum weight of 105kg, compared to 130kg for the 500cc bikes.
Courtesy of speezilla.com
It seemed like a great idea, but the RSW2 riders soon found themselves outgunned down the straights by the fierce 500s, before being blocked at corner entries.
Aprilia responded by increasing the capacity to 430cc, then 460cc and finally 498cc but they could never challenge the outright grunt of the four-cylinder 500cc bikes.
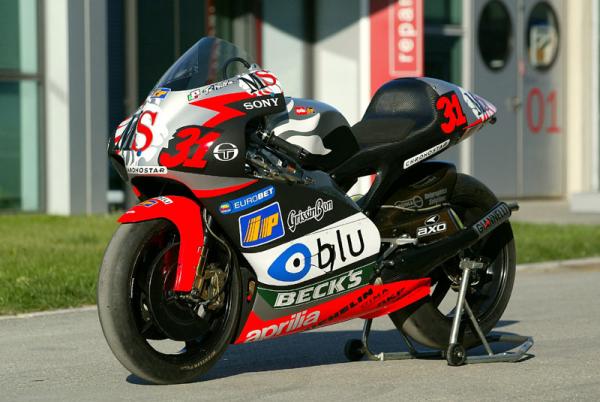
6. Aprilia RS Cube (2002)
Having dropped out of 500cc GP after 2000, Aprilia decided to try again in MotoGP with the advent of four-strokes in 2002.
Honda had gone the V5 route with their RC211V in 2002, while the other manufacturers stayed the course on inline-Fours. Aprilia, being the “rebel” jumped in with a 990cc, inline-Triple which was developed by Cosworth.
Courtesy of visordown.com
Cosworth is a tuning house that’s developed some very powerful and famous engines for the car racing fraternity, including Formula One. Hence, The Aprilia’s engine featured technologies derived from the top class of car racing. They included the then new developments for motorcycles such as ride-by-wire throttle, traction control and pneumatic valves.
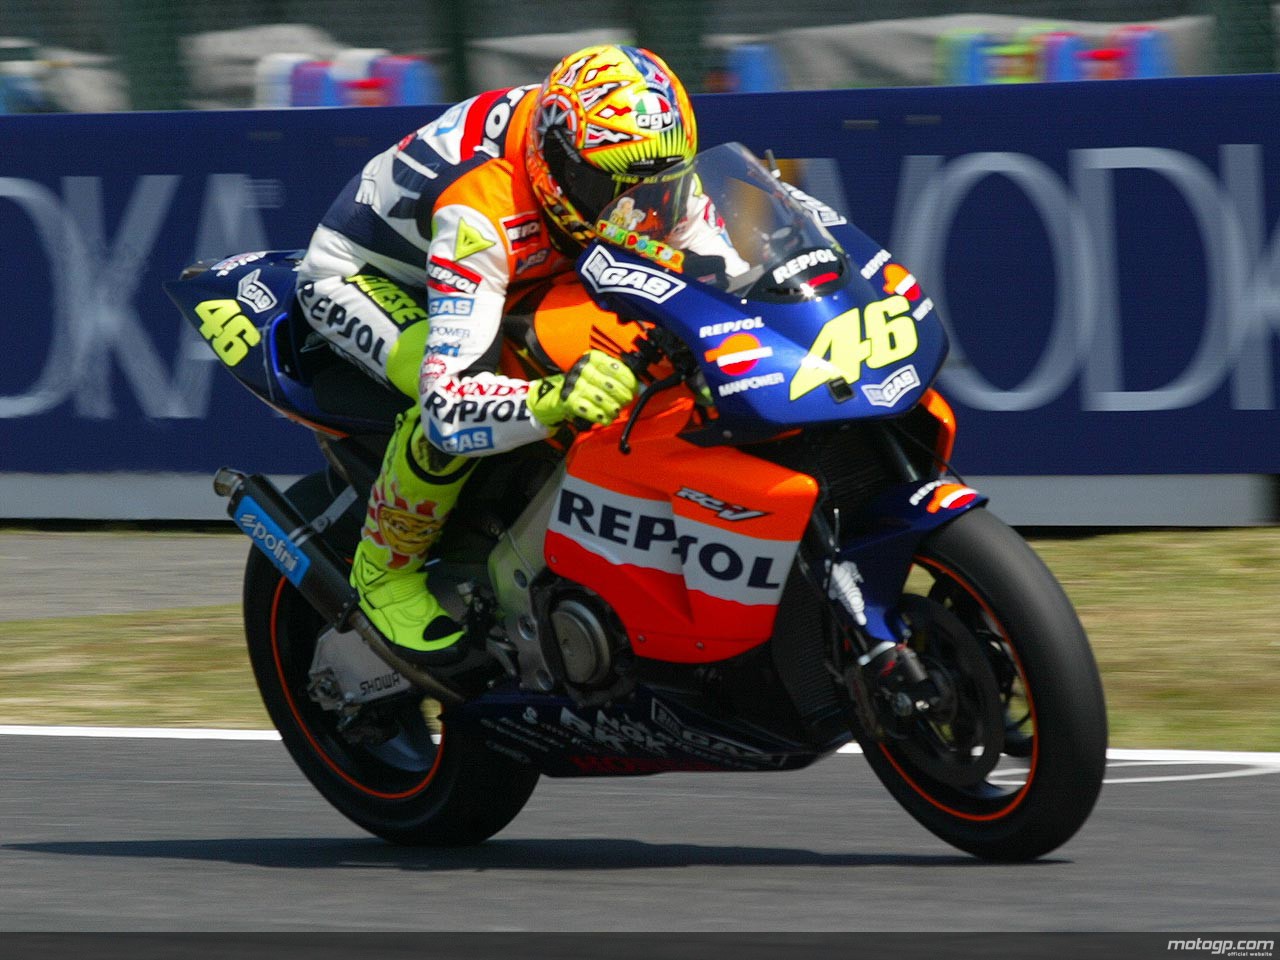
7. Honda RC211V (2002)
The RC211V four-stroke carried on what the NSR500 two-stroke had done earlier: Winning.
When Honda showed off the V5, no one outside the factory had any idea how or if it would work. Honda has never revealed the secrets of the V5 until this very day, including how they overcame crank balance problems.
Courtesy of yudibalang.com
Apart from the engine, it was the RC211V which started the “mass centralization” revolution that we see on virtually every sportbike nowadays. The first road bike to claim direct lineage to the RC211V was the Honda CBR1000RR, popularly known as the “Rabbit” in Malaysia. Compare the CBR’s frame and how mass is centralized to the RC211V, and you’ll see the picture.
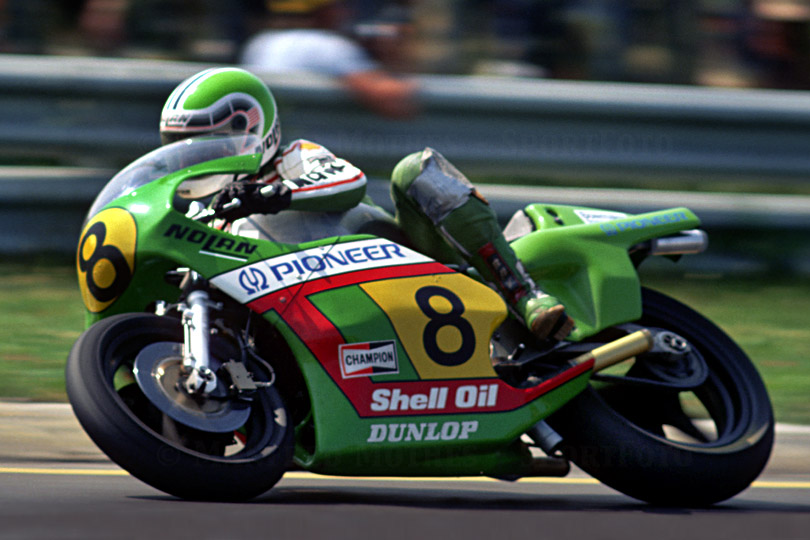
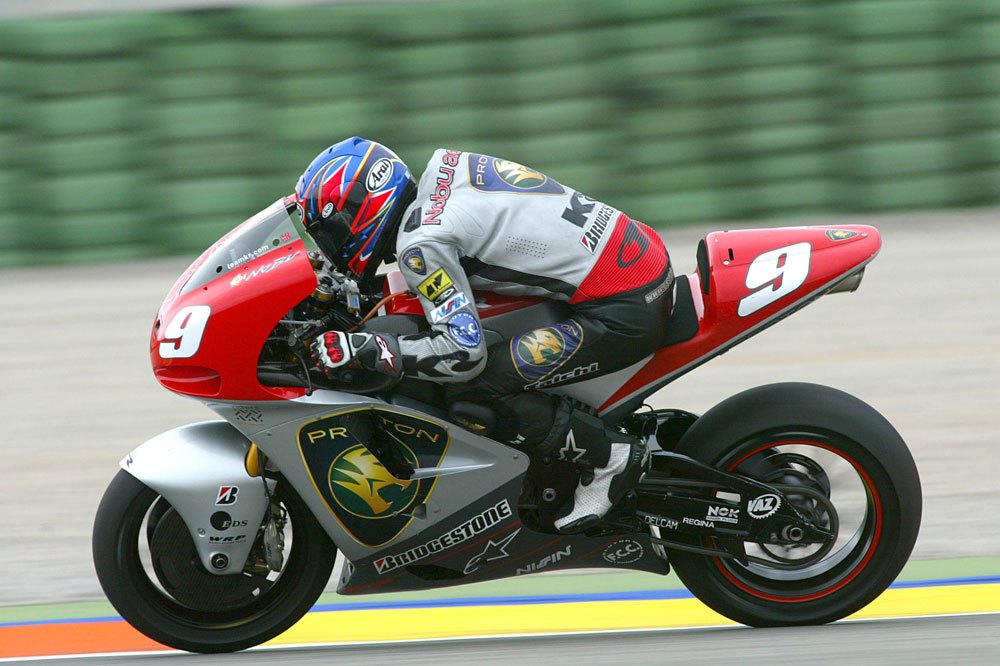
8. Proton KR5 (2003)
Kenny Roberts’ team held on to the KR3 500cc two-stroke triple for 2002 and scored some astonishing top 10 finishes against the new more powerful 990cc four-strokes. But the dominance of Honda RC211V prompted Roberts to develop his own four-stroke V5 engine for his 2003 bikes called the KR5.
Courtesy of motogp.com
The venture turned out to be a vertical curve and the KR5 didn’t even match the KR3’s results. Roberts turned to a KTM V4 engine to no avail, until they were supplied the real Honda V5 engines in 2006. The KR5 went on to score two podiums, but that was the last year of the 990cc machines, as MotoGP resorted to 800cc machines in 2007.
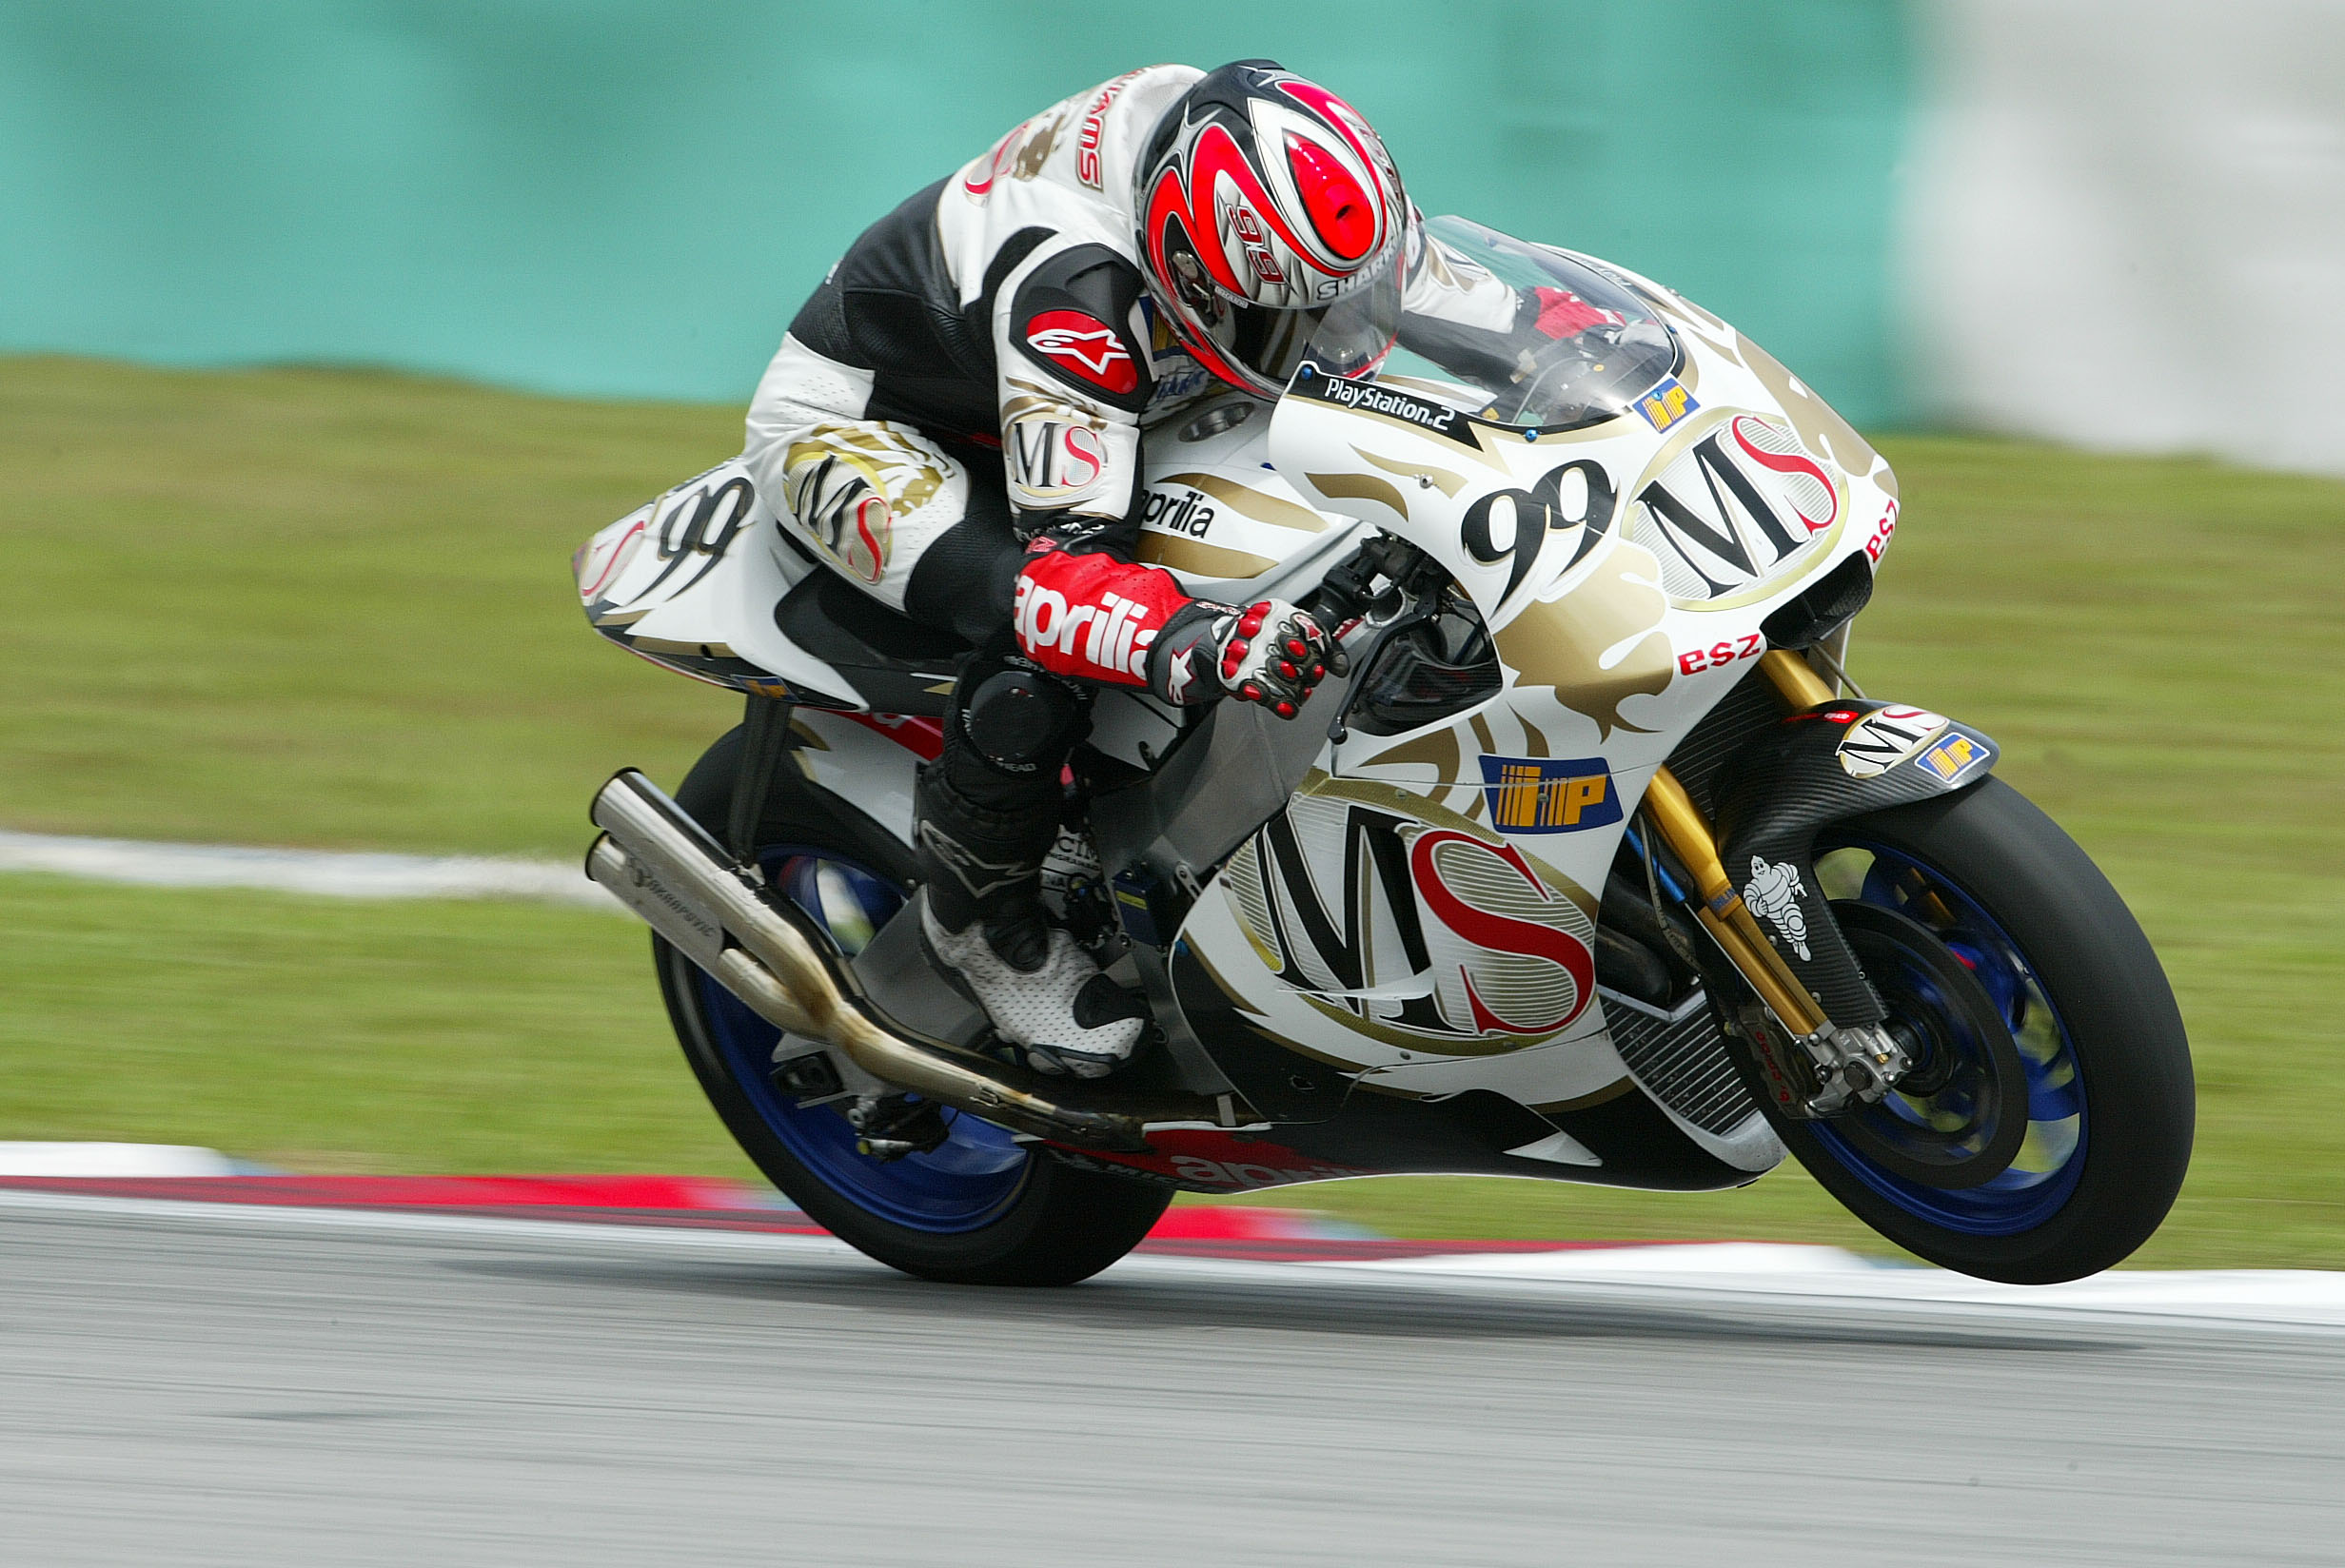
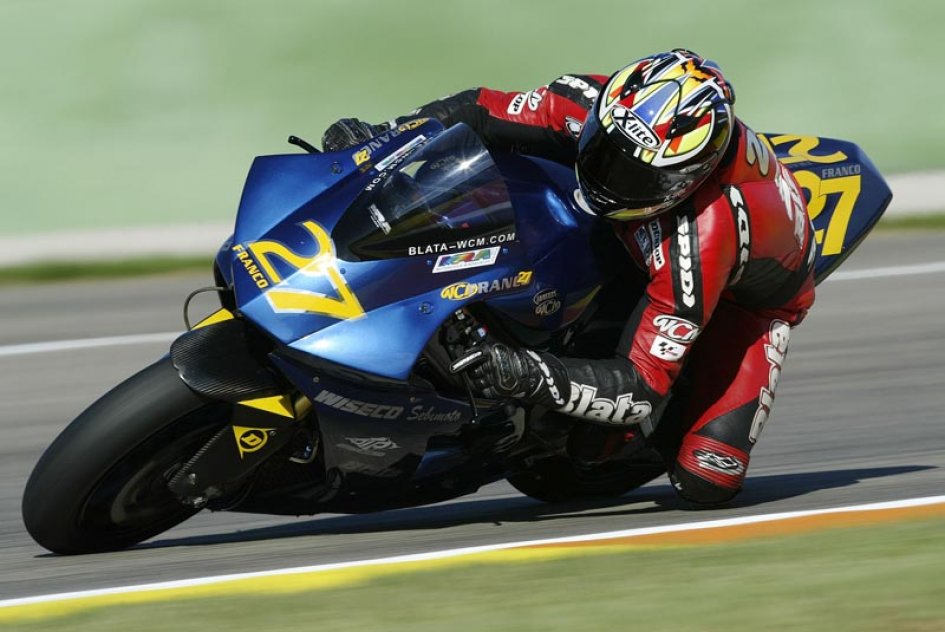
9. Blata V6 (2005)
When four-stroke GP bikes were made their debut in 2002, the regulations were a little more “lenient” compared to how they are now.
Courtesy of motogp.com
In view of this, the Czech manufacturer, Blata, better known as a mini-moto maker, worked on a V6 MotoGP engine for the WCM team. Unfortunately, the project was beset with difficulties and numerous delays. The project was deep-sixed eventually, forcing WCM to compete on old Yamaha-derived 1000cc inline-Four engines.
2005 was also WCM’s last season in the championship.
10. Ducati Desmosedici GP17 (2017)
Casey Stoner may have won the 2007 MotoGP championship on the GP7, but it was the GP17 which truly turned the Italian manufacturer’s fortune around after a decade-long drought.
Courtesy of foxsports.it
Ducati had developed “winglets” for the 2016 Desmosedici GP16 to combat front wheel lift (the wheelie) when exiting corners. A “wheelieing” bike loses forward momentum causing the bike’s traction control to cut power, especially at corner exits. But the idea hit a brick wall when other manufacturers protested.
So, Ducati went back to the drawing board and created the “aero body” for the GP17. Andrea Dovizioso guided the GP17 to six race wins and was the title contender right down to the last race of the season.
Here, we sum them up as 10 Steps to be a Better Rider.
Keep these tips in mind everytime you ride.
We’ve published a number of riding tips previously, from avoiding target fixation to braking to body positioning and so forth. To sum them all up, plus adding a few more, here are 10 steps to be a better rider.
Again, as we’ve mentioned many times before, you have to “check” your riding at all times not only to be able to go faster, but more importantly, to be safe. Being safe means you can continue to ride forever.
1. Be attentive
Don’t daydream. Always evaluate your surroundings, speed and space. Be proactive in spotting potential danger – if you find yourself in close call situations all the time, it could pretty well mean that you’re not on top of things.
2. Look further up the road
Not looking far enough could also be attributed to losing concentration. The human vision will default to a view of just a few centimetres in front when a person doesn’t focus on anything in particular. When that happens, reaction time is increased. Additionally, peripheral vision is reduced, and you can’t spot that car swerving into your lane quickly enough. So, keep your eyes up and look ahead as far as possible while continuously scanning to keep your vision and mind active.
3. Maintain a wide vision
As we mentioned above, keep your vision wide by scanning the road back and forth – imagine a forward-looking radar. A wide vision helps to slow things down at any given speed. Sure, zeroing down your vision is fun at speed, but you’ll feel overwhelmed when something unexpected occurs. Keeping your vision wide also avoids from getting surprised from the sides. Finally, a wide vision helps to avoid target fixation as it allows you to spot a route of escape.
4. Body positioning
Seat yourself back a bit by leaving 2.5 cm (1 inch) between the tank and your crotch. You will feel that the steering is lighter, and your upper body will have a more natural bend. Being natural results in better comfort too. Remember to clamp the sides of the fuel tank with your knees and inner thighs to free up the torso. And keep ride with the balls of your feet on the footpegs.
5. Relax!
There are still too many riding with straight arms. Keep them loose. Loosening up the arms loosens up your grip on the handlebar, besides your torso, shoulders, neck and back. The benefits are increased comfort, the bike handles better, and more control. The bike handles better because you allow it to do what it’s supposed to. Riding tense means you’re fighting the bike.
6. Be smooth
Image credit: MotoGP
Notice how smooth professional riders transition from accelerating to braking to turning and back to accelerating? Being smooth avoids feeding extra forces into the bike which causes instability. Being smooth also means that you’re not cramming too many inputs at one go for example, grabbing the brake while downshifting and turning. Here’s a little secret: A smooth rider isn’t afraid of worn tyres or slick road conditions.
7. Ride in the rain
Photo credit cycleworld.com
Speaking of slick road conditions, riding in the rain teaches you the necessity of being relaxed and smooth with your controls. Besides that, you’ll also discover how much your bike and tyres are capable of. All our Editors love riding in the rain!
8. Practice your braking
We’ve written about this before: Don’t treat your brakes as an on/off switch. Instead, find an empty road or parking lot and practice your braking technique. Find how much pressure you need to slow the bike down to a desired speed. Discover how much distance you need to bring the bike to a complete stop from certain speeds. Find how much pressure it takes to trigger the ABS and how it feels when the system activates. Learn to steer the bike when ABS triggers. Know how the bike feels like when a tyre skids. Don’t forget to practice trail braking, too. Last but not least, clamp your knees on the tank when you brake and leave your arms loose.
9. Ride a dirt bike
We can’t stress this enough. Riding a dirt bike teaches you the real basics of throttle control, braking, body positioning, rider inputs, traction and everything else you can shake a stick at it. We understand that many are concerned about safety when riding in the dirt, but guess what, you don’t have to jump like Gabit Saleh in order to ride in the dirt. Just go to Most Fun Gym or Moto Maniac and ask to practice on a flat piece of ground. (That’s what we do.) You’ll be surprised how much better you can after that!
10. Enrol in an advanced riding school
This goes without saying. We think probably less than 1% have done so and that’s what contributes to the exceptionally high number of motorcycle accidents in Malaysia (among other causes). There are so many to choose from that could fit your budget and type of bike you ride.
BONUS
Attend a trackday. You don’t have pressure yourself into riding at Azlan Shah’s pace. Who said you have to, by the way? Go to the track and have fun riding around in a controlled environment while you practice your skills. You can even make new friends who are faster and lead you around the track.
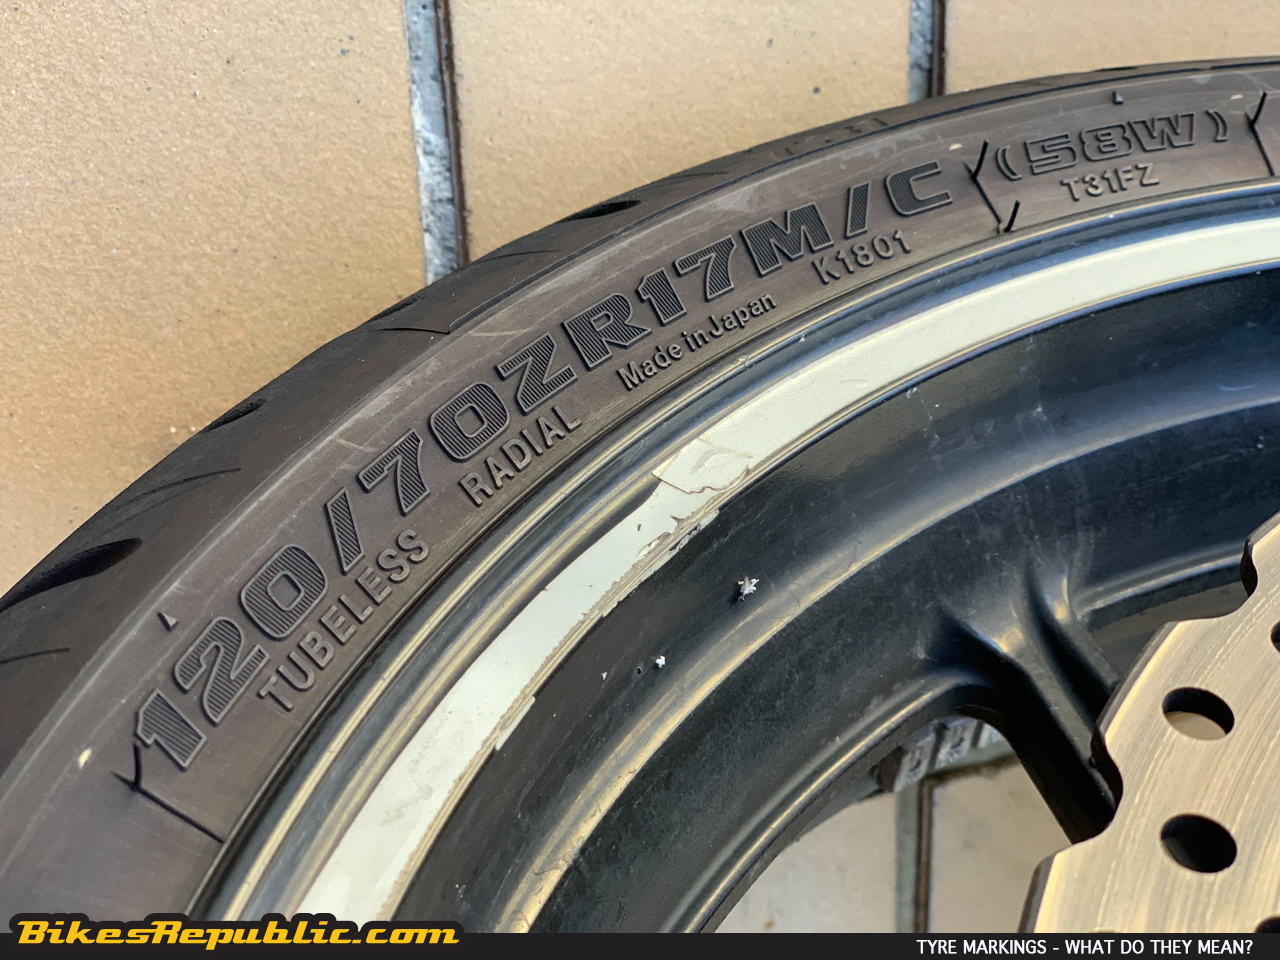
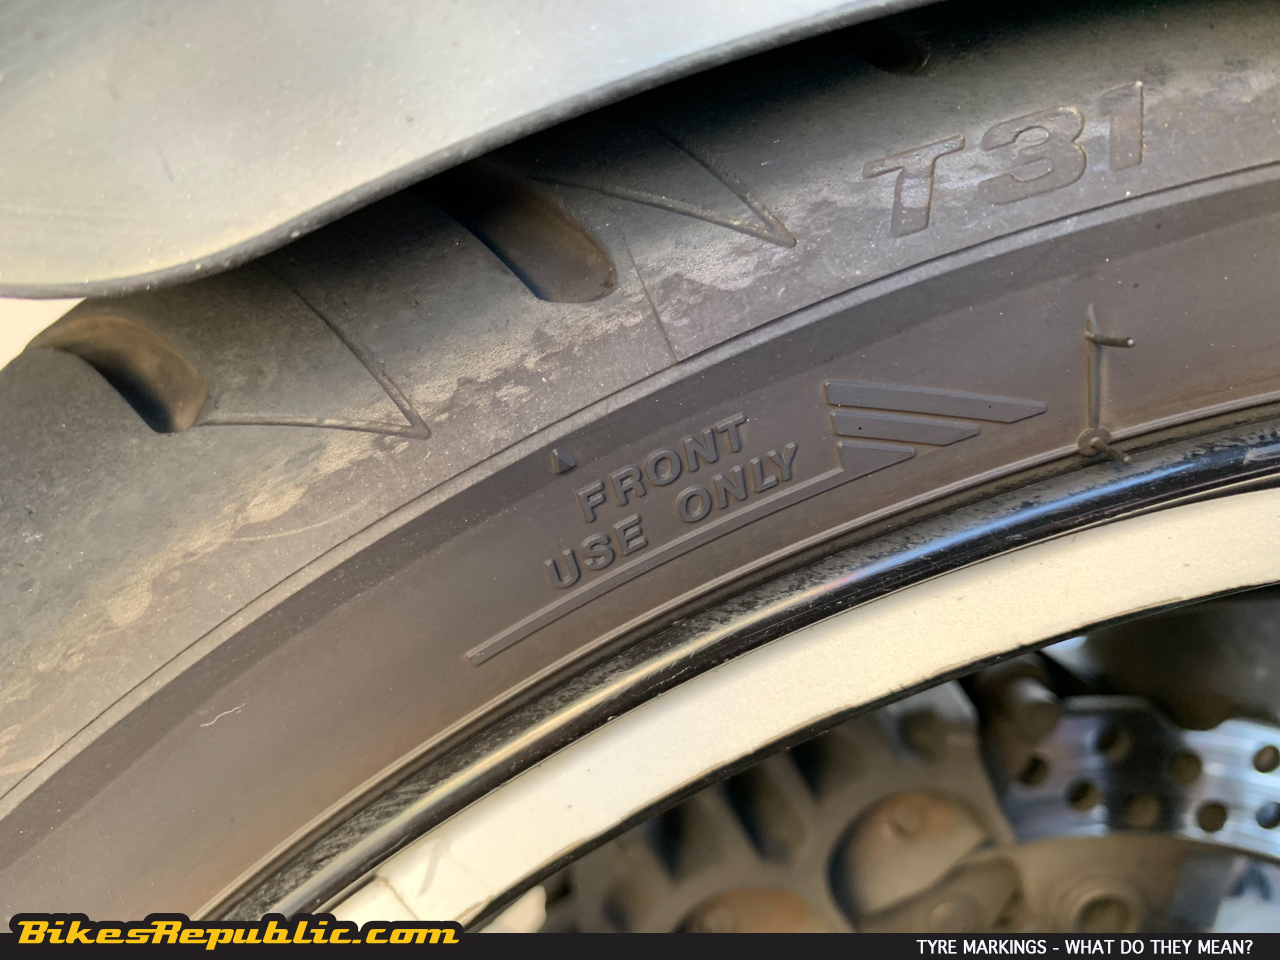
Okay, let’s begin. Let’s take the following numbers from a Bridgestone T31 front tyre as a reference.
120/70ZR17M/C(58W)
120
It denotes the nominal width of the tyre measured at the widest point of the tyre, in milimetres (mm). You may have noticed that one brand of tyres may be wider than another. That’s because manufacturers may vary the width to tune for different handling characteristics, by +/- 4%.
70
Indicates the tyre’s aspect ratio or in other words, section height. It is expressed in percentage, not a direct measurement. So, 70% of 120mm is 84mm. Again, different manufacturers vary aspect ratio by +/- 4%.
ZR
The two letters represent two different meanings, although joined together.
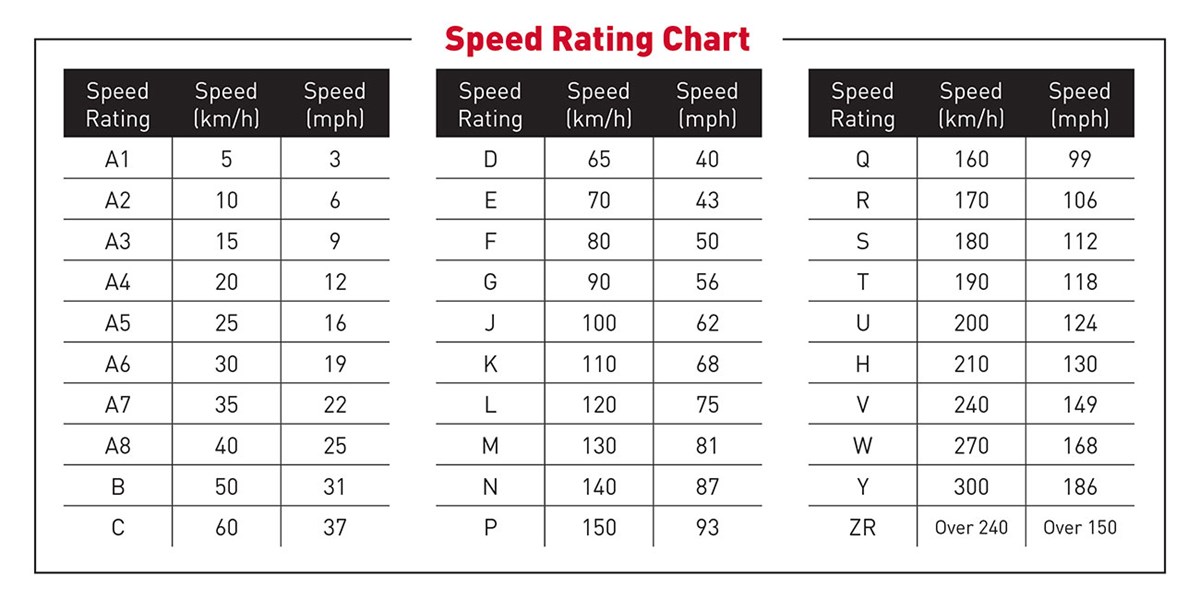
“Z” is the tyre’s speed rating which in this case is 240+ km/h. Interestingly, the “Z” symbol on Pirelli tyres stands for “Zero” as in zero tolerance for mistakes.
“R” means radial construction. NOT racing. The letter is omitted if the tyre is a bias-ply type (usually on dirtbikes, dual-sport, older cruisers, and kapchais).
17
The wheel (rim) size in inches.
M/C
The tyre is for motorcycles. You hear this Lani? Please don’t let us hear “medium compound” again or we’ll slash your tyres.
(58W)
There are two parts to this as well.
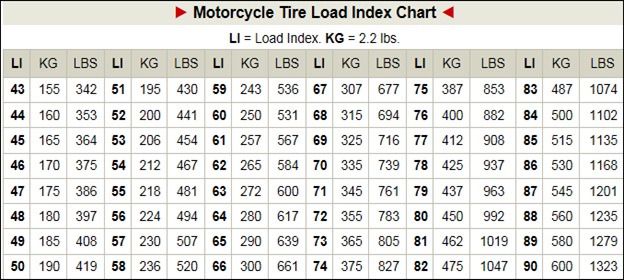
“58” stands for the tyre’s load index. It’s the code that says the maximum load of this tyre is 236kg at maximum inflation pressure.
“W” is the tyre’s speed index, 270 km/h in this case. This is where it gets confusing. Didn’t the “Z” already indicate that the tyre can exceed 240 km/h? Ah hah. There’s a reason why the load index and speed index are married to each other.
It works like this: The maximum speed at which you should ride while carrying 236kg at maximum pressure is 270 km/h.
However, the brackets around “58W” means the tyre can go faster than 270 km/h (provided you’re not carrying 236kg, of course).
There are other markings on the tyre’s sidewalls, also. Let’s take a look at them.
TUBELESS
Tubeless. Certain tyres may carry the “TL” designation. Conversely, tube tyres may carry the “TT” symbol. No, “TT” DOES NOT mean the Isle of Man TT.
GT
You may come across a tyre with the GT marking after the above markings i.e. 120/70 ZR17 M/C (58W) TL GT. “GT” means the tyre is designed for heavier motorcycles such as the BMW R 1200 RT, Kawasaki 1400GTR, Yamaha FJR1300, among others. It’s not recommended to mount it on your middleweight bike just because “the GT version lasts longer.” Yes, it does last longer on your Versys 650 because the tyre’s compound and construction are meant for heavier bikes.
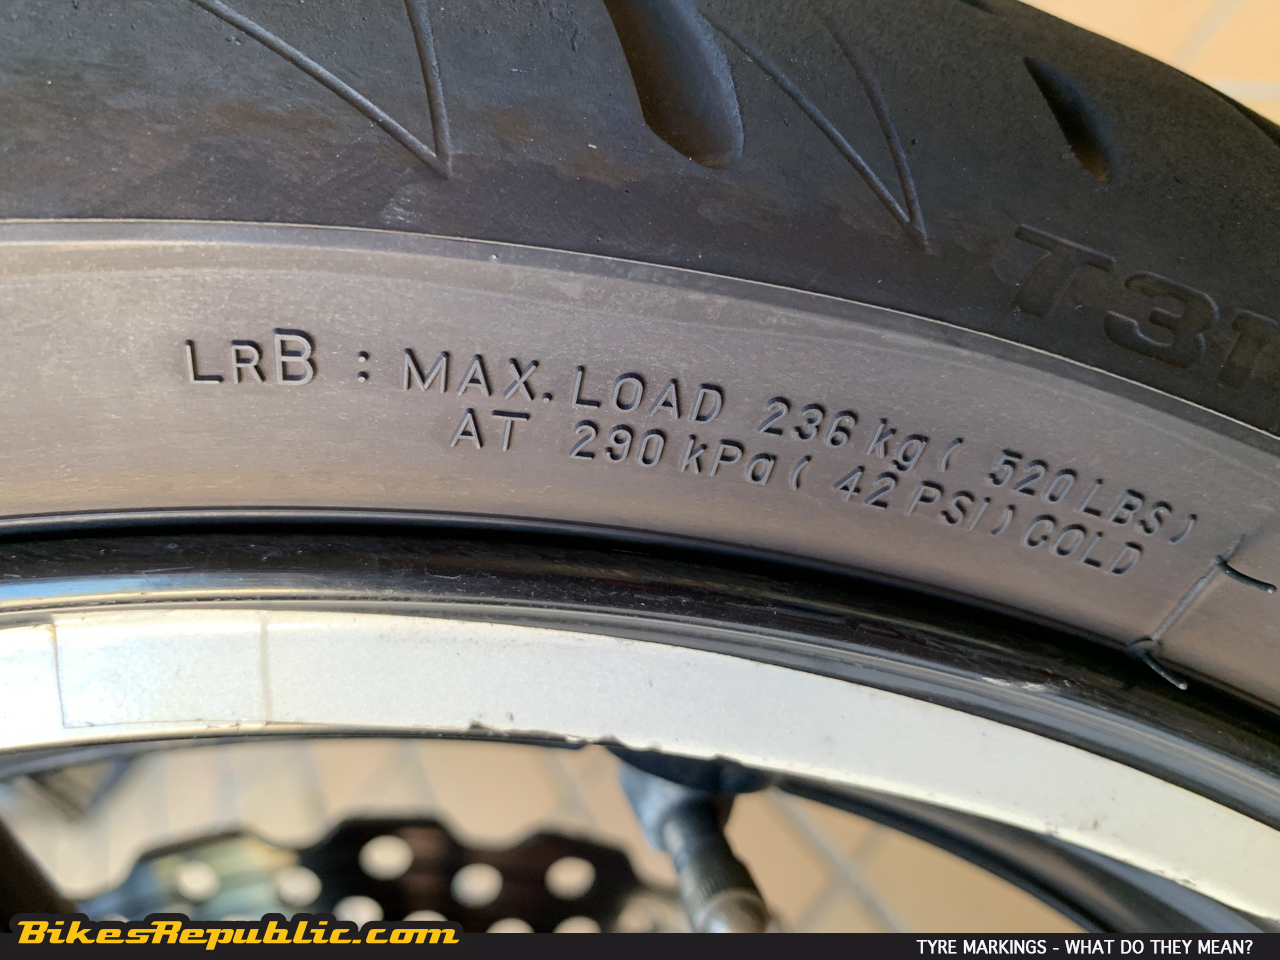
MAX LOAD
Refer to (55W) marking above. Virtually all tyres carry this marking. See what this one says? Just like what the load and speed indexes indicated. Also note the maximum pressure, which is 290 kPa or 42 psi in this case. DO NOT ever exceed this.
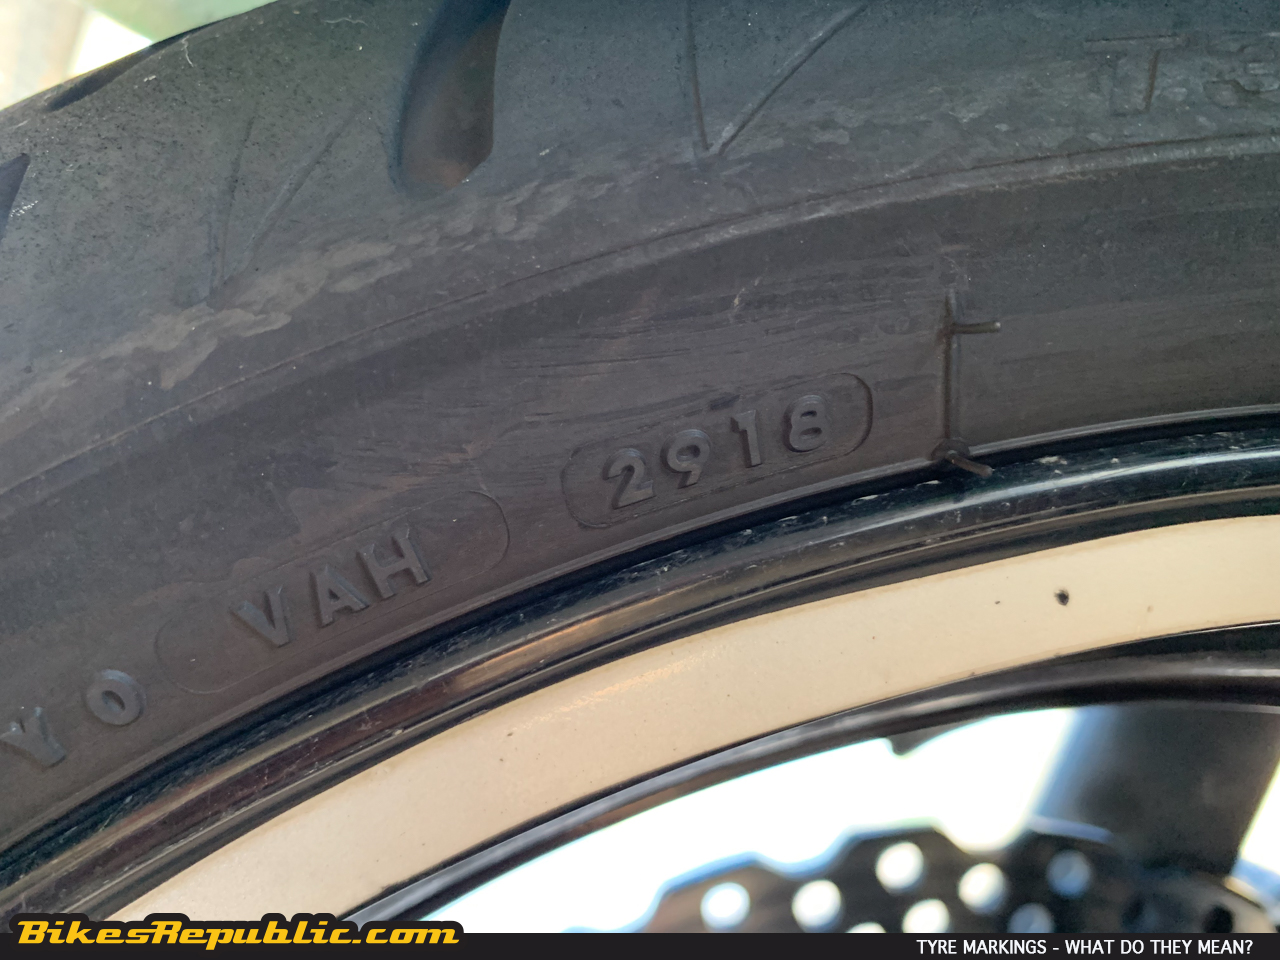
Four-digit numbers in an oval or rectangle
Together, they denote the manufacturing date of the tyre. The first two digits tells the week, while the last two are the year. For example, “2918” means the tyre was produced in the 29th working week of 2018. While there are 52 weeks in a year, there may not be production during every week.
Rotation or Direction
Every tyre has an arrow to mark the direction of rotation for the tyre, hence it should be mounted as such. DO NOT mount it against the intended direction – even if it “feels better when mounted backwards.” (You may laugh, but we’ve actually had riders telling us so.)
CONCLUSION
So, there you are. There are still more markings and symbols but these are the most important ones.
Here we describe how the principles of the cooling system and how coolant works.
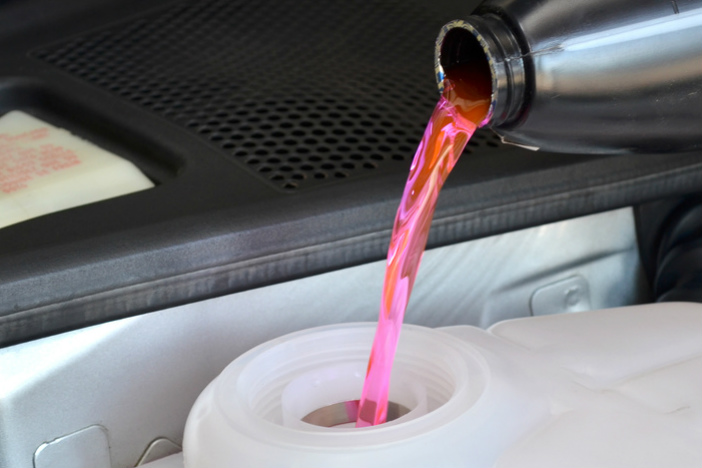
Engine coolant or antifreeze is a necessity in most bike these days but it’s another thing many take for granted. Do some research and it will turn out that there’s so much to that coloured liquid sitting in a translucent plastic tank.
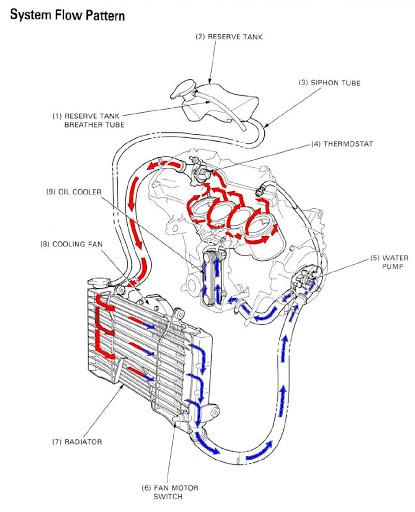
How does the cooling system work?
It’s about heat transfer.
Credit Dan’s Motorcycle Repair Coourse
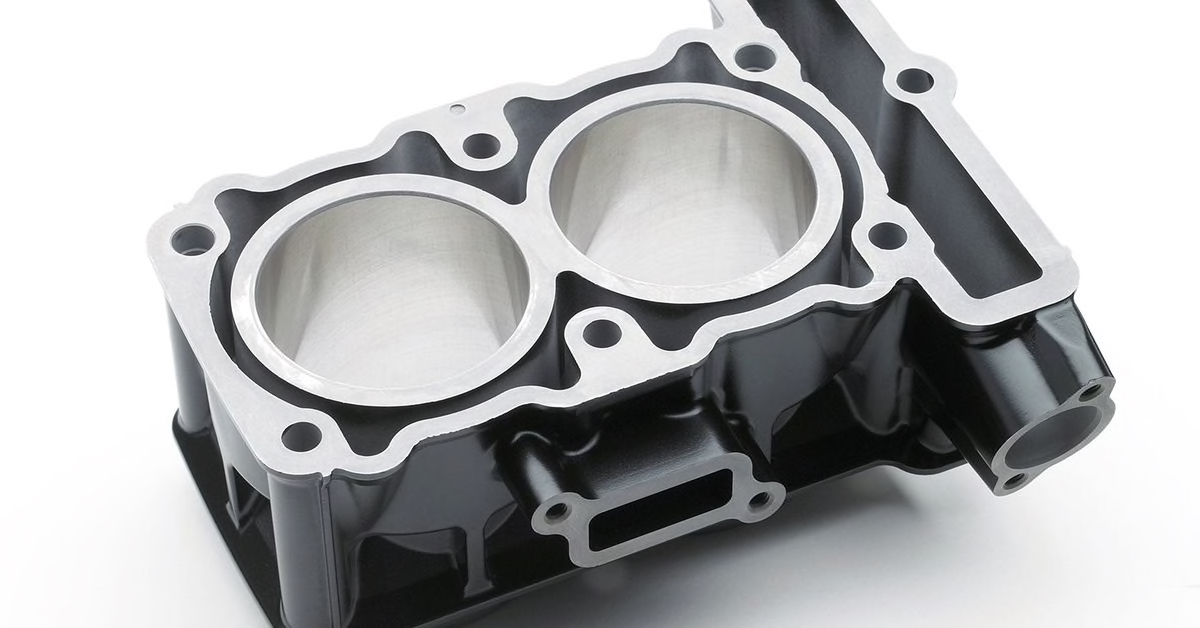
The coolant/water pump pushes coolant through passages called “water jacket” surrounding the engine block. Some of the heat from combustion is transferred to the coolant.
The KTM 790 cylinder block. The space around the bores is the coolant jacket. The large rectangular hole on the right is cam chain cavity
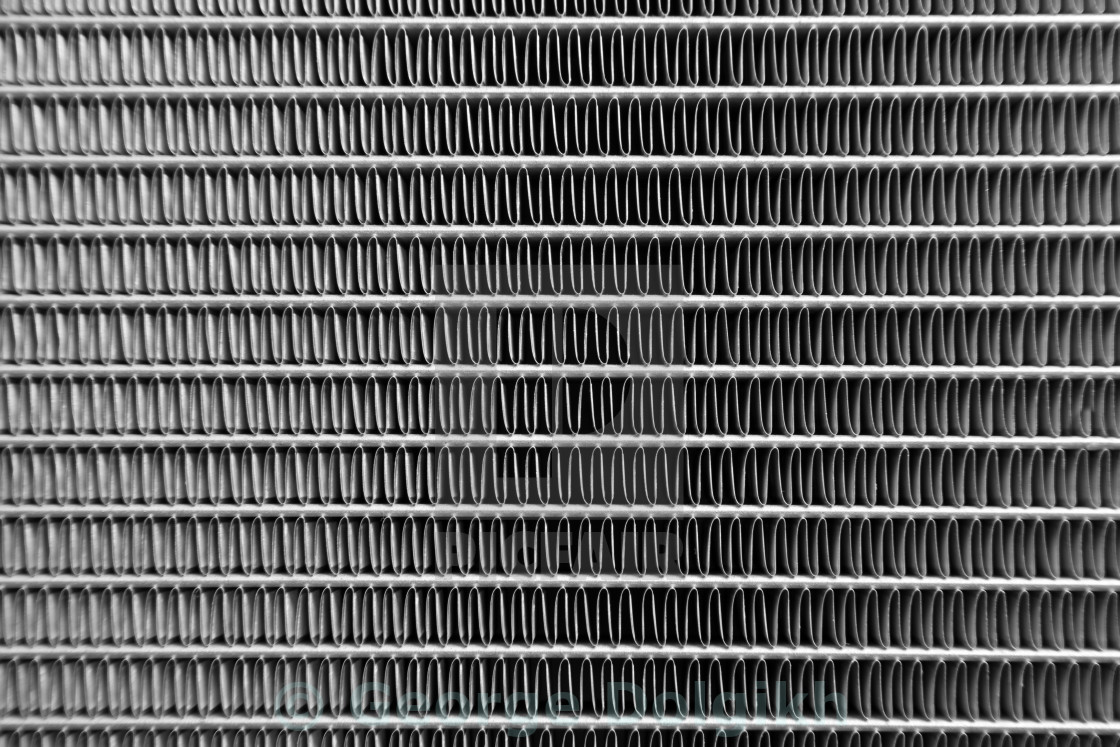
The coolant continues its journey to the radiator. The radiator consists smaller tubes that are surrounding by little fins. These fins provide bigger surface areas thereby absorbing even more of the heat (just like fins on the engine block).
Incoming air cools the coolant as it travels back to the engine block. A fan takes over to pull heat away from the radiator when the bike idles for an extended period.
This is why the radiator is also known as a heat exchanger or just “cooler” unit.
What is coolant and antifreeze
First and foremost, let’s talk about the good ol’ Edge-Two-Oh (H2O). Water freezes at 0-degree Celsius and boils at 100-degree Celsius.
This is why we need to add something else to the water to change its freezing and boiling points. As such, coolant and antifreeze are essentially the same as far as product terminologies go.
Ready to use coolants usually feature a mixture of 50% water and 50% glycol. It brings freezing point down to -37-degrees Celsius and boiling point up to between 240- to 270-degrees Celsius.
However, to be more precise, coolant is the medium i.e. antifreeze or water or oil circulating through the cooling system; while antifreeze is the concentrate before being diluted. Most coolants are sold as premixed these days, so again, they are the same. However, do check the descriptions and instructions on the bottle on whether the product is ready to use or needs to be diluted.
What are the types of glycols in antifreeze?
There are generally two types of glycol used:
Ethylene glycol
It used to be a common ingredient but its toxicity can cause birth defects, reproductive damage or even death if ingested. It’s appealing to young children and animals due to its sweet odour and flavor. Consequently, it requires specific handling.
Propylene glycol
It’s significantly less toxic than ethylene glycol. The words here are “less toxic” at low levels.
What are the types of antifreeze?
There are three types:
Inorganic Additive Technology (IAT)
This is the common green antifreeze with corrosion inhibitor package. It typically includes silicate, borate, phosphate, nitrate, nitrite and molybdate. It has a lower lifespan, typically 2 years.
Organic antifreeze (OAT)
Typically based on a variety of carboxylic acids and derivatives. Carboxylic acids is the general terms for acids found in plants. Coolants with OAT generally last longer (up to 5 years).
Hybrid Organic Acid Technology (HOAT)
It combines both inorganic and organic substances, hence provides the best of both worlds. It’s also compatible with both IAT and OAT coolants, therefore users can just top up their coolant levels, regardless of the type present in the system.
Why can’t I just use water?
Again, it’s because water freezes and boils too early. Corrosion will clog a cooling system and/or cause leaks.
Apart from that, good coolant also:
Prevents rust and corrosion of metal parts.
Prevents corrosion of rubber hoses and plastic parts.
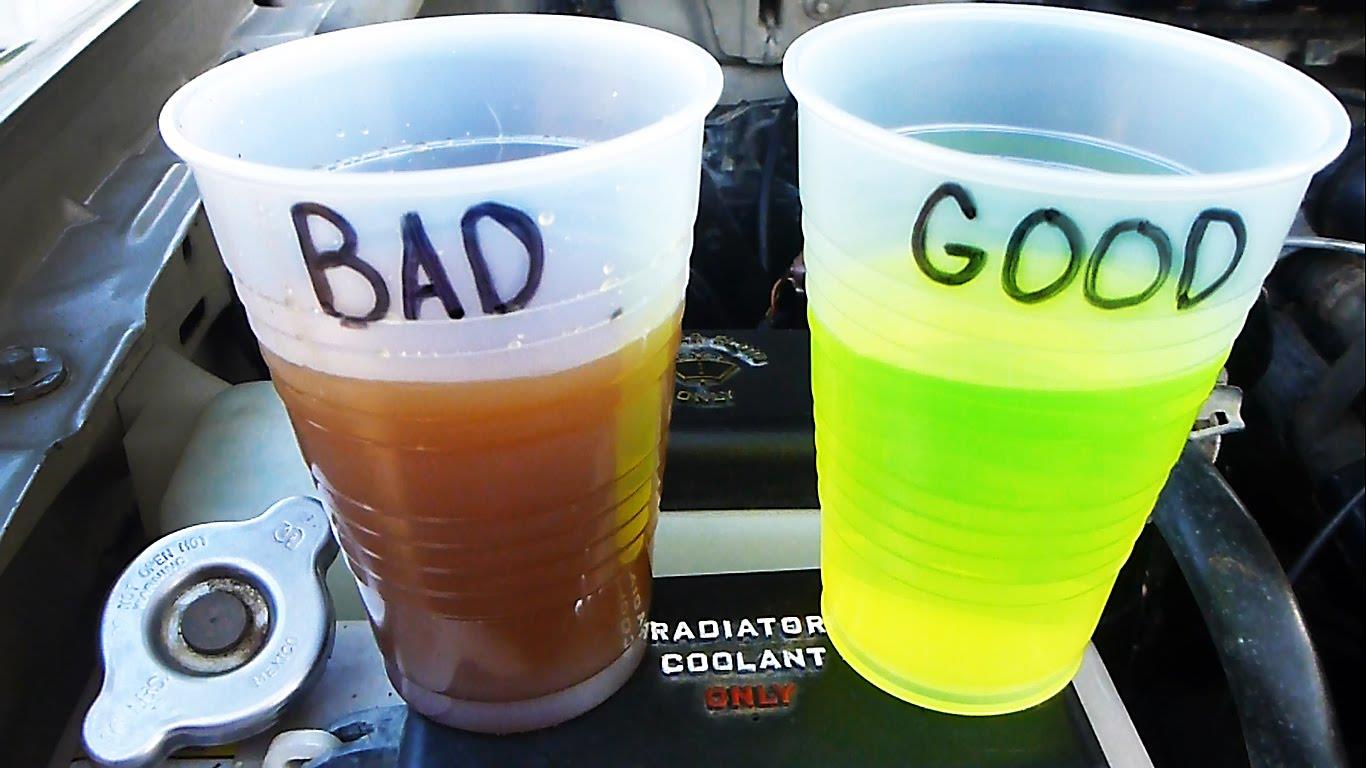
What about the colour?
Coolants used to be available in green only (I personally call it “radioactive green”) but there are all sorts of colours now. The colours are supposed to mean different proportions of glycol and water, but they are not regulated therefore colours don’t offer a specific guide between different brands.
A bit on maintenance
Coolant doesn’t go on working at its best forever and therefore is considered a consumable. Manufacturers typically recommend replacing it every 2 to 3 years regardless of type used.
We will touch more on maintenance, replacement, handling in a future article.
Many modern motorcycles are equipped with electronic rider assist systems.
These systems include ABS and traction control.
But why do we still crash?
The TC and ABS lights blinked like Christmas lights gone crazy as the R 1250 RT’s rear end snapped to the right, threatening to overtake the front. MFG and CSS training told me to hold on to the gas, to not chop the throttle. So, I held a steady. The rear wheel reversed direction and slid to the left, then continued sliding the right and back to the left.
However, the intensity of the slide started to lose momentum, the slide was now smaller in degree and wound down to four right-left-right-left headshakes.
Still keeping the gas on, the bike and I continued down a straight line. Speed had dropped from 140+ km/h down to just below 100 km/h.
The above scenario wasn’t made up (no need to sumpah laknat), as it happened while I was testing the new BMW R 1250 RT. I had hit a huge rainstorm like a continuous ice bucket challenge on the way back from Ipoh to Kuala Lumpur. I steered too quickly over the white line, which triggered the slide.
Traction control did work, as evidenced by the blinking lights and lower speed at the end. But this episode brought up and important question: Why do riders still crash despite rider assistance?
What do we have?
Most bikes these days are equipped with ABS, while those higher up the scale (read: more expensive) feature a whole myriad of rider assistance systems such as lean-angle sensitive traction control and ABS, engine braking control, wheelie control, vehicle stability control (slide control, in other words), rear wheel lift mitigation, etc. etc. The list of rider assistance electronics would stretch almost from A to Z.
So why do we still crash?
Lowside crash due to too much speed – Courtesy of RNikeyMouse
Rider assistance electronics are just that: TO ASSIST. While they do compensate for clumsy riding and mistakes, it’s only to a small degree as it still depends on the rider to make the correct inputs. Think about it: If the systems take over, we might as well just sit back and let the bike ride itself.
There are a number of factors
Over confidence. That’s right. I’ve met riders who think that the rider assist systems will automatically make them better riders. Sorry to burst your bubble – they don’t. Never go out there and ride without thinking of the consequences of your actions just because the “bike has the most advanced traction control system.”
I’ve seen riders keeping the TC and power settings in “slick” mode when their bikes weren’t on slick tyres and riding on public roads. Sure, they probably liked the bike’s aggressive nature in those settings but keep the consequences in mind.
Not knowing how the systems actually work. Sure, the development of rider assist has come a long way. But remember, they still depend on the rider’s inputs to work.
Let’s go back to the opening story. Things could’ve been tragically different had I shut the throttle as soon as the wheel started sliding. Snapping it shut would cause weight to transfer abruptly to the front, taking the load off the rear wheel. Besides that, engine braking will take effect. These factors will in turn worsen the slide and the bike could’ve either slid out from underneath me or worse, having the rear gripping suddenly and sending me over the high-side.
Therefore, not shutting the throttle abruptly didn’t throw in extra variables into the equation and allowed the ECU to determine the best course of action effectively and quickly.
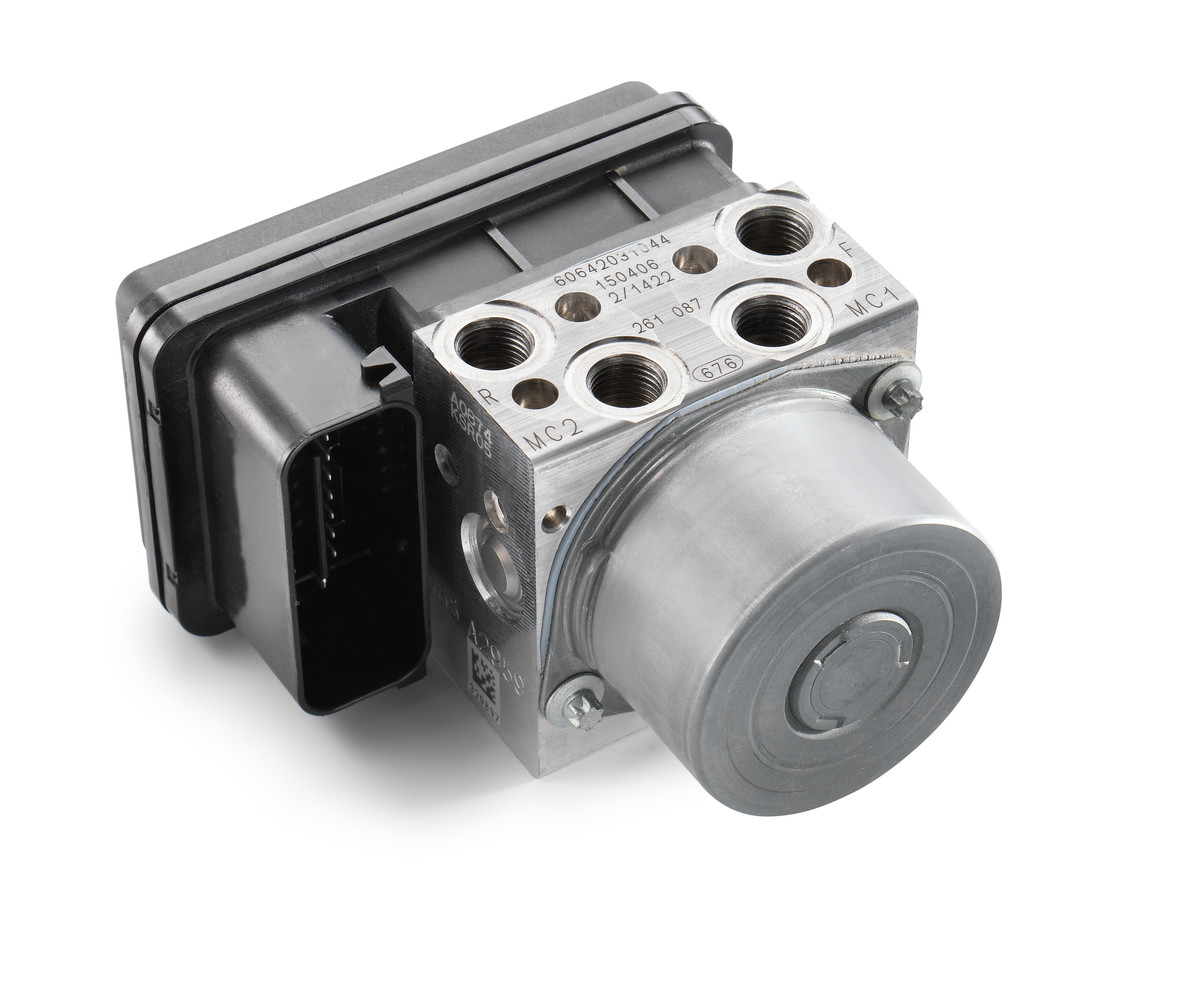
ABS control unit
That’s the same thing with ABS leading riders to think that they wouldn’t hit an obstruction. While ABS does allow you to brake at the maximum level, hence shorten the braking distance, it’s real function is to keep the wheel from locking up into an uncontrollable skid. It also means that you can steer away from the danger – not braking hard and heading straight towards it!
Also, some riders got spooked when the brake lever started pulsing when ABS activated, causing them to release the lever instead of holding on.
So, what should I do?
The first thing you should do is nothing if the bike slides. Yes, you read that correctly. A sliding tyre is actually looking for a stable position and will find that equilibrium if you let it. Fighting it makes it worse.
If the tyres slide when you’re leaned into a corner, all you need to do it countersteer slightly on the outside handlebar to lift a little and reduce the lean angle. Just don’t lift it with your entire body because that will send you wide and overshoot the corner. Keep looking through to where you want to go and keep the bike pointed that way.
2008 Ducati Hypermotard 1100 S
But most of all, keep the gas on. If you really need to slow down, roll the throttle off smoothly. Snapping the throttle off is tantamount to throwing everything down the road.
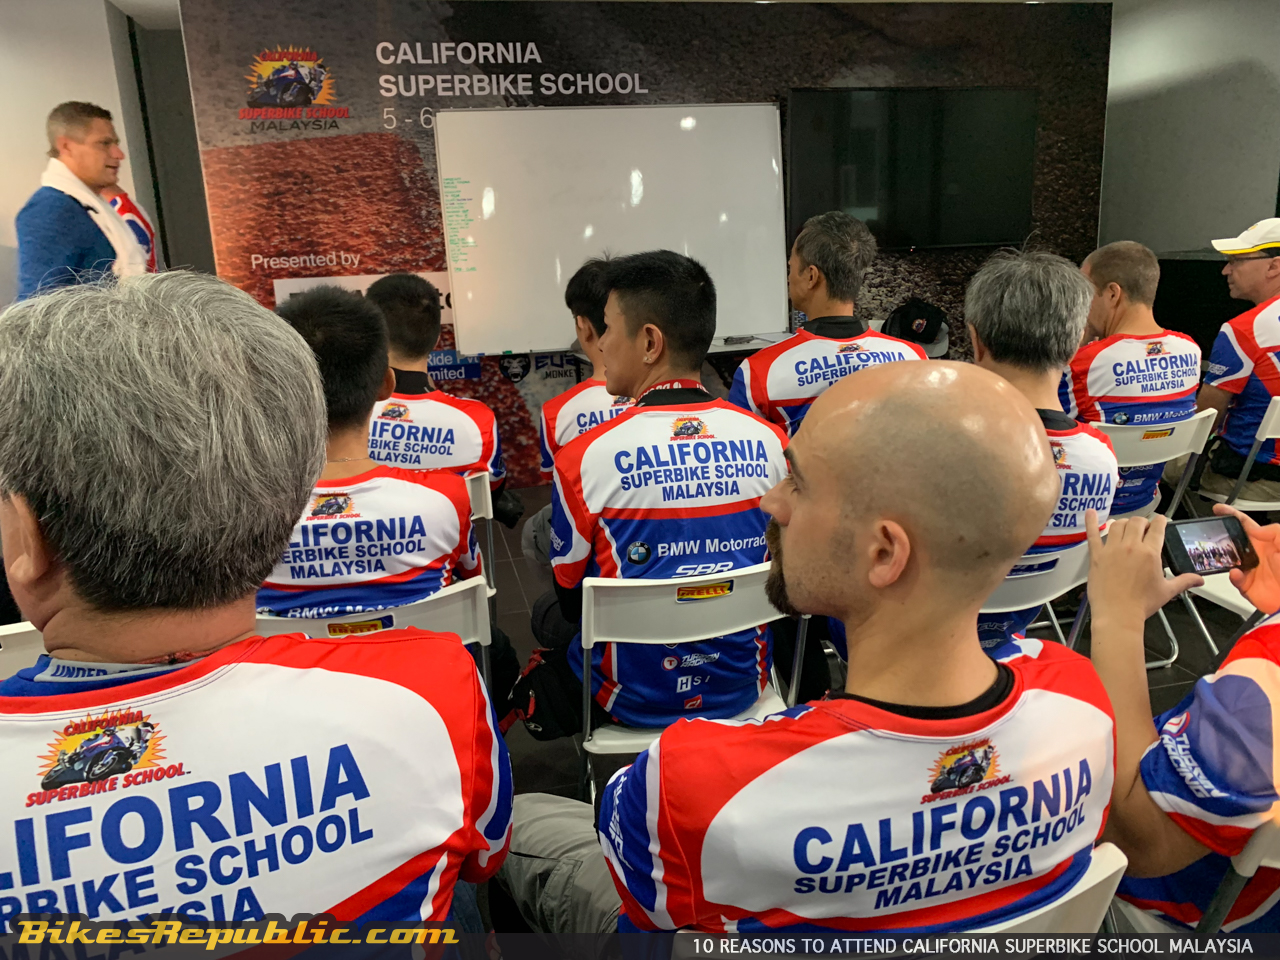
The best to do is to take up advanced rider training and learn the correct fundamentals of riding. For ultimate slide control, you can learn it at Most Fun Gym (MFG). For performance riding, you can choose from Alpha Track Academy, Ducati Riding Experience (DRE), PTD, Eric Yong, et al. Also, don’t miss California Superbike School Malaysia.
Going too fast into a corner happens to every biker.
But you can get away with it.
Practice these steps and you’ll come away with more confidence.
A corner looms ahead. It looks like a fast one, so you line it up and steer in. Only to find that the apex is actually further inside. Much further.
The road seems to double-back on itself and here, you’re in the outside 1/3 of the corner and just tipping the bike in.
What should you do? What can you do?
The fundamentals
There are five basic skills that every biker MUST possess: 1. Steering; 2. Vision; 3. Throttle control; 4. Brake control; 5. Body positioning/control. Not necessarily in that order, but these skills need to be invariably present.
Let’s keep these five points in mind as we take you through a butt-clenching ride.
Don’t panic
This is the most important. Panicking will exacerbate the situation; making it worse when you could actually make it home to your loved ones.
The first thing to happen is your body tenses up when you panic. A tense body will lock your limbs in position and cannot provide effective steering forces anymore.
Look through the corner
The best way to overcome this panic or impending panic is to turn your head into the corner along with your eyes (they must be inclusive). Remember that the bike goes where you look. Force yourself if you have to and flick your head to the side and get those eyes focused on the corner’s exit.
More steering input
Remember how to countersteer. Push on the inside and pull on the outside parts of the handlebar in a quick manner. Doing so will snap the bike over quicker.
Countersteering – Courtesy of sPEEDY pADDY
Control that throttle
Should you shut the throttle? Open the throttle? Hold the throttle steady?
The answer is don’t do anything. If you’ve closed the throttle from the corner entry, keep it closed. If you have it slightly open, keep it there and don’t roll off or open it any further.
Any change to the throttle at this point will cause weight to shift, changing your chassis balance.
If you chop the gas, weight will transfer to the front tyre and force the bike wide. Yes, wide. You’d expect the bike to steer better but the opposite happens as the front tyre’s footprint widens, creating a large patch of resistance. Steering becomes heavy.
Throttle control – Courtesy of dreamtime.com
Conversely, weight transfers to the rear when you add more throttle. The front tyre becomes light as the contact patch becomes smaller. That smaller footprint may not react enough to steering forces. Consequently, the bike goes straight. Yup, just like if you chop the gas.
But if you maintain the present state, the motorcycle’s chassis is in its current state of equilibrium. At least, you know that steering effort is still consistent.
If really need be, you can roll off the gas. Roll off as in turning the throttle down smoothly, NOT chopping it.
Once you’re on your line to the exit, apply throttle to balance the bike and blast out.
Stop treating the throttle as an on/off switch. Instead, use it as a tool to control not only the bike’s speed but its chassis balance and grip levels.
Wee bit or no brake
The first track exercise carried out by all California Superbike School students is the “one gear, no brake” drill. We went out there, set third or fourth gear, then control the throttle as we went into and out of corners.
Yes, it’s about throttle control, but it also showed us about how modern bikes and tyres can perform beyond our expectations and fears. Make that 99% of us.
Now, you’re in too fast and room is running out fast.
If you’re already leaned over, touching the front brake now spells disaster. Conversely, dab on the rear brake. Doing so will 1. Create a resistance behind the bike’s centre of gravity; 2. Flatten the chassis. The bike will tighten its line.
The rear brake technique is used by virtually all MotoGP riders.
In the case that you’re just about to turn in, you can apply the front brake but not by grabbing it like you’re trying to crush a rock. Instead, squeeze it to feel its bite, then smoothly let out the pressure as you lean the bike over. Once you’ve seen the exit and off the brake, apply the throttle.
Conclusion
So, that’s it. It all starts from not panicking but do practice the five skills above as soon as you have the opportunity. I do so everytime I’m on my bike. I’d like to add that these drills don’t have to be carried out at high speeds. In fact, you’ll discover that you learn a lot more when you don’t rush yourself into things.
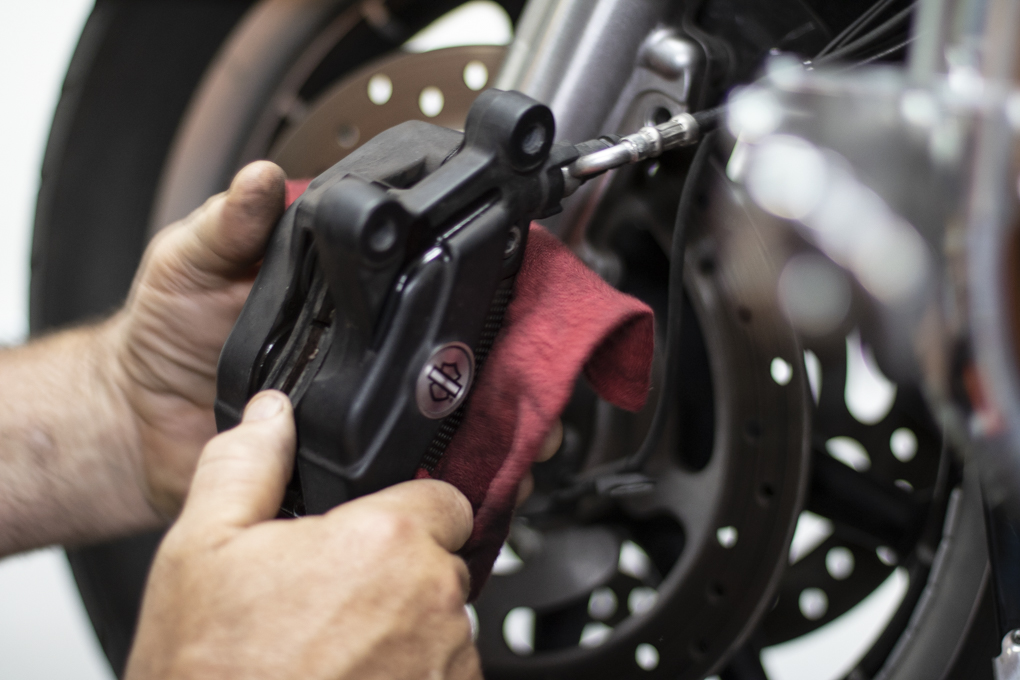
Bikers usually talk about performance and aesthetic upgrades.
But how many actually talk about brakes and brake maintenance?
Today, we look at how often should replace the brake fluid.
It surprises me that in my 33 years of riding, no one had ever asked, “How often should I replace my brake fluid?”
I’ve always been asked what’s the best performance parts such as exhausts and tyres, instead. It’s not wrong to ask about those parts, of course, but brakes are the most critical next to the almost everything else on the bike.
However, I do understand why almost nobody talks about brakes. Modern brake systems are very reliable. Apart from replacing the brake pads whenever they’re worn, the system keeps working: The rider presses the lever and the bike slows down. When the pads are worn again, he replaces them.
In a brake system that performs normally, performance deteriorates slowly and surreptitiously. Consequently, you won’t feel much difference since the last time you rode it. This will continue until we encounter serious problems.
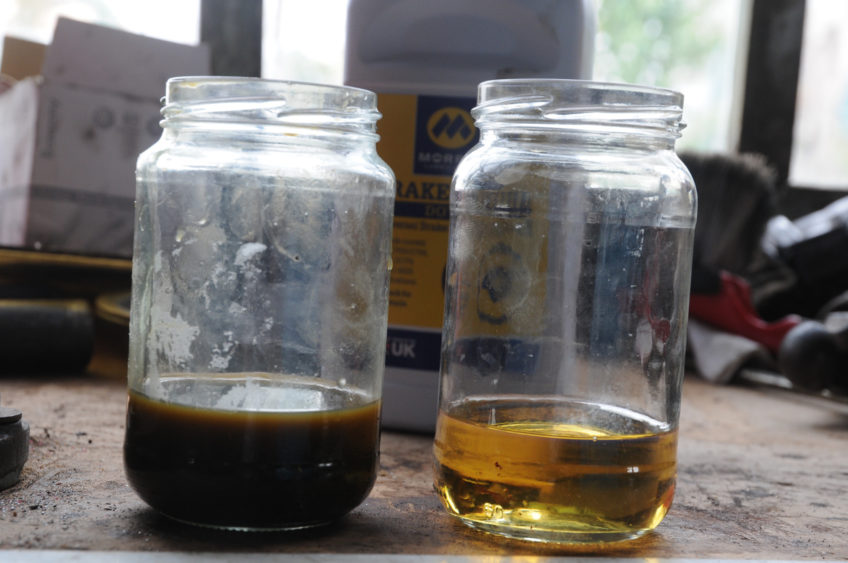
But what about the fluid? Sadly, no one seems to bother. Brakes are working after all. News is, deposits will start to build up in old brake fluid. If you’re unlucky, these deposits may someday flow into the nooks and crannies and block the flow of fluid in the system. In the worst-case scenario, deposits build up or get into the ABS pump and render it useless. When this happens, the part must be replaced, which costs thousands. Believe me, I’ve seen this happen in both bikes and cars.
Old vs new brake fluid
Besides that, brake fluid is hydroscopic i.e. attracts moisture. The system may be sealed but wear and tear can eat away at a gasket or two. The presence of moisture in will lower the brake fluid’s boiling point. When this happens, the brake takes more effort to work. In a bad scenario, the brake lever will feel spongy. In the worst case, the lever has been pulled all the way back and sticking to the handlebar, yet the bike doesn’t slow down at all.
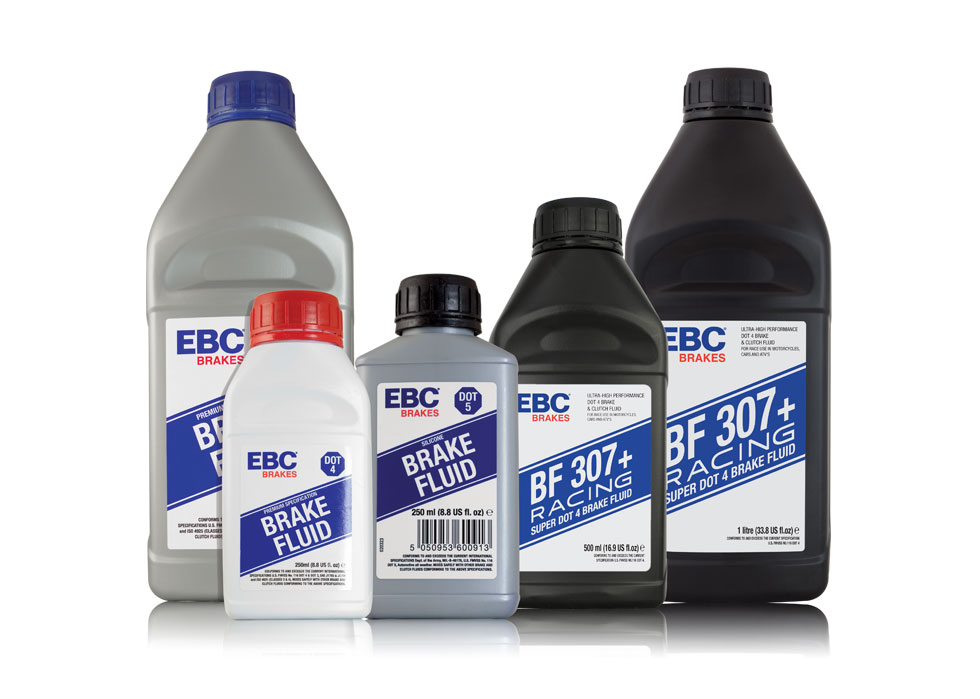
So, how often do you need to change your brake fluid? Every two years, regardless if the fluid “still looks good.” The job is easy enough that you could DIY (do-it-yourself), but you can also visit a workshop if you aren’t confident or need more tools.
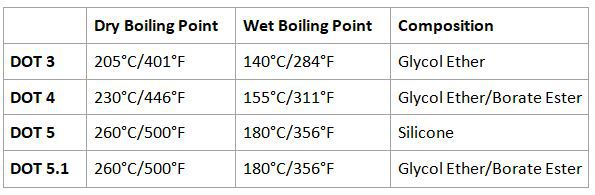
What DOT should I use? Just follow the manufacturer’s recommendations. For example, use DOT 4 if that’s recommended. Try not to be seduced by the mechanic’s “Ini barang baik punya (This stuff is good)” sales pitch, especially if the fluid is of different DOT rating or for racing. Racing brake fluids are usually even more hydroscopic!
The OEM rubber brakes hoses typically need to be replaced every four years.
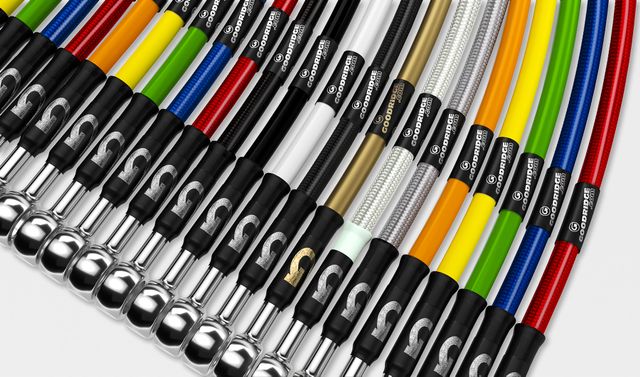
You can choose to replace them with braided steel lines.
Steel lines are more durable.
As we mentioned previously in other articles about brakes, brake hoses are considered consumables, that is, they need to be replaced some time down the road. The question then is to whether replace them with OEM rubber hoses or braided steel lines?
Before we go further, let us explain that most top-of-the-line motorcycle models are already equipped with braided steel hoses, especially sportbikes. As for those in other segments, there are manufacturers who include them as OEM from the factory, while those of the lower categories may not.
So, let’s assume that your bike is fitted with rubber hoses. Rubber brake hoses need to be replaced every four to six years, depending on your manufacturer’s recommendations.
OEM rubber hoses deteriorate over time
Cutaway of a rubber hose (left) vs a braided steel line. See how much simpler is the steel line’s construction – Photo credit crowz.narmir.com
Over time, the rubber becomes soft and will expand when subjected to the high stresses of the brake system. Consequently, you lose braking power. In other words, some of the brake fluid’s pressure’s lost in pushing brake hose outwards, instead of being concentrated on the caliper(s) pistons.
The lever will feel spongy and you lose feel of how much you can taper off the pressure on the lever. This is especially irritating when you need to trail brake into corners – the brake seems to just let go. When that happens, the forks will rebound abruptly therefore shifting the bike’s weight to the back. This will cause the bike to run wide or even overshoot the corner.
What’s the difference between rubber hoses and steel braided lines?
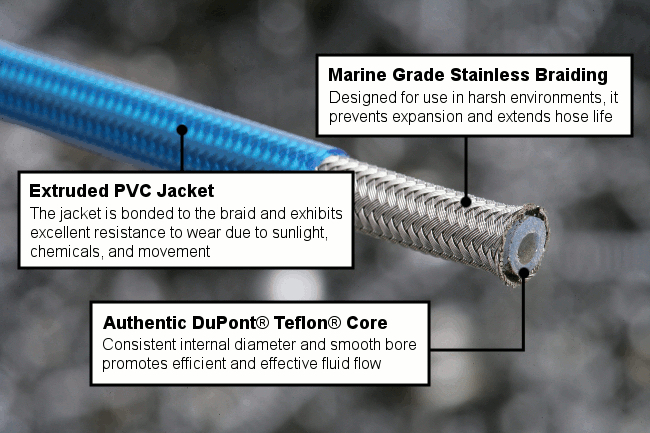
Picture courtesy of Venhill
In a steel braided line, a steel casing surrounds the core hose inside, made of either nylon or Teflon. A PVC protective layer covers the steel line. It’s best to choose the PTFE Teflon core as it can resist much higher temperatures generated during braking.
The steel casing keeps the inner hose from expanding when the brake is applied. As a result, you have a better feel of how much braking you can apply, rather than relying on just the feel of the bike’s speed alone. This is especially helpful when you need to trail brake or letting off some pressure to enable you to steer the bike.
What you shouldn’t expect after switching to steel braided lines
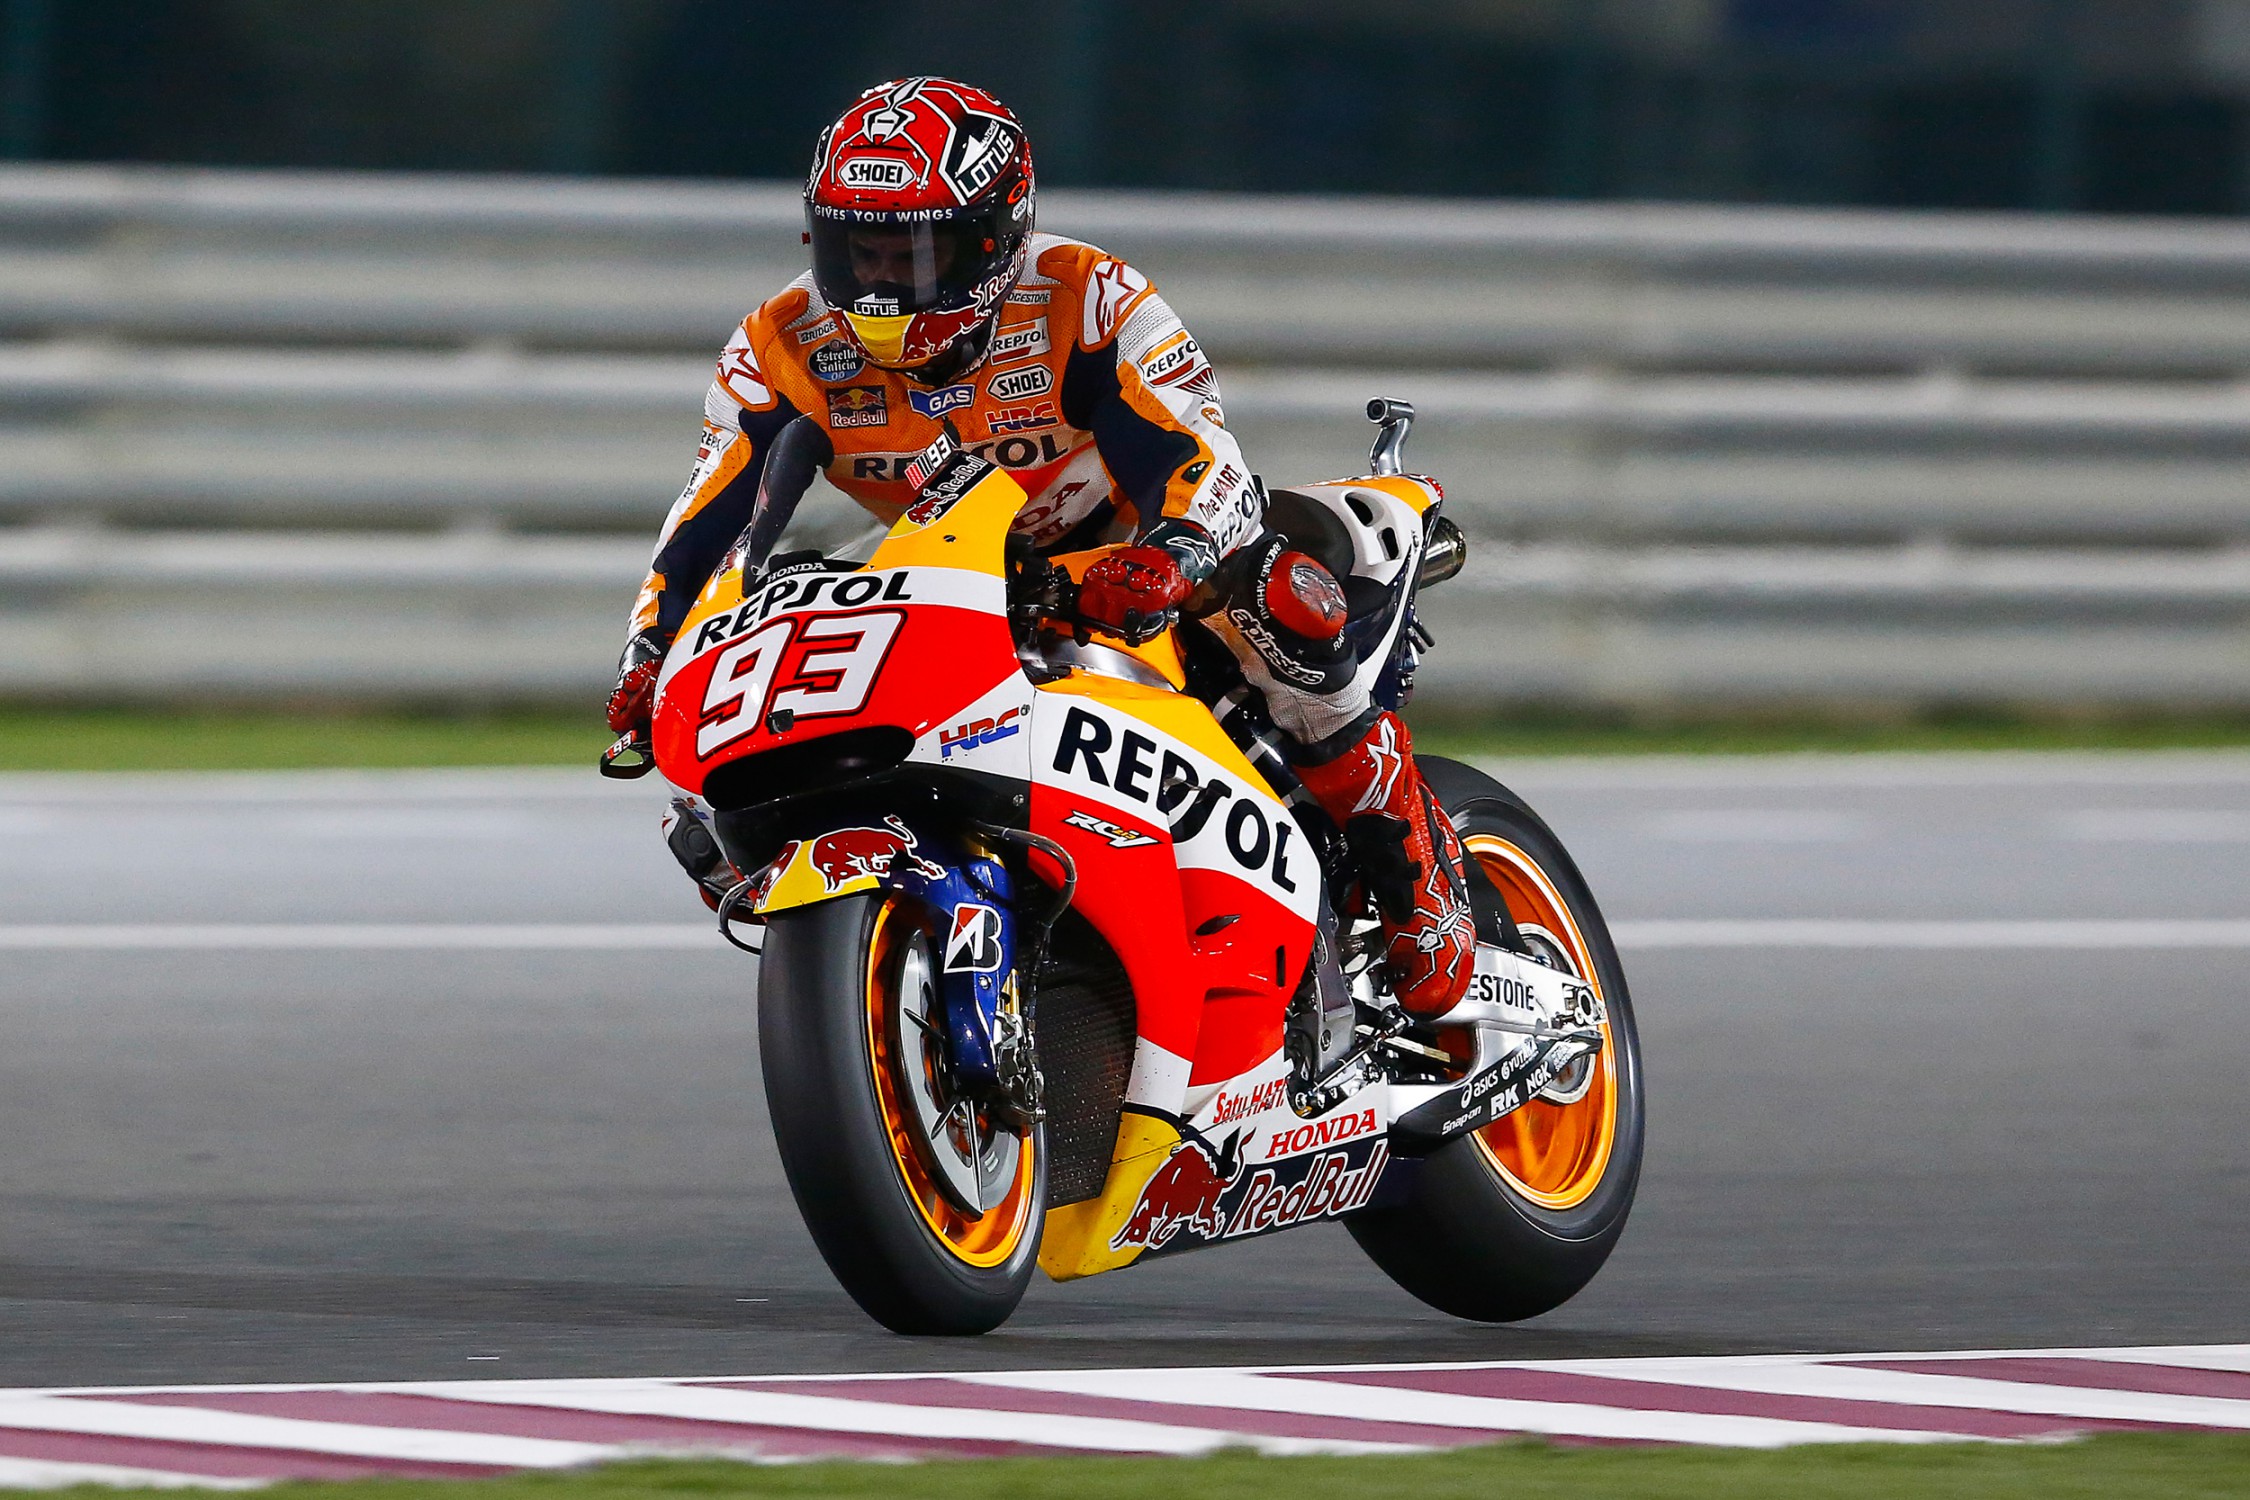
Don’t expect your bike to brake like Marquez’s bike for Turn 9 at the Sepang International Circuit. Braided lines give you better feel and return some of your brake’s power, but you won’t get eye-popping braking all of a sudden.
What to look out for
If you end up getting a steel line with a smaller inner diameter compared to your OEM hoses, do expect that the brake lever will require slightly more travel. This is due to the increase of pressure in the line due to the smaller orifice, as stated in Bernoulli’s Principle. As such, the brake master pump’s cylinder needs to travel a little further.
But more critically, do look for quality steel lines rather than some el cheapo ones. Never compromise on quality when it comes to brakes. Besides, good braided steel lines could last for a long time.