We have listed the CE standards’ codes for motorcyclists’ Personal Protection Equipment (PPE), so there is also a CE standard for motorcycle gloves.
By the way, “CE” and “EN” mean the same thing: “CE” stands for “Conformite Europeenne” in French, while “EN” stands for “European Norm.”
The CE standard for motorcycle gloves is:
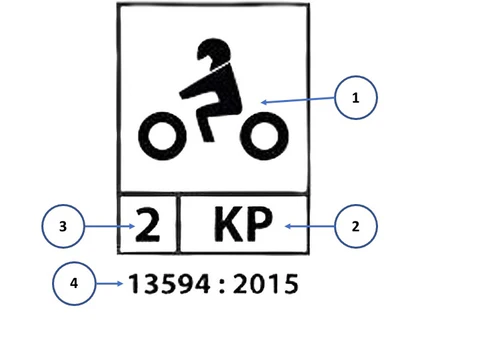
EN 13594:2015
Referring to the sample label above:
The rider on two wheels with a helmet means this PPE is meant for motorcycling. Not for bicycling, driving, or skateboarding.
If this box says “KP,” it means that the glove’s knuckle protector was tested and provides protection for the knuckles. As such, be careful because some gloves with knuckle protectors may not have this “KP” rating.
The digit here pertains to the level of protection provided by the gloves. There are levels 1 and 2, the latter being more protective. Please refer to the box below.
The CE standard and its year of revision.
In order to qualify as Level 1 or 2, the gloves need to pass these test standards:
So, be careful when you buy gloves that seem to be protective but are actually not.
Motorcycle accidents can happen due to the combination of several factors: Road condition, mistakes committed by other drivers, weather, etc. But accidents also happen due to the rider’s own abilities, or lack of, such as target fixation.
Target fixation may not be the main cause of motorcycle accidents but it is the main reason why we cannot avoid accidents.
Good news is, advanced riding schools and teachers have narrowed down the causes of mishaps creating by the rider. You see, we humans have several built-in defence systems called “survival instincts.” There is no doubt that these instincts have kept our forefathers alive until now, but they can be a hindrance to our survival on motorcycles that go up to 300 km/h or more. Ironic.
And yes, one of these survival instincts is “target fixation,” and there are countless videos that show how those accidents could have been easily avoided if not because of target fixation.
What is target fixation?
The instinct originates in our brains telling us to keep an eye on a dangerous situation or hazard. While it worked well against predators, it unfortunately becomes a bane when we ride motorcycles that travel at much faster speeds. And, the strength of the instinct increases as you increase speed.
Have you entered a corner a little faster only to find your vision locked onto the outside of the corner instead through it? Or a car pulled out of the junction right in front of you and could only stare at it, wishing that it went away? Or you saw a pothole in the middle of the road and still proceeded to hit it although the hole is only 0.5 metre wide, while the road is 8 metres wide?
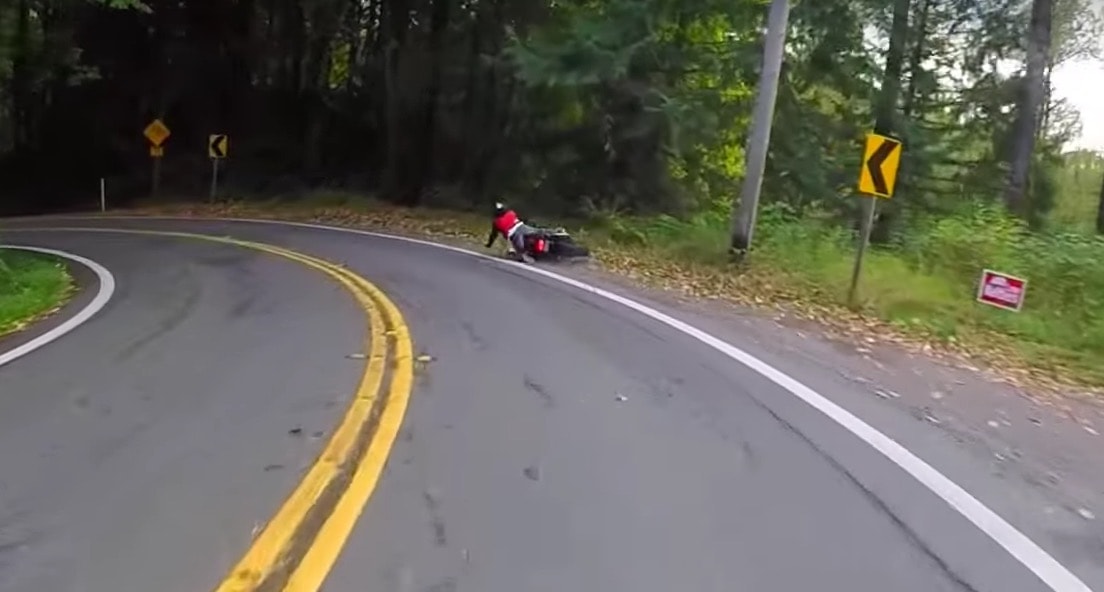
Or, just the like in the video below. The motorcycle rider had the entire lane, plus the adjacent lane to himself, yet he ran into those hapless cyclists.
All those issues were caused by your brain telling you to fixate (lock) your vision on the danger, hence, target fixation.
So, how do we fix it?
Like many bad habits, we can train our brain to overcome them, target fixation included. We only need to practice: You do not need to mount those expensive tyres, suspension, etc.
Keep these points in mind:
The motorcycle goes where we look.
Ride with a wide field of view – do not let your vision tunnel down.
A wide field of view lets you open up the road in front of you, thereby creating more space.
With that wide view, look to the sides of the hazard when you spot one.
Steer the motorcycle away from the hazard.
Practice
Find an open road with no traffic. Better yet, a large parking spot.
Start with 40 km/h. Look up and look wide.
Imagine a pothole or any hazard ahead of you (how far ahead depends on your speed).
Look to the either side i.e. left or right of it.
Then steer to either the side. Keep practicing until it becomes a habit, and your muscles will follow suit (muscle memory).
We once came across a comment from a motorcycle owner/mechanic who to have mixed gasoline in his motorcycle engine to flush the old engine oil.
More surprisingly, there were readers who followed in his footsteps.
What will happen if we did that?
It is true that engine oil will thin out when mixed with petrol, making it easier to remove. BUT, mixing gasoline in the engine is something that should NOT be done at all.
This is because there will be residual engine oil already mixed with petrol left in the engine, especially in the cylinder head and valve train areas, as well as anywhere there are small recesses, even after we drained the old oil. Therefore, the new oil will be mixed with the remaining oil that was mixed with petrol. As a result, the new engine oil is as good as being adulterated.
Apart from that, there is a film of oil that covers the moving parts. Petrol will remove this film, causing in friction between the metal surfaces before the new oil reaches these components. This is especially important between piston rings and cylinders, between gears, piston pins, rocker arm rollers, cam lobes, connecting rod bearings , camshafts, and more. All these parts are oiled when assembled, and this shows how important the oil film is.
In addition, petrol is not environmentally friendly, nor is it friendly to rubber and gaskets. Sooner or later, the gaskets will break and the oil will leak.
Some say, “I’ve done it before but it’s ok.” Yes, we may not feel any damage initially, but believe us, problems will arise later on. You will know the pain when you need to overhaul the engine.
Therefore, DO NOT mix petrol with the engine oil. Instead, use specialised flushing products for the task. For example: Use a screwdriver to drive the screw in, not a hammer.
Another note: You do not need to flush your vehicle’s engine if there is no trace of sludge. However, if do you want to clean the engine’s internal components, regardless, you would be better off by disassembling and overhauling the engine.
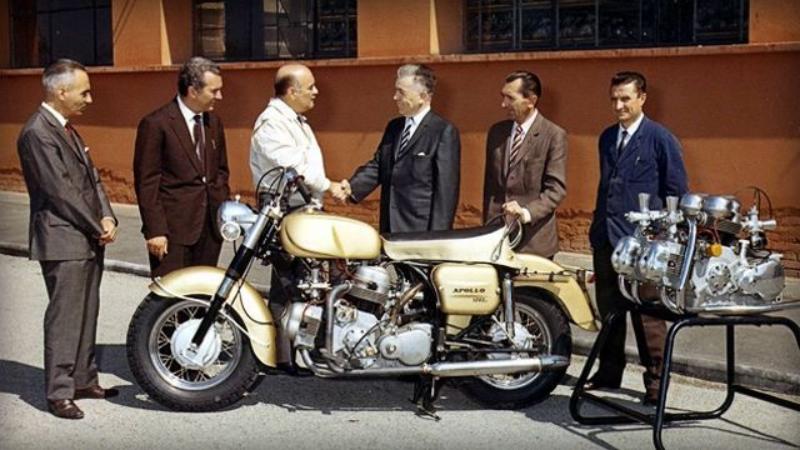
While we revel at the current Ducati’s V4 lineup consisting of the Panigale V4, Streetfighter V4, Multistrada V4, and most recently the Diavel V4, Ducati had actually made a V4 engine even prior to producing their first V-Twin engine. Instead, perhaps ironically, it was the V-Twin that went on to bring the Ducati name to the masses, before they went back to the V4 to dominate the world’s racing circuits. The answer has to do with the machine the engine was fitted to: The Ducati Berliner 1260 Apollo which debuted in 1964.
How it began
Ducati’s United States distributor, the brothers Joe and Mike Berliner of Berliner Motor Corporation were convinced they could sell motorcycles to the American police departments. But they had to compete with Harley-Davidson who had a free run in that segment.
So, Joe Berliner approached Ducati in 1959 with a proposal to build that bike. Ducati was owned by the Italian government at the time and produced only the 20occ Elite. And, they were also in a bad state as with all other Italian motorcycle manufacturers who had to contend with the Fiat 500’s popularity.
However, official US police department specifications were increasingly standardised across the country, and naturally favoured their national product i.e. Harley. They required an engine capacity of at least 1200cc, a minimum 60-inch/1525mm wheelbase, and 5.00-inch x 16-inch tyres.
Mike Berliner shipped two Harley FL Duo Glides to Ducati for evaluation. After considering the design of the archaic 74 cubic inch (1212cc) Harley FL’s engine, Ducati’s chief Dr. Giuseppe Montano and chief engineer Dr. Fabio Taglioni agreed they could produce a more efficient and modern design. Taglioni eagerly accepted the commission as a technical challenge.
Unfortunately the bureaucrats in Rome showed much scepticism which resulted in dragged out negotiations until 1961 before Montana got the green light, and after Berliner promised to underwrite the project including development and production costs.
The name Apollo was chosen by the Berliner brothers in honour of the Apollo moon program which had just begun.
The engine and its performance
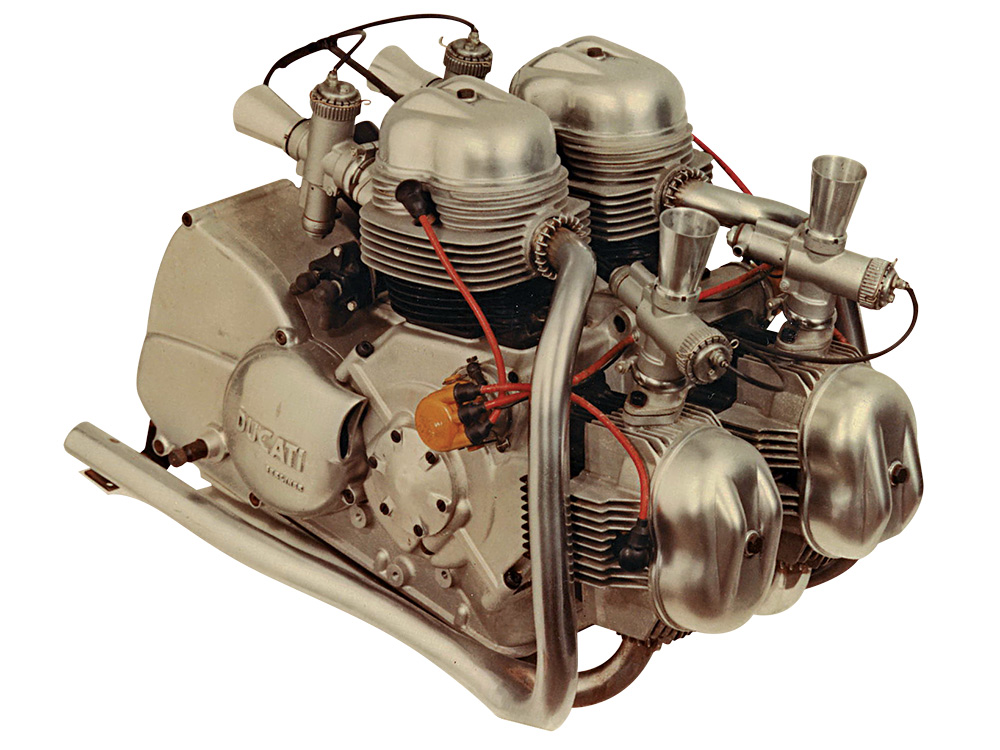
Taglioni was told to make the big bigger and faster and so, he designed a 1257cc, air-cooled, two-valved, 90° V4, with a 180 crankshaft. The bores and strokes were 84.5 mm and 56 mm, respectively, making it the most oversquare Ducati engine at the time. Valve actuation was handled by pushrods and rocker arms, rather than tower shafts and bevel gears. It made 100 hp at just 7,000 RPM.
Ducati gave it a 5-speed transmission to up the ante against their rivals who had 4-speed gearboxes. Taglioni even designed a provision to fit an automatic (CVT) in the future.
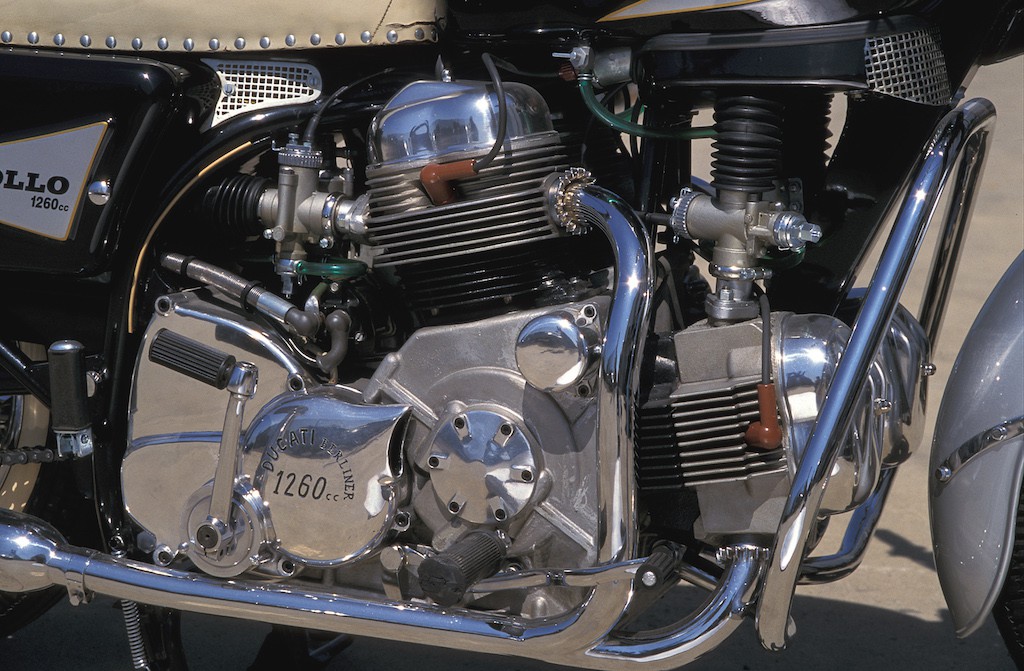
The engine was mounted in a heavy duty open cradle frame. There was a kick starter for the brave or with steel shins, but there was also an electric starter which looks similar to the Fiat TV1100’s. There was a massive 200w generator on the right side to cater for all the police electrical equipment. Ceriani developed the suspension, and front and rear single leading show drum brakes.
Weigh was finally tallied at 270 kg, dry. Although that is a lot even by today’s standards, it was actually lighter than the Harley’s 291 kg.
Ducati completed the bike’s styling with a peanut-style fuel tank, cowboy seat with a chrome cage grab rail, and forks and shocks that look similar to the FL’s.
Two fully working prototypes were built, one was painted gold for Berliner to demonstrate at shows, while another in black and silver. There were also two extra spare engines.
The test
So, off went Ducati’s test rider Franco Farne on the bike’s maiden test, only for him to return with the verdict: “It handles like a truck.” But the Ducati Berliner 1260 Apollo made up for it in straight-line performance, where it hit more than 200 km/h. It confirmed that it was most powerful the fastest European bike.
Unfortunately, that amazing performance was also its downfall, especially because it was fitted with those 16-inch automobile tyres. Another Ducati tester, and former GP mechanic Giancarlo Fuzzi‚ went out for a high speed test on the Milan-Bologna autostrada when the whitewall rear Pirelli ballooned, detached its tread, and came off the rim at around 160 km/h. Fuzzi called his survival “a miracle.”
The engine was subsequently detuned to 80 hp by lowering the compression ratio and fitting less aggressive cams, but it was still too much for any tyre at the time. Again it was detuned by lowering the compression even more to 65 hp and tyre wear became “acceptable.”
By comparison, the Moto Guzzi Grand Prix 500cc V8 had 20-inch wheels, but its 78 hp also shredded the bike’s tyres.
The end of the project
Berliner was of course happy with the performance and went ahead to print flyers to sell the bike. They planned to sell the detuned ‘normale‘ version to civilians as a touring model, while reserving the fully powered ‘Sport‘ version for law enforcement. In fact, 65 hp from the V4 was still more powerful than Harley’s 55 hp.
However, the detuned version had to contend with other European bikes such as BMW and British Twins.
Harley could also undercut the Apollo’s price of USD 1,500 by saying that they offer something close to that performance and a much cheaper price.
Then the Italian government decided that the limited market did not justify the tooling costs of production, and withdrew project funding. This was a severe blow to Berliner’s business plans.
What it could have been
The Ducati Berliner 1260 Apollo could have been the very first ‘superbike’ had tyre technology been up to the task; that and if it had used 18-inch tyres instead. Instead, the Honda CB750 appeared in 1969 to claim the honour. Even then, it had only 68 hp and a top speed of 201 km/h. Heck, even the “groundbreaking” Kawasaki Z1’s 903cc inline-four in 1972 produced only 81 hp and a top speed of 209 km/h.
Years later, Honda and Suzuki would copy the V4’s design for them to dominate GP racing.
It was indeed as missed opportunity.
However, the V4 engine’s design led Taglioni to design the engine that would bring about Ducati’s dominance in the superbike racing: The 90º V-Twin. But it could be seen that the 1257cc V4 had a place in his heart, which one of the spare engines sat in his office until his retirement in 1984.
Today, the black and silver prototype is owned by Hiroaki Iwashita, and resides in his museum at Yufuin on the island of Kyushu, Japan.
The fate of the gold coloured prototype is unkown.
Will we may see the end of the Ducati V-Twin superbike, with the announcement of the Ducati Panigale V2 Superquardro Final Edition? The factory will still utilise the 90° V-Twin engine in other models, of course, but it will be a sad day to see the absence of a two-cylinder Ducati superbike in the lineup, for it was the V-Twin (Ducati calls it the ‘L’-Twin) that cemented Ducati’s name in the halls of excellence.
So maybe it is a good time to retrace the evolution of the Ducati V-Twin superbike. (This article only covers Ducati’s sportbikes with the Panigale V2 Superquardro Final Edition as the main picture.)
When did the Ducati V-Twin begin?
As with almost all manufacturers, Ducati had started with building single-cylinder engines. The first one was in fact a 48cc unit made by SIATA which Ducati installed in the bicycle in 1950.
Ducati actually built their first V4 engined motorcycle called the Berliner 1260 Apollo in 1964. It was a beast that almost no one could ride and no rear tyre could withstand the engine’s torque and power. Well, why not: The 1257cc air-cooled 90° V-Four engine produced 100 hp at just 7,000 RPM. By comparison, the Harley V-Twin of the era did only 55 hp. (We shall write a story about this intriguing bike soon!)
One day, 20th March 1970, Dr. Fabio Taglioni began sketching on a 90° V-Twin engine. It was from here that an entire slew of models came about both in racing and its adoption to street models, including 500cc racebikes and 750cc road bikes. The Ducati 750 Imola Desmo went on to win the Imola race in 1972.
The camshafts were driven off a tower shaft and bevel gear system up to this point. Taglioni introduced the Pantah 500SL with belt-driven cams in 1980. This belt-driven system continued until the Superquardro V-Twin came to light on the Panigale 1199.
Two became four
Dr. Taglioni had experimented with the four-valved head but seemed to have made no headway. Instead, it was his understudy, Massimo Bordi who successfully designed and pushed it through.
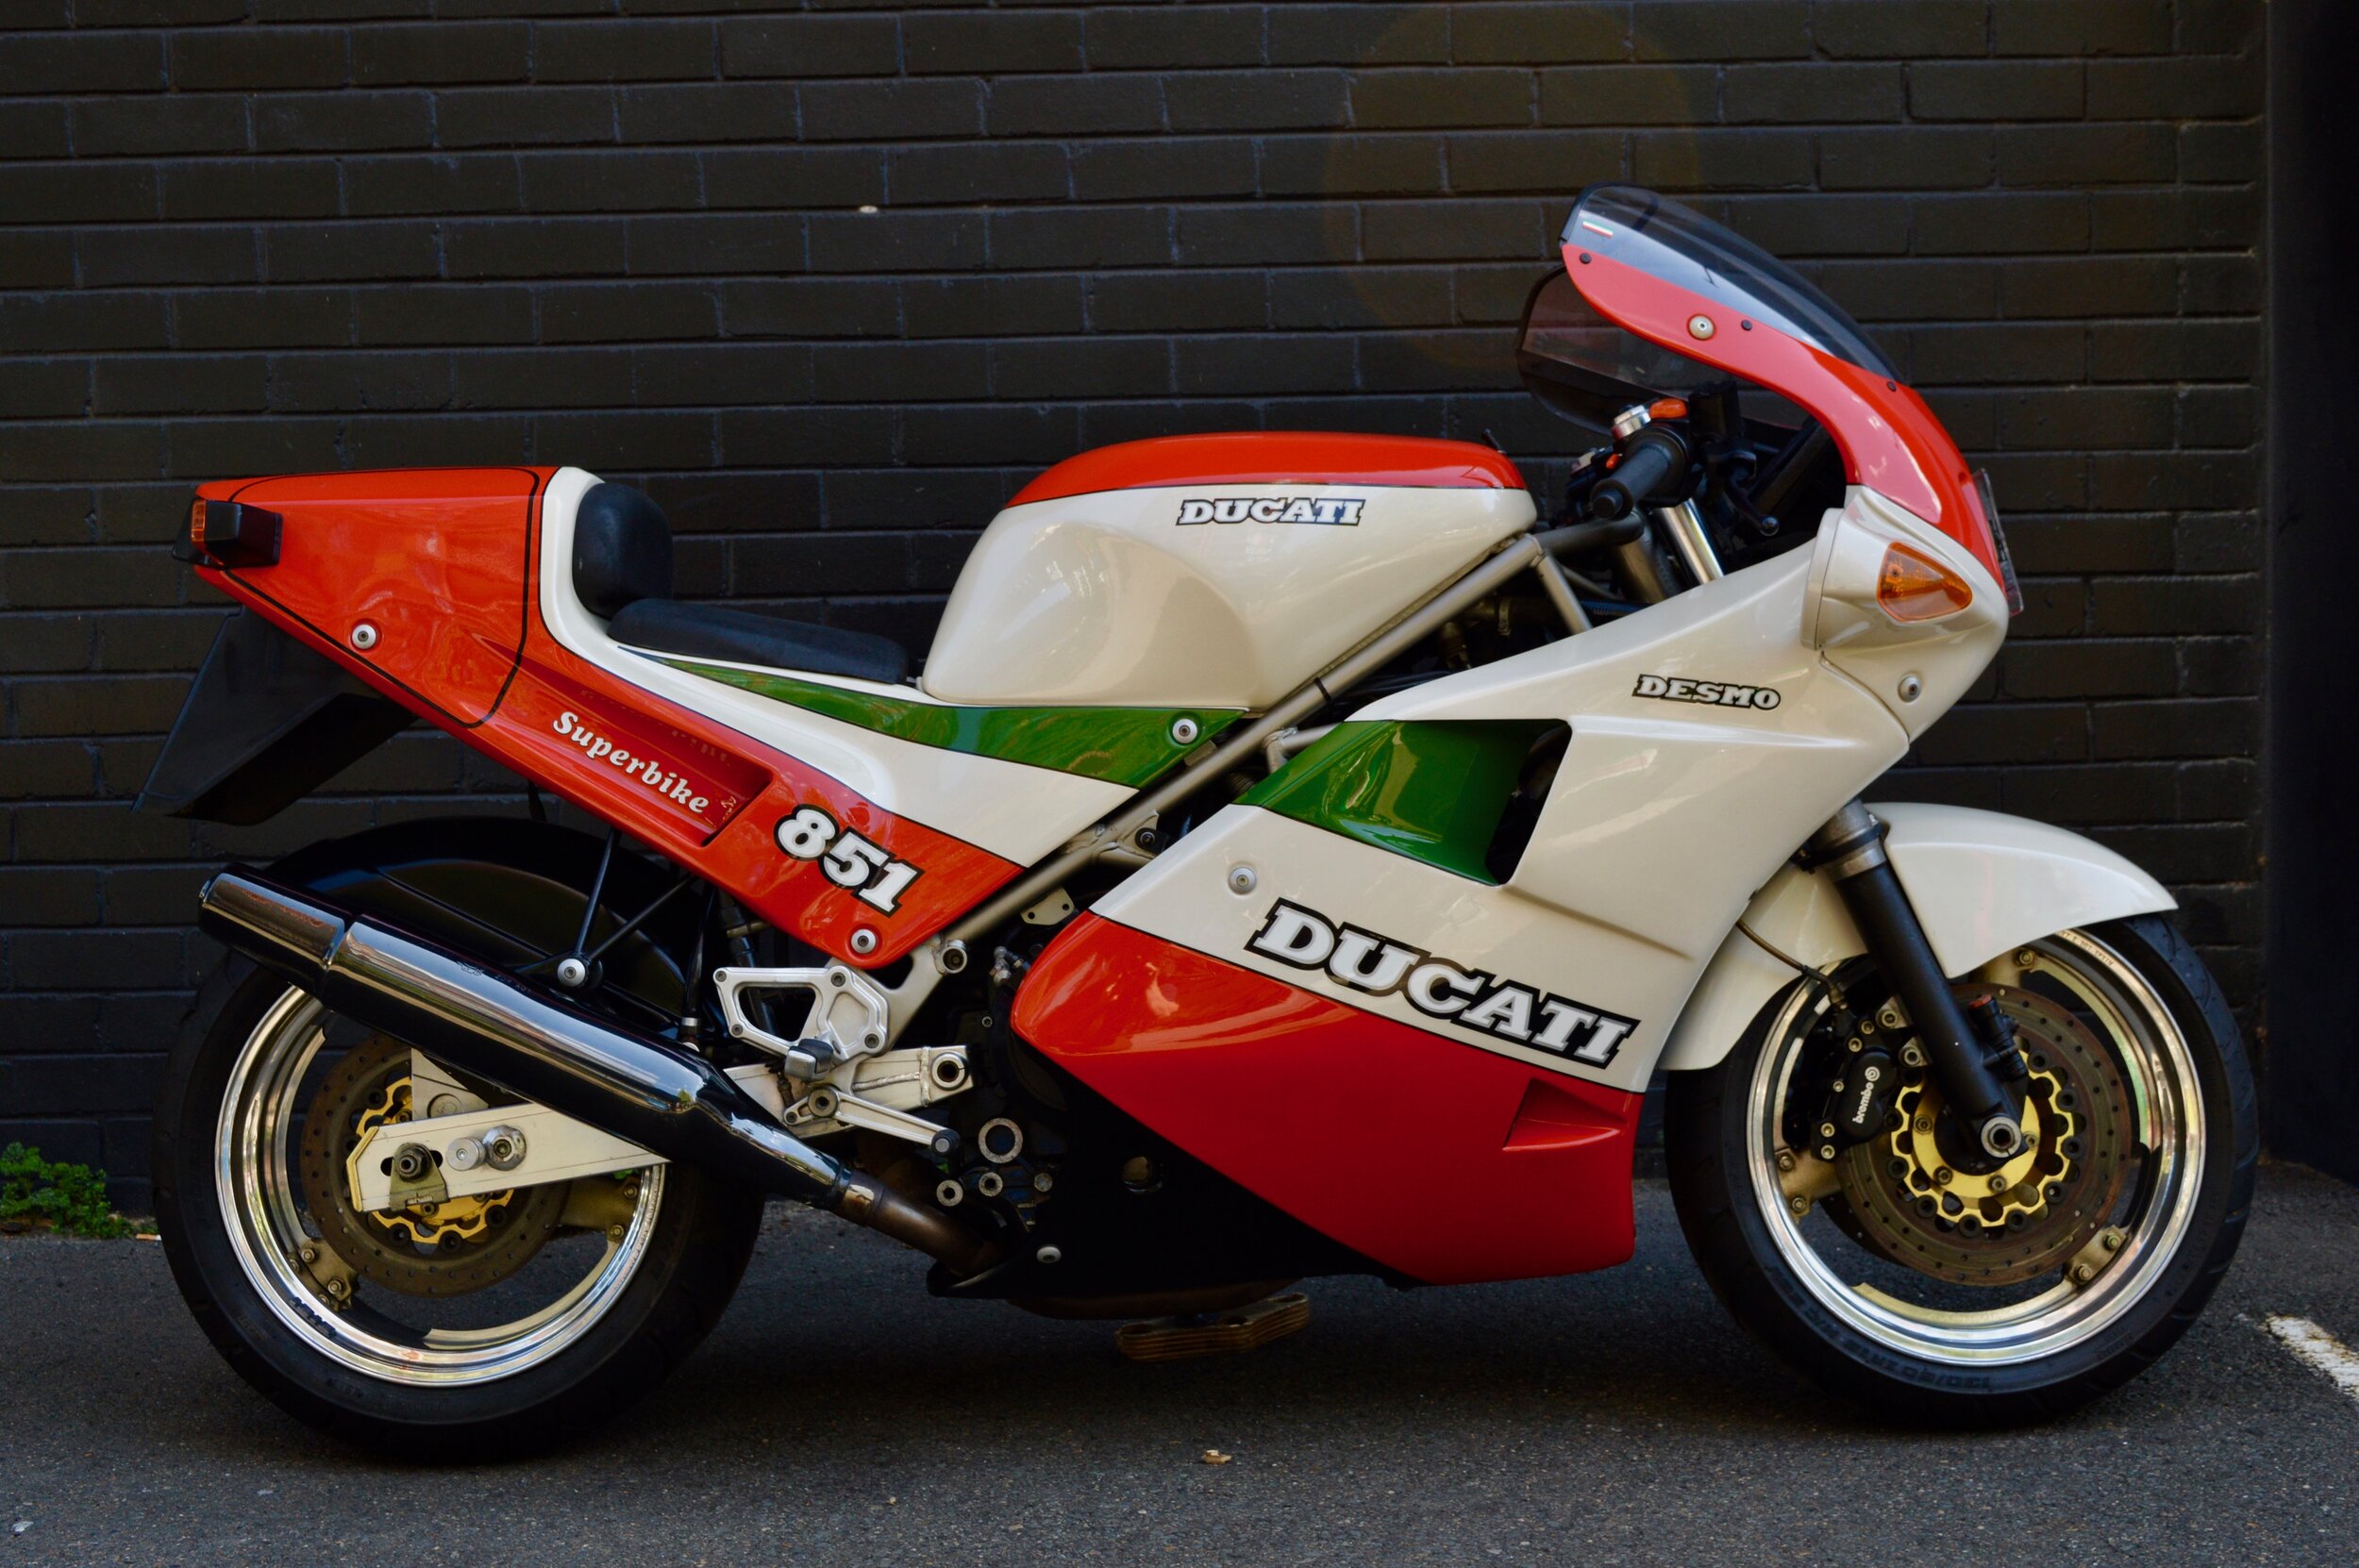
The four-valve 90° V-Twin engine, now known as the Desmoquattro, began in the prototype 748IE Bol d’Or racer in 1986, before being adopted in the Ducati 851 in 1987. At the same time, it was also Ducati’s first liquid-cooled engine. Raymond Roche took the 851 to the first World Superbike crown for Ducati in 1990 hence starting Ducati’s domination in the championship.
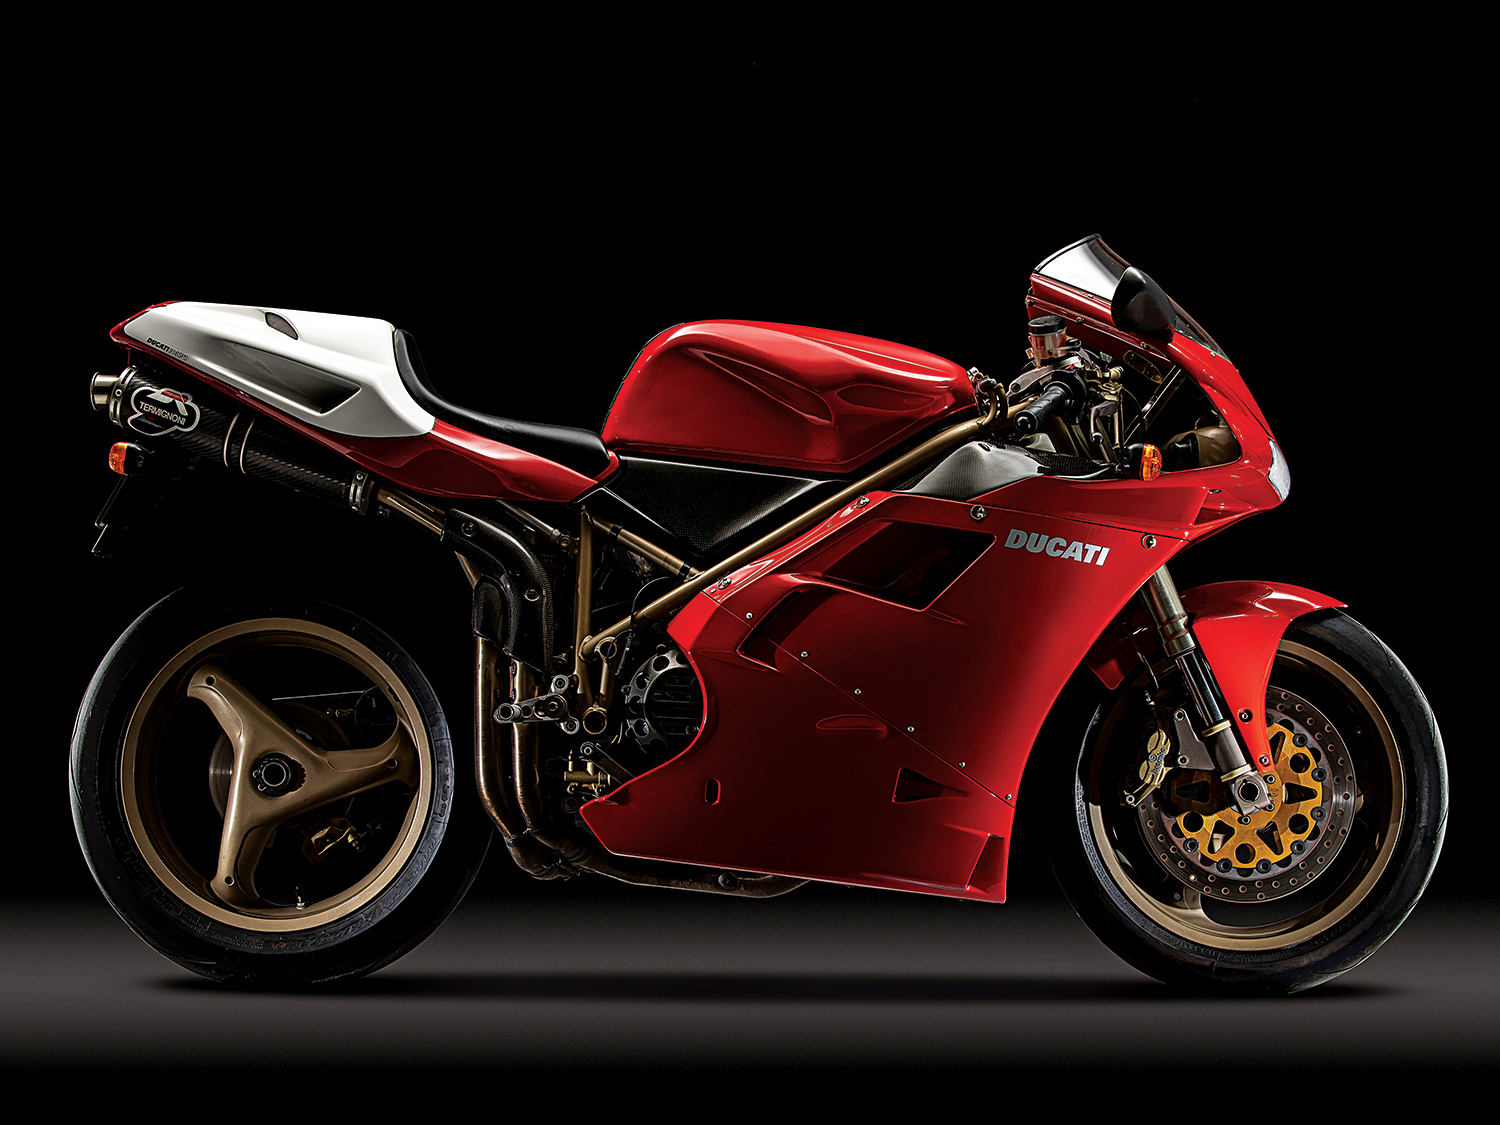
The 851 became the 888, then came the iconic 916 that in turn became the 955 (ultra limited SP version only), and finally the 996.
Subcategories of the Desmoquattro
Testastretta
In 2001, Ducati brought out the 996R homologation model. It was essentially used the 998cc engine which featured the new Testastretta head or “narrow head.” The new Testastretta had the included valve angle reduced from 40 degrees to 25 degrees. As such, the bore could be made bigger to increase the rev limit, hence producing more top end power.
The 999, designed by Pierre Terblanche was a wholly redesigned bike, followed in 2003. However, the design was way too far of its time and was severely panned, despite the 999 being better in almost every department.
Testastretta Evoluzione
The 999 was in turn succeeded by the 1098 in 2007. It was the most powerful V-Twin of the era and was well-received, what with a styling that “evolved” from the 916. The 1098 became the 1198 in 2009.
Superquadro
The 1098/1998 lineup was subsequently replaced by the 1199 Panigale in 2012 hence began the Superquardro engine. It was the most powerful V-Twin at the time, punching out 195 hp and 133 Nm.
There were several changes, most obvious was the deletion of the belt-driven cams for a hybrid gear/chain drive. Ducati made four displacements for this engine, ranging from 898cc to 1285cc.
The smaller V-Twin sportbikes
We need to mention the smaller capacity Ducati sportbikes as they led to the Ducati Panigale V2 Superquardro Final Edition. Amidst the 916 was the smaller 748 which Ducati raced in the SuperSport categories vs. 600cc inline-four superbikes. The 748’s engine was of course, a 90° Desmo V-Twin with four-valves per cylinder, but displaced 748cc. So, to complete the timeline, the 748cc engine started getting bigger becoming the 749, 848, 899, and finally the present 955 with the Superquardro engine. The 955cc Panigale was rebranded as the Panigale V2 following the debut of the Panigale V4 in 2018.
Reaching this stage in life has taught me to appreciate the simplest things in life. I used to crave the fastest, baddest superbike while not paying much attention to the lesser powered motorcycles. But then superbikes became too powerful and complex – you cannot even sort out the fuelling without a diagnostics system anymore… So, has this 2024 Suzuki Burgman Street 125EX show up at the right time?
What is it?
The Burgman range is where you find Suzuki’s luxury scooters, consisting of 125cc, 400cc, and 650cc variants. The Avenis range, on the other hand, consists of the sportier models.
The Burgman Street 125EX is powered by a 125cc, SOHC, two-valve, air-cooled 4-stroke Suzuki Eco Performance-Alpha (SEP-α) engine. It produces 8.6 hp at 6,750 RPM and 10 Nm of torque at 5,500 RPM. It is also equipped with the Engine Auto Stop-Start (EASS) and Suzuki Silent Starter System.
Additional features include the trappings of any scooter such a floorboards, underseat storage, storage bins at the front, a hook in front and another just underneath the front of the seat.
The first thing that strikes you about the Burgman 125 is how large – more like how bulbous – it looks despite being a 125cc scooter. The leg shields extend much further out the sides, and the side panels are similarly rounded to complete the theme. It reminded me of the Suzuki Gladius 650.
Riding the 2024 Suzuki Burgman Street 125EX
Grabbing the handlebar the first time, they are apparently as wide as on bigger bikes. Personally, I prefer wider handlebars because they provide more steering leverage.
You only need to tap the starter button once and let go as the aforementioned Silent Starter System will take over and er… start the engine.
Twist the throttle and… the bike just purred off idle. That was exactly how it was. It did not give a swift punch off the line, even when we nailed it full wide open. It was like a motorcycle with an extremely tall final drive ratio.
However, we soon discovered that Suzuki built it this way for the city. The engine was super smooth – serene even – between 60 – 80 km/h.
Suzuki motorcycles are well known for their easy handling characteristics and this was no exception. It was stable on straight roads, while the wide handlebar provided lots of leverage to steer. It required only the slightest pressure to change directions, allowing you to zip through traffic with ease.
Surprisingly, the scooter had lots of ground clearance despite the low seat height. I tried our best to grind the belly fairing and stands but I never succeeded. (Shhh… I ground a BMW R 1200 GS cylinders in corners before.)
We decided to ride it up to Genting Highlands, as we always did with any test bike. we already know the route like the back of our hands and taking different bikes on the same route allowed us to test the bikes, not the route.
We maxed out the Suzuki Burgman’s horsepower on the highway, hitting 108 km/h on downslopes. The engine continued to be smooth without sounding like it was going to detonate. There was just very little buzzing through the handlebars. Again, credits to Suzuki for building strong engines.
The long wheelbase again showed its benefits as the bike did not swerve or wobble when passing or being passed by heavy vehicles.
But the neat stuff for me was when we climbed that mountain proper, after the first checkpoint. Full gas upslope, the bike did between 60 – 70 km/h. We just held the throttle in its position and steered the bike through all the corners. The bike did not wobble at all unless it hit a pothole or uneven surface. All those luxury car drivers were wide eyed when they saw a little scooter passing them in the corners and pulling away! And that sequence of S-corners just before Gohtong Jaya was so much fun. Ah, the satisfaction.
We should also mention that the road surface was still damp from the overnight rain. Some scooters we tested before slipped and slid in the corners, but the Burgman held fast. There was one occasion when the rear started to go wide but it was instantly cured by lifting the bike up a little from its lean angle.
But, there must be some disadvantages, surely? Yes, of course, every bike does.
Coming back down the mountain revealed that the front brake needed lots of lever pressure to decelerate the bike with this 85-kg rider aboard. Good news was the rear drum brake never locked up even when hard braking was applied over the yellow speed breakers. So, plan your riding strategy ahead of time and give yourself more room to brake and stop.
Besides that, being a street scooter means the suspension has shorter travel and Genting’s pothole-ridden road did not help. Quite some bump energy was fed through the chassis to the rider. However, we wish to point out that sportbike riders would feel the same, so it is not to say the Burgman 125 specifically was bad in this department.
So, back on Karak Highway, it was full throttle from the on-ramp all the way through the series of corners until that final sharpish left, following that long, long righthand sweeper. The Burgman’s chassis instilled so much confidence, yes, despite the small wheels(!), that blasting corners was almost hilariously fun. We actually overtook several bigger bikes (150cc, 155cc, and a 200cc) in the long sweeper – on the outside.
Back on the straighter sections, it was time to relaxed and I backed it off to 90 km/h, while revelling at how smooth the engine was. The suspension also settled down nicely. The seat was also thickly padded and there was nothing sore at the end of the ride.
Who is the 2024 Suzuki Burgman Street 125EX for?
The way we see it, it is the perfect bike for those who commute daily as something that gets you from your home to your workplace and back without drama and fuss. It is a motorcycle that you get on, thumb the starter button, twist the throttle, and off you go. Simples.
It is also a great choice for Mums (and some Dads) who ferry their kids to school. I did exactly that for my son, zipping past the bleary eyed and irritated parents who had to wake up so early only to get stuck in a traffic jam. The brakes were not grabby for a reason, as it avoids ham-fisted riders from locking up the front tyre in panic situations. The smooth, user-friendly powerband and wide comfy seat will boost any kid’s confidence. My son was upset when I returned it. This is saying a lot because I had carried him on all sorts of bikes. How is that for a passenger’s review?
Last but not least, the engine was really fuel efficient, with the fuel consumption indicator hovering around 46 to 52 km/litre for daily urban riding. That equated to a range of more than 250 km on a full 5.5 litre tank . That “adventure” at the Karak Highway and Genting Highlands took a lot more fuel, of course, bringing it down to 36 km/l.
In closing, we found the 2024 Suzuki Burgman Street 125EX befitting its “street” denotation, and the meaning of appreciating the simple things in life, on two wheels.
It is a sight to behold is it not? A rider hanging onto a bike that is leaned way over, knee planted, elbow, even shoulder onto the track’s surface. It is made possible by the technological advances in tyres and motorcycle chassis, and also the unsung hero: The knee slider.
As with all things on the track, the knee slider went through a development process spanning several decades.
Why drag knees on the track?
Dragging the knee allows the rider to gauge how much lean angle he is carrying through a turn.
At the same time, having the torso, bum, and knee off to one side of the bike moves the rider’s centre of gravity (CoG) off the centreline of the bike, thus taking away the rider’s weight from being added to the centrifugal forces acting on the tyres’ contact patches. Too much centrifugal force will cause the tyres’ to wear out quickly and it is also easier for the tyres to lose grip.
Also, with the rider’s CoG off the to the side, the bike leans less in a corner compared to when the rider is sitting in the middle of the seat. This also boosts the tyres’ ability to grip, hence being able to carry more cornering speed and is also relatively safer.
And finally, the rider is able to use that knee to push the bike up ever so slightly off that front tyre’s band of contact patch when it starts to slide (some riders call it “push” or “close”).
When did knee sliding start?
If you see old motorcycle racing pictures prior to the late 70’s, you would see riders sitting straight up on their bikes in corners.
The person who popularised knee sliding on the track was the legendary “King” Kenny Roberts, Sr. Now, he was not the first to do so, because Jarno Saarinen who first did so. The Finnish rider began his career as an ice racer before migrating to road racing. Roberts then witnessed Saarinen moving his body off the centreline of the bike, sticking his knee out in corners, and sliding the rear tyre at the Ontario Motor Speedway in 1972.
Roberts was a dirt track rider himself and used to sliding the bike’s rear tyre, too. He decided to try out Saarinen’s technique, albeit exaggerating his body position by moving his body more off the bike. (Legend has it that he hurt one of his testicles during a dirt-bike crash, hence moving his body as such.) He immediately found that doing so settled down his bike and most famously, the veastly Yamaha TZ750 and the later TZ500 for the corners. Carrying more and more speed into the corners meant that his knee began to touch down on the track’s surface.
Other riders saw how successful he was and began copying his technique and the kneedown cornering technique was born.
Early knee sliders
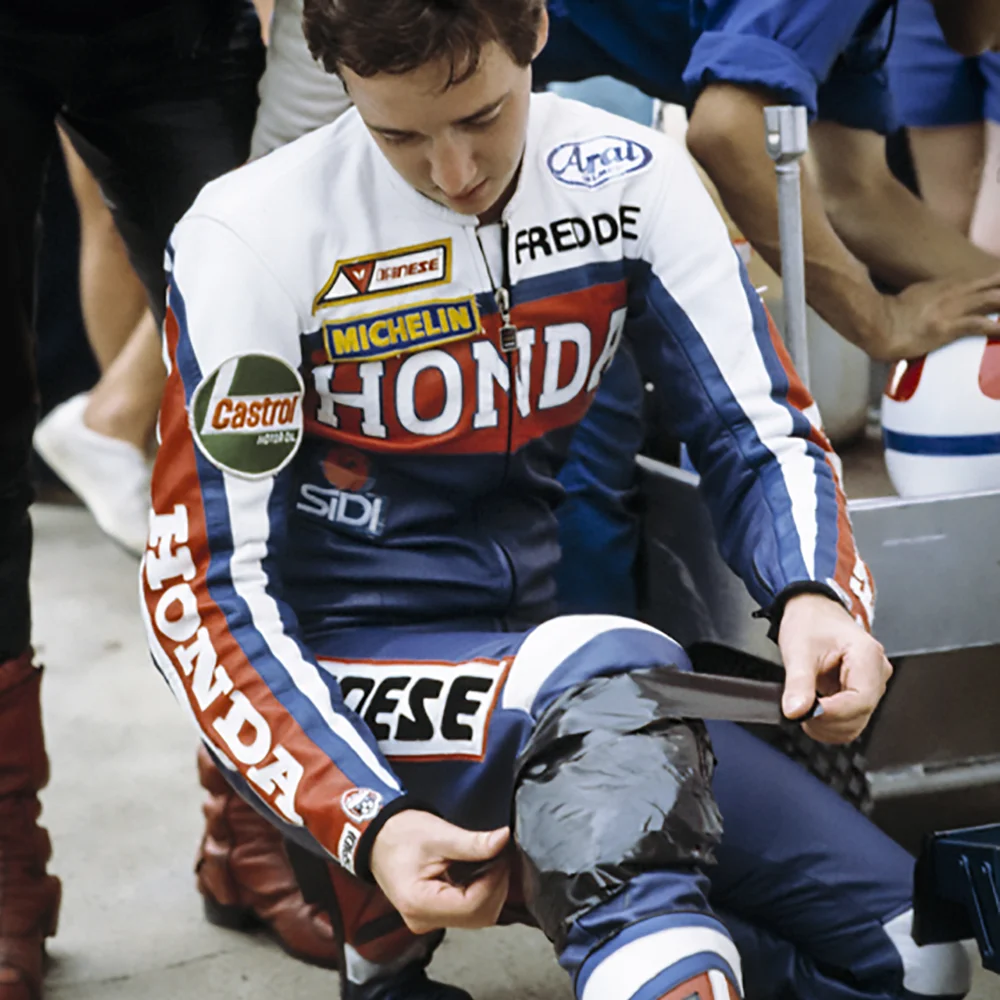
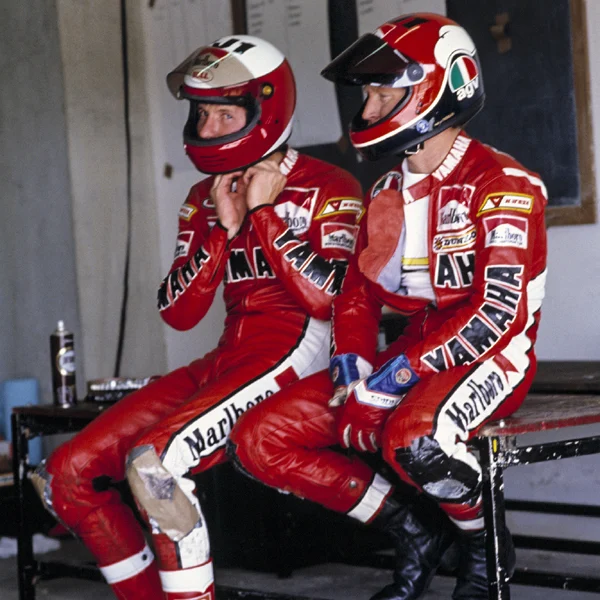
Planting the knees in corners had the friction holing Robert’s leather suit. Besides that, leather does not slide well, and could grab the surface of the track. So he began wrapping the knee region with copious amounts of duct tape.
Freddie Spencer applying duct tape. Lots of it.
Then someone experimented by taping motorcycle helmet visors to their knees. Is slid smoother but also wore out quickly.
Eddie Lawson on the left, Roberts on the right. Notice the helmet visor on Eddie’s knee.
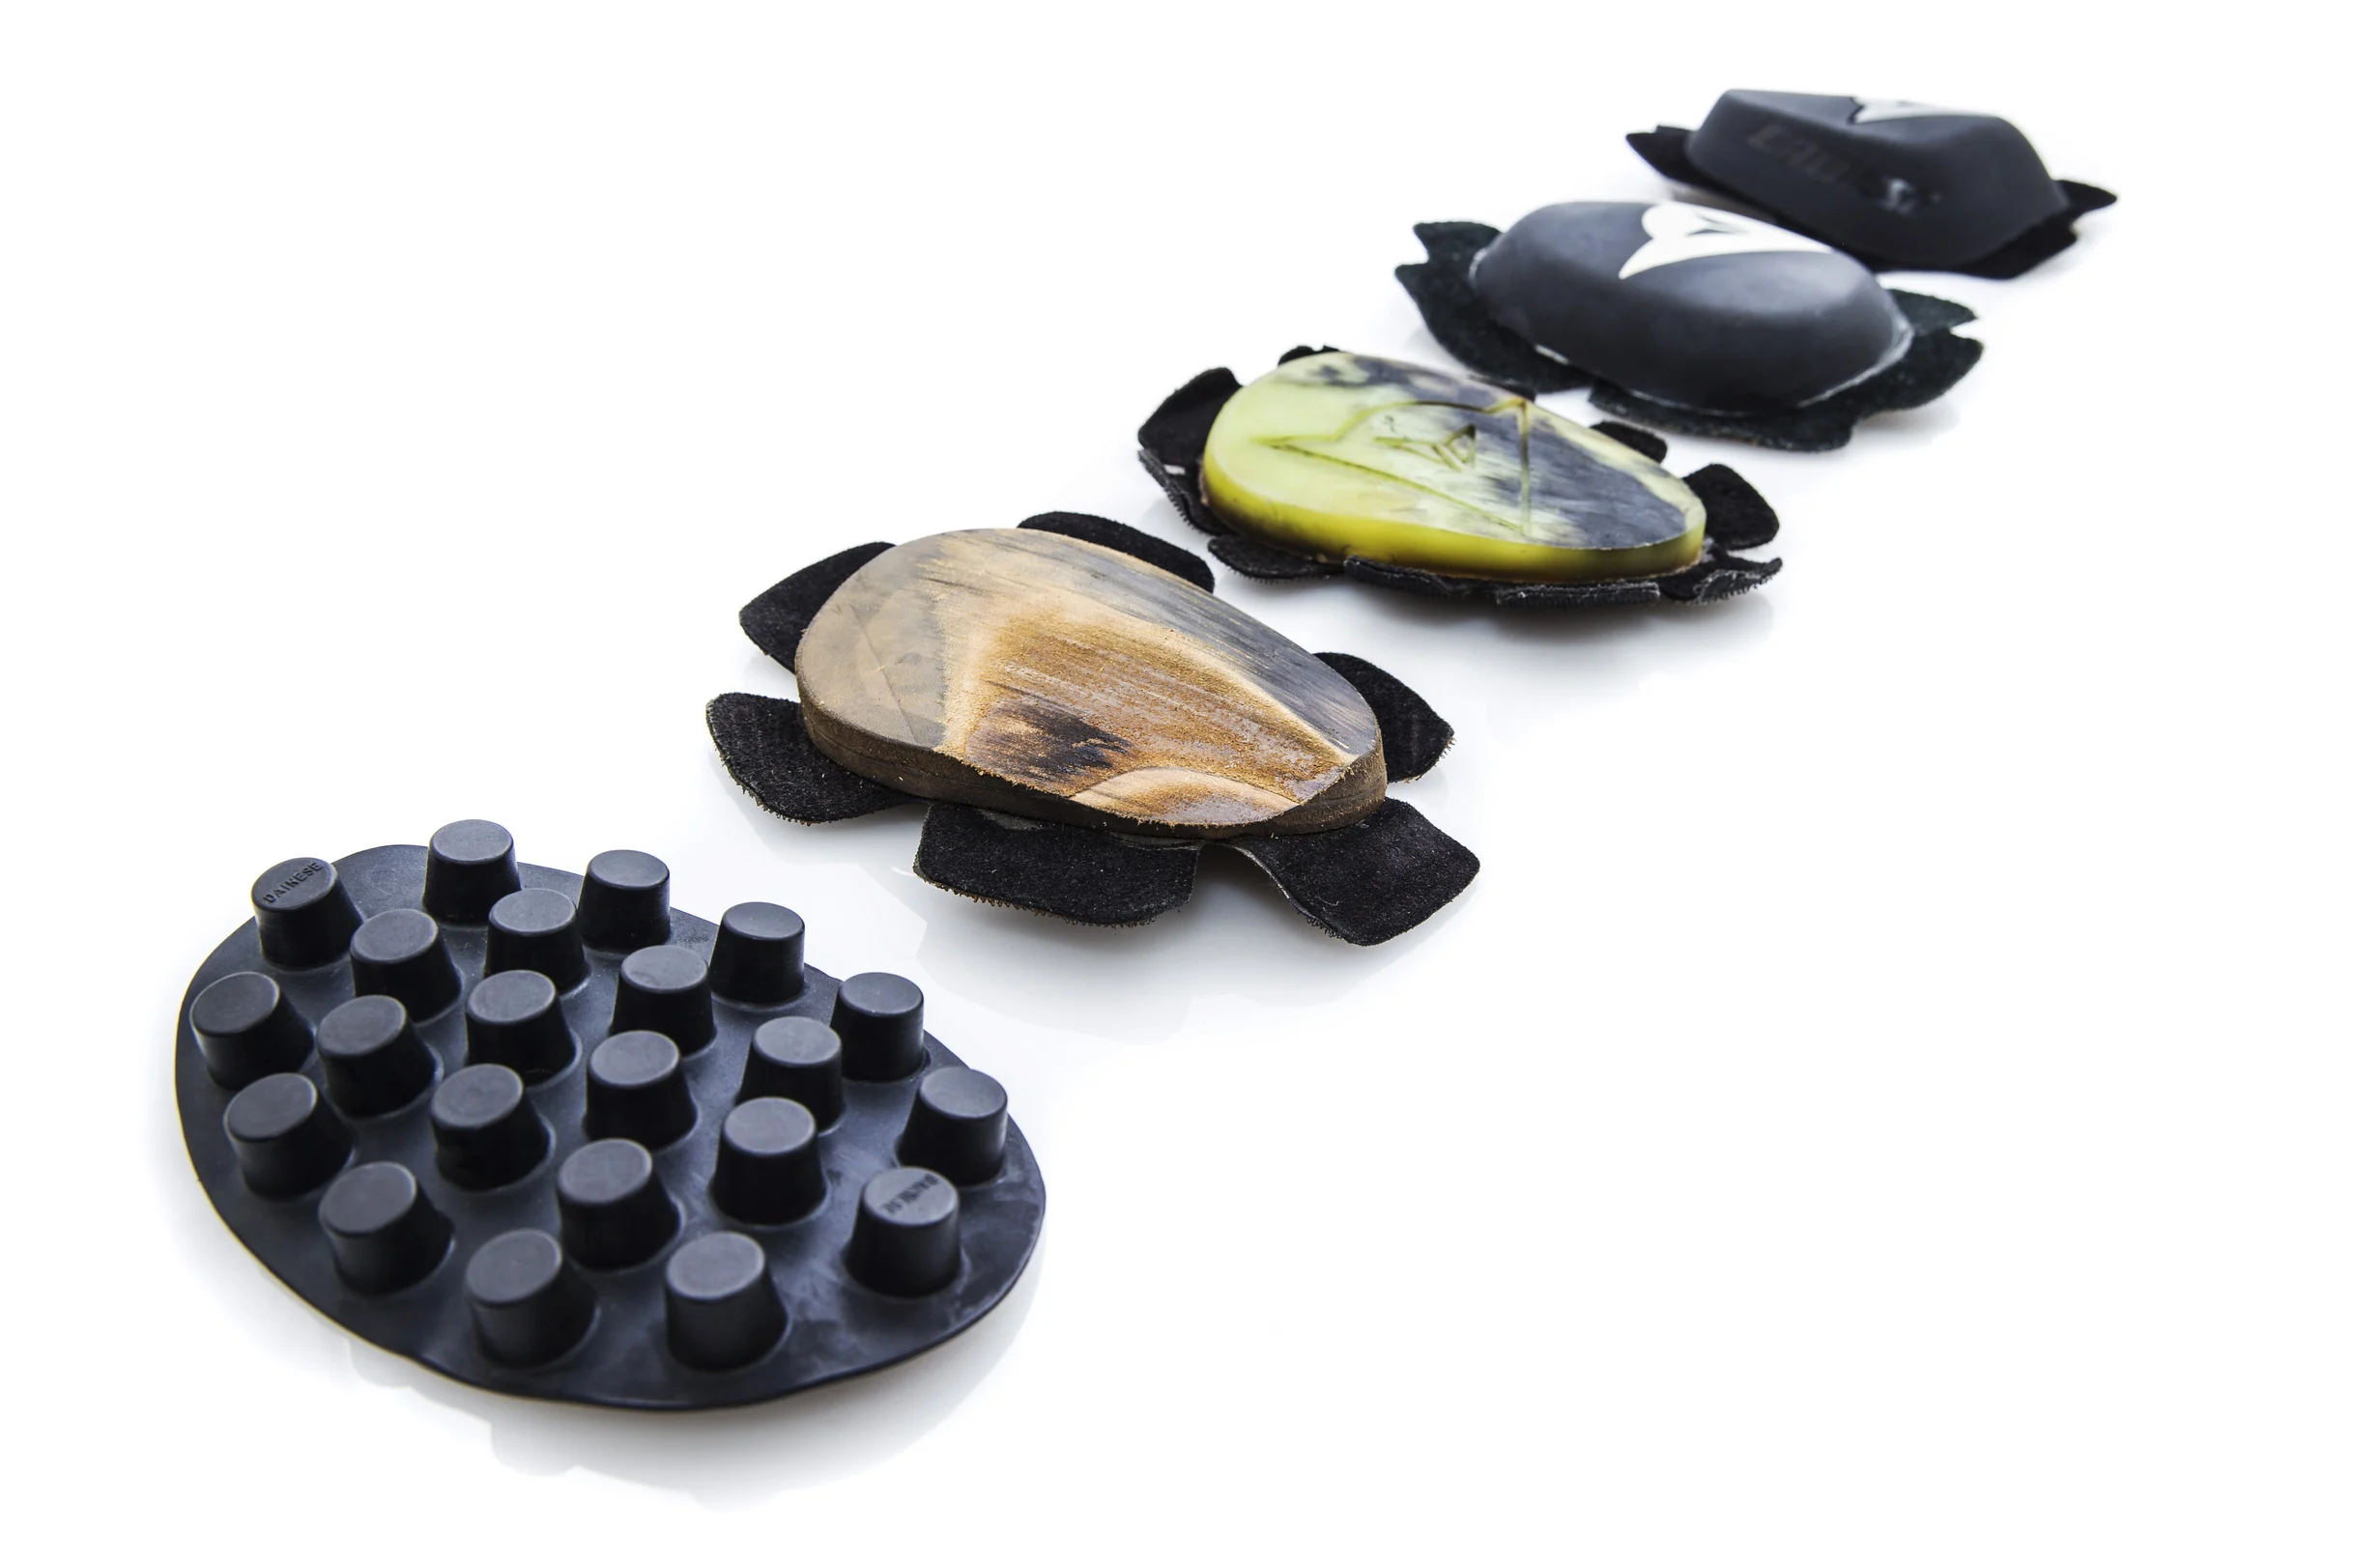
Bear in mind that racesuits had no provision for knee sliders up to this time. Then in 1981, Dainese stepped up by creating a suit with knee sliders stitched in. It had several plastic cylinders poking up from the base, and was dubbed the istrice (porcupine). It proved to be difficult to replace.
The istrice on the left, followed by a leather, and finally plastic knee sliders
Several years later, a suit with Velcro knees pads was introduced. The knee slider was now made of harder leather. Easily replaceable, but not slippery enough for sliding.
In 1986, a new knee slider appeared. It was made of plastic and began to look oval-shaped like what we have now. But the true modern knee slider appeared in 1990 with the shape and materials we see today.
However, several riders continued to voice their objection as the plastic was too grippy. So, suit and knee slider makers kept working at improving the slider’s slipperiness and durability.
Into the new era
Modern knee sliders are made to several criteria: How slippery, how much feel is transmitted to the rider, durability, and, aerodynamics. Also available are rain knee sliders that are thicker so that riders do not lean their motorcycles as much as they do on a dry track.
Oh yeah, elbow sliders and even shoulder sliders are made of the same material.
So, spare a thought for the unassuming knee sliders.
The Yamaha NMAX “Turbo” was recently launched in Indonesia, and the name “Turbo” drew plenty of enquiries which pointed to some confusion. So, let us take a look at how turbo works.
Anyhow, the NMAX “Turbo” does not use a real turbocharger. Instead, it is a mode to switch the CVT into delivering instant torque for speeding up and overtaking.
There are several reasons why a turbocharger is not popular among motorcycles, although there was an era of turbocharged motorcycles.
What is a turbo?
An internal combustion engine requires air in order to work. Air is drawn in, mixed with fuel and combusted. This combustion changes the chemical energy in fuel to thermal energy (heat), which in turn pushes the piston down to rotate the crankshaft (kinetic energy).
However, each piston can pull in so much air. Not enough air means you cannot mix in too much fuel, otherwise the unburned fuel is wasted. So, since there is not enough air and fuel, the engine produces limited torque and power.
The turbo changes this by stuffing in more air, to be mixed with more fuel, so the engine can produce more power.
How does it work?
The basic premise is the turbocharger utilises exhaust gas to compress intake air, rather than letting it go to waste.
To be a little more specific, a compressor in the turbocharger pressurises the intake air before it enters the inlet manifold. In the case of a turbocharger, the compressor is powered by the kinetic energy of the engine’s exhaust gases, which is extracted by the turbocharger’s turbine.
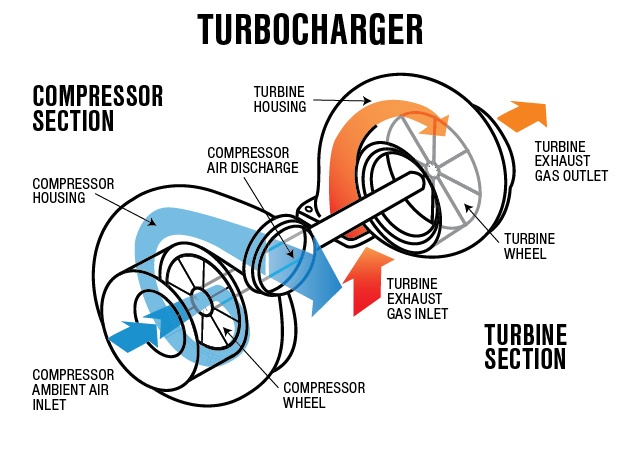
The main components of the turbocharger are:
Turbine – usually a radial turbine design.
Compressor – usually a centrifugal compressor.
Centre housing hub rotating assembly.
Turbine
The turbine section (also called the “hot side” or “exhaust side” of the turbo) is where the rotational force is produced, in order to power the compressor (via a rotating shaft through the centre of a turbo). After the exhaust has spun the turbine it continues into the exhaust and out of the vehicle.
The turbine uses a series of blades to convert kinetic energy from the flow of exhaust gases to mechanical energy of a rotating shaft (which is used to power the compressor section). The turbine housings direct the gas flow through the turbine section, and the turbine itself can spin at speeds of up to 250,000 rpm.
Compressor
The compressor draws in outside air through the engine’s intake system, pressurises it, then feeds it into the combustion chambers (via the inlet manifold). The compressor section of the turbocharger consists of an impeller, a diffuser, and a volute housing.
Centre hub rotating assembly
The centre hub rotating assembly (CHRA) houses the shaft that connects the turbine to the compressor. A lighter shaft can help reduce turbo lag. The CHRA also contains a bearing to allow this shaft to rotate at high speeds with minimal friction.
Some CHRAs are water-cooled and have pipes for the engine’s coolant to flow through. One reason for water cooling is to protect the turbocharger’s lubricating oil from overheating.
The cons of a turbocharger
Every engineering solution creates another problem, so it is all a compromise. The same goes for the turbocharger, hence its limited use.
Turbo lag
Turbo lag refers to the delay that occurs between pressing the throttle and the turbocharger spooling up to provide boost pressure. This delay is due to the increasing exhaust gas flow (after the throttle is suddenly opened) taking time to spin up the turbine to speeds where boost is produced (due to the turbine’s inertia). The effect of turbo lag is reduced throttle response, in the form of a delay in the power delivery.
Then, when the boost pressure is sufficient, the engine’s torque suddenly increases and the vehicle takes off, sometimes surprising the operator.
There are ways around this lag, of course, but it requires a lot of tech (read: expensive).
Heat
Needless to say the system generates lots of heat, necessitating the use of oils that could stand up to the torture. Hence, only synthetic engine oils are recommended.
As mentioned in a previous article, motorcycle rider gear such as the helmet, jacket, pants, gloves, footwear must conform to a certain standard. And you may have seen such a tag above attached to a clothing item. But what is and why is CE-rated protector in motorcycle gear important?
By “protector” we mean the padding held in the areas where jacket, pants, or race suit that are prone to impact such as the elbows, shoulders, back, chest. However, there must a standard or standards to govern the tests and results otherwise manufacturers may as well make and claim whatever they wish.
What is the standard?
The standard which is the most prevalent the world over is CE “Conformité Européene” or EN “European Norm” EN 1621. Please refer to the picture below which is a replication of the label you can find in a motorcycle riding gear.
The motorcycle symbol shows that this is motorcyclists’ protective clothing against mechanical impact.
Below and outside the box, you can find these codes EN 1621-1:2012.
EN1621-1 mean the padding is for any of these areas:
S – Shoulder.
E – Elbow.
H – Hip.
K – Knee.
K + L – Knee, upper and middle tibia.
L – Shin (front of leg) below knee protector.
KP – Knuckle protection.
2012 in the code means the year the EN 1621 was revised. It DOES NOT denote the year the item was made.
Going back into the box, underneath that motorcyclist symbol:
E/K TYPE A means this padding can be used as the elbow or knee protector.
TYPE A refers to the coverage area:
A – reduced coverage area for special applications.
B – normal coverage area.
If you see EN1621-2, the armour is for back protection only. However, there are different codes for different areas of coverage:
B or FB – Full back protector.
CB – Central back.
L or LB – Lumbar only.
The EN1621-3 standard applies to chest protectors.
Do note that gear manufacturers may or may not list the entire code in the garment or armour itself. However, you may find the full information on the cards attached to the piece of new gear.
Level of Protection
There are two levels of protection, Level 1 and Level 2. The amount of force transmitted through determines the level. For example:
Level 1 – Maximum transferred force must be below 18 kN, and no single value above 24 kN.
Level 2 – Maximum transferred force must be below 9 kN, and no single value above 12 kN.
This means a certified Level 2 armour is more protective than one that’s certified as Level 1.
Optional criteria
On this note, certain riding gear manufacturers may also describe the level of protection for other criteria, for example:
Performance Level 1 or 2.
Abrasion resistance Level 1 or 2.
Impact cut resistance Level 1 or 2.
Burst strength Level 1 or 2.
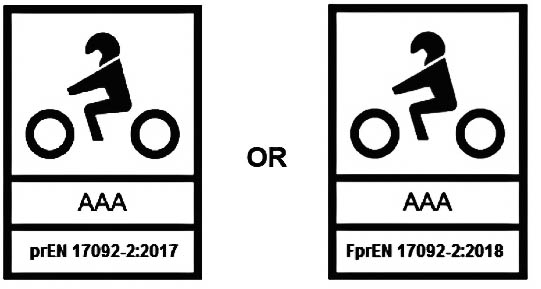
UNI prEN 17092-X:2017
The CE authorization body has implemented a new standard after 2018, although it does not appear on all riding gears, depending on where the item is sold in. This new standard encapsulates the level of protection within the code itself, unlike the previous EN1621-X, which only alludes the area of protection.
For example, it means Class AAA (the highest level) if you see the code prEN 17092-2:2017 (2017 being the year the gear was certified).
Class AAA (prEN 17092-2:20XX)
Offers the highest level of protection for highest level of risk.
Class AA (prEN 17092-3:20XX)
Second highest level of protection.
Class A (prEN 17092-4:20XX)
Third highest level of protection. Comfortable for street riding on a daily basis.
Class B (prEN 17092-5:20XX)
Abrasion protection equal to Class A but without impact protection.
Class C (prEN 17092-6:20XX)
The least level of protection. Some armors may fall into this category as they resist impacts but not abrasion.
Conclusion
Once again, although the CE/EN standard for motorcyclist gear is not enforced in Malaysia, please do not take these ratings lightly, as it means that the protector was tested and found to provide some protection.
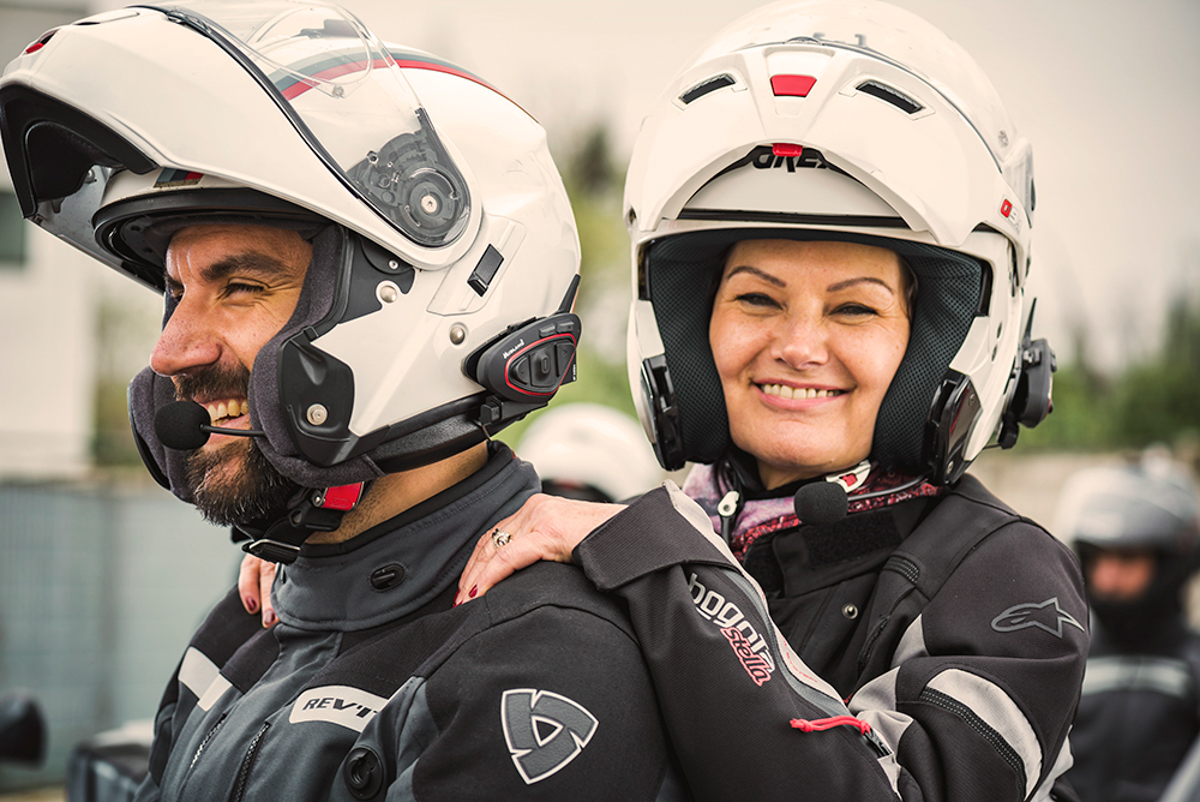
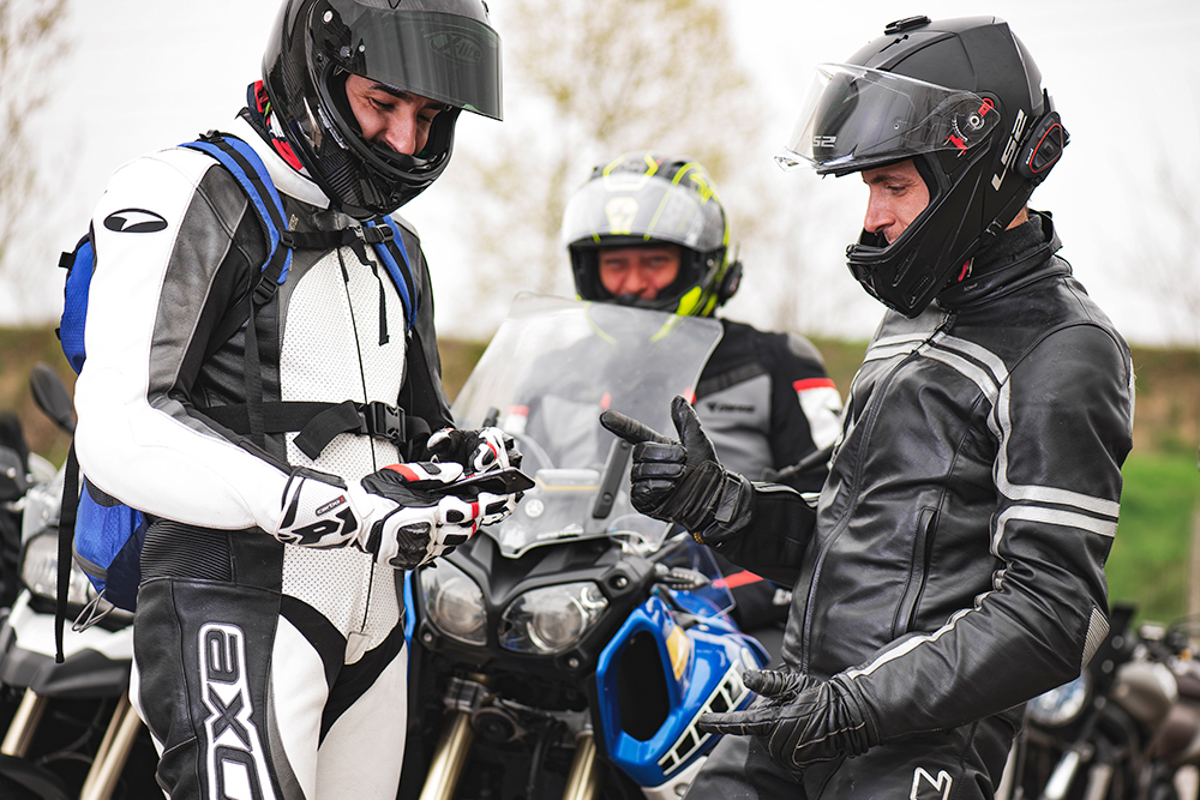
The advent of the Bluetooth communicator following the advancement in smartphone technology has added much to the enjoyment of riding.
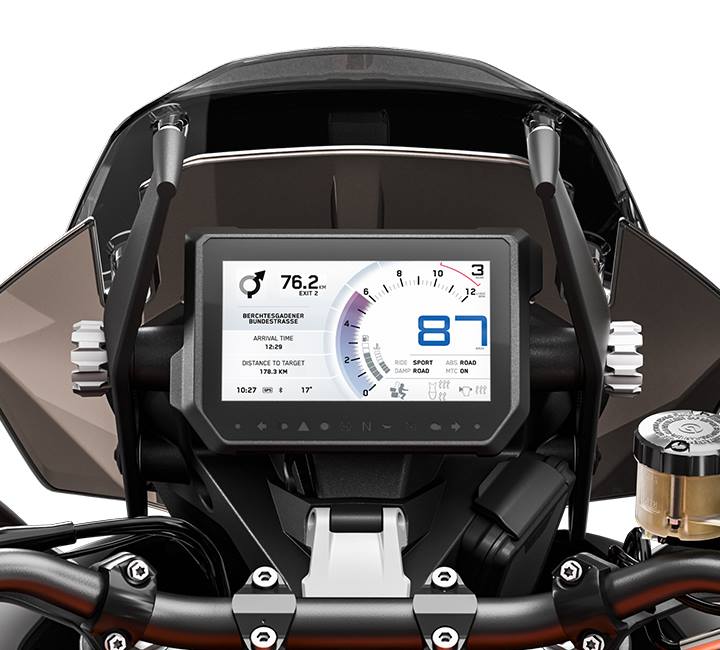
But it also prompted motorcycle manufacturers to adopt it and create a new feature on their motorcycles. The communications or media suites of certain bikes connect to the user’s smartphone to stream music, make outgoing and receive incoming phone calls, and even provide turn-by-turn navigation via their instrument cluster (LCD or TFT screen) and to a Bluetooth communicator.
Several helmet manufacturers have also designed their helmets to fit such device.
So now, the communicator is no longer a luxury item, instead it is a necessity for motorcycle riders. I will honestly say that I was against using the device when it first appeared on the market. Now, I never ride anywhere without one.
Here are several benefits of using the device.
1. Communication between rider and pillion
This is the obvious place to start. Please allow me to recount an experience.
My missus and I were riding to Penang. As we reached Sungai Perak, she called out to me by pointing ahead. I thought she was pointing at the river, so I turned around and said, “Yeah, nice river.” Then she said something which very muffled in the helmet. I couldn’t hear her. Passing the bridge, she began tapping my vigorously so I pulled to the side of the road. It was then when she yelled, “I WANTED TO GO TO THE BATHROOM!”
Needless to say it escalated from there. Me being blamed for not paying attention, that why was she fated to have a hearing-challenged husband, yada, yada, yada.
But it all changed when we installed Bluetooth communicators in our helmets. No more miscommunication, no more yelling into the wind, no more fighting.
This is also why more and more advanced riding schools are using such device as it provides clear communications between the instructor and students.
2. Safety
Whether you are using Waze, Google Maps, Petal, or any other navigation app, it sometimes warns you – audibly – of upcoming hazards that other nice motorists keyed in. You can hear this warning when you are driving, but you cannot do so when you are riding your motorcycle – unless you connected your phone or TFT to a Bluetooth communicator.
These voice prompts also prepare you the distance to the next turn or destination. As such, you do not have to keep down at the phone or screen.
Also, using a communicator, especially one which lets you issue voice commands via your phone’s Siri or Google Assistant, or through its built-in voice command feature, keeps you eyes on the road and hands on the handlebar.
3. Staying awake and alert
Droning for kilometre after kilometre on the highway while being baked by the sun will turn you brain off very soon, even if you are riding on an intercity highway. So, stream some of your favourite songs or listening to a radio station breaks the monotony.
However, we advise you to consciously switch between mental modes on where you are riding and traffic conditions, when you have the communicator on. For example, you can sing along to a song on the open highway, but push the music in the background and focus on riding when you are in populated areas or difficult conditions i.e. the city, kampungs, in the rain, etc.
4. Group dynamics and safety
It is especially helpful for every participant or at least among the key individuals such as marshals in a convoy to have a communicator. Hand signals are sometimes not enough, or some individuals in the middle of the convoy are lazy to convey them from the convoy’s leader.
Or in the situation of being separated, which always happens. The separated groups will find it difficult to reach each other as one group may be riding while the other group is trying to call. This will, without a doubt, lead to some sour faces.
5. Never miss a call
While this was not why I got a communicator in the first place, hence placing it last on the list. However, I do appreciate the fact that I can receive important calls while I am riding.
You probably are already aware that reputable motorcycle gear such as jackets, pants, gloves, race suits, helmets are CE approved. And yes, there is also a CE standard for motorcycle footwear.
As you may be aware by now, the European standards committee is very serious when it comes to safety; so much so that their standards have been adopted by the United Nations. The CE mark is not something to be taken lightly, because insurance companies certain European countries will deny claims to injured motorcyclists found not wearing CE-certified gear.
CE standard for motorcycle footwear
The current CE standard for motorcycle footwear is EN 13634:2017. This is the third and latest revision after the standard was established in 2002. The revisions concerns how the shoes and boots are tested besides other safety criteria.
The label shows that this is a personal protective equipment (PPE) for motorcycling use.
The CE standard for motorcycle footwear, EN 13634:20XX. The year at the end notes the year of the EN 13634 standard was revised, in this case, 2017. It DOES NOT denote the year the footwear was made.
Height of the footwear. “1” is for ankle height, while “2” is for tall boots that cover the shin. Some manufacturers forgo this digit.
Level of abrasion resistance. The footwear is divided into two areas: Area A includes the sole, front and back of the boot. Area B includes all other areas outside A. Three samples are cut from each area and they are held against a moving abrasive belt. Thus, the abrasion level is determined from how soon the material develops a hole.
Level 1 means the Area A sample lasted a minimum of 1.5 seconds while the Area B sample lasted a minimum of 5 seconds.
Level 2 is certified when the Area A sample lasted at least 2.5 seconds, and Area B lasted a minimum of 12 seconds before holing.
Impact cut resistance – how well the footwear holds up against sharp objects. A blade is mounted to a block which is then dropped at different speeds onto the footwear’s Areas A and B.
For Area A, the blade is dropped at 2 m/s. The blade must not penetrate more than 25mm to earn Level 1 and Level 2 rating.
For Area B, the blade is dropped at 2.8 m/s. Level 1 approval is accorded if the blade does not protrude more than 25mm. Level 2 approval is given if the blade does not go through more than 15mm.
Transverse rigidity – The strength for the footwear in resisting being crushed i.e. motorcycle dropping onto the wearer’s foot.
The widest part of the footwear is positioned between two compression plates that presses together at 30 mm/min. An apparatus records the force required to compress the sole. The machine is stopped when the plates stop compressing or the force remains constant or the sole has been crushed by 20mm. The test is repeated three times.
If a force less than 1kN compressed the sole to 20mm, the footwear fails the test. If the force was above 1kN to 1.4kN, the footwear is certified at Level 1 for transverse rigidity. If 1.5kN or higher was required to compress the footwear by 20mm, it gets a Level 2 pass.
Optional tests
Manufacturers may opt to submit their products for additional tests. The passed criteria will be printed on the label beneath the mandatory boxes.
IPS/IPS – Impact protection for the ankle or shin. The footwear is cut open at the sole and the protector is subjected to a force of 10 joules. The protector must not transmit more than 5kN through it. Should the ankle protector pass, IP will be printed on the label. If the shin protector passes, IPS will be indicated.
WR – Water resistance. There are two ways of testing for this. The first is a person donning the footwear and walking a total of 1km in shallow water. Another method is by fixing the footwear to a machine with toes and replicating 4,600 steps while submerged in water. The area of dampness inside the footwear must not exceed 3cm2.
FO – Fuel and oil resistance on the sole. The sample footwear is first weighed before being soaked in fuel for 22 hours. It is then removed and weighed again. The new weight should not increase more than 12%.
SRA/SRB/SRC – Sole’s slip resistance. The tests are carried out with a mechanical heel placed at a 7-degree angle. If the footwear’s label shows “SRA,” it passed on a ceramic tile surface covered with diluted soap. “SRB” means steel floor treated with glycerol. “SRC” means the footwear passed both the SRA and SRB tests.
Breathability of upper parts – If the footwear’s label has a “B” on it, it has passed the test for moisture vapour escape.
WAD – Water absorption/desorption of inner. The footwear is tested to see how much water gets soaked into the inner and how much of that is released.
In closing
Do consider wearing CE tested footwear when you ride because they were exhaustively tested before being approved for sale.
Granted, there are also motorcycle footwear in the market without without CE approval but there is no telling how well they will protect your leg and feet in any accident.
And no, your Nike Air Jordan is not CE certified for motorcycle riding.
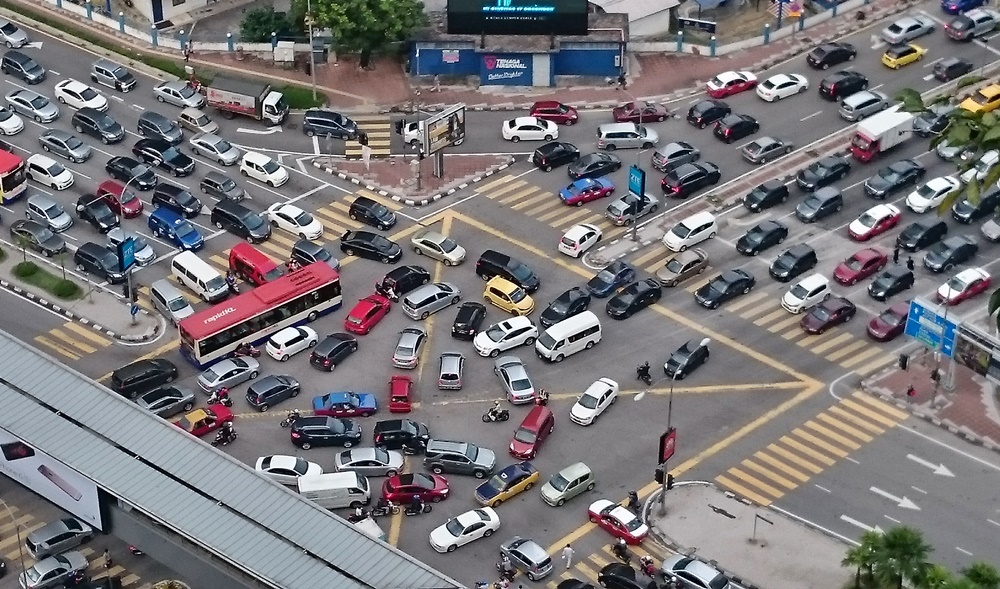
We posted a news item about obstructing the traffic offences being the most during Operasi Hormat Undang-undang (Ops HUU) which is currently running. So much so that a total of 15,075 summons related to the offence were issued in just seven days.
Accordingly, it is only appropriate that we look at the definition of the offence of “obstructing the traffic” more closely.
What does “obstructing the traffic” mean?
Obstructing the traffic refers to actions that interrupt, prevent, or restrict the smooth flow of traffic on the road.
What is classified as a traffic obstruction offence?
These offenses are governed by Malaysian traffic laws, such as the Road Transport Act 1987, and may result in legal action such as a summons, fine, or other disciplinary action against the responsible party. The purpose of this enforcement is to ensure the safety and smoothness of traffic for all road users.
This can include various types of errors such as:
Illegal parking: Parking a vehicle in a place that is not allowed or that obstructs traffic, such as at an intersection, in a pedestrian area, or in a no-parking zone.
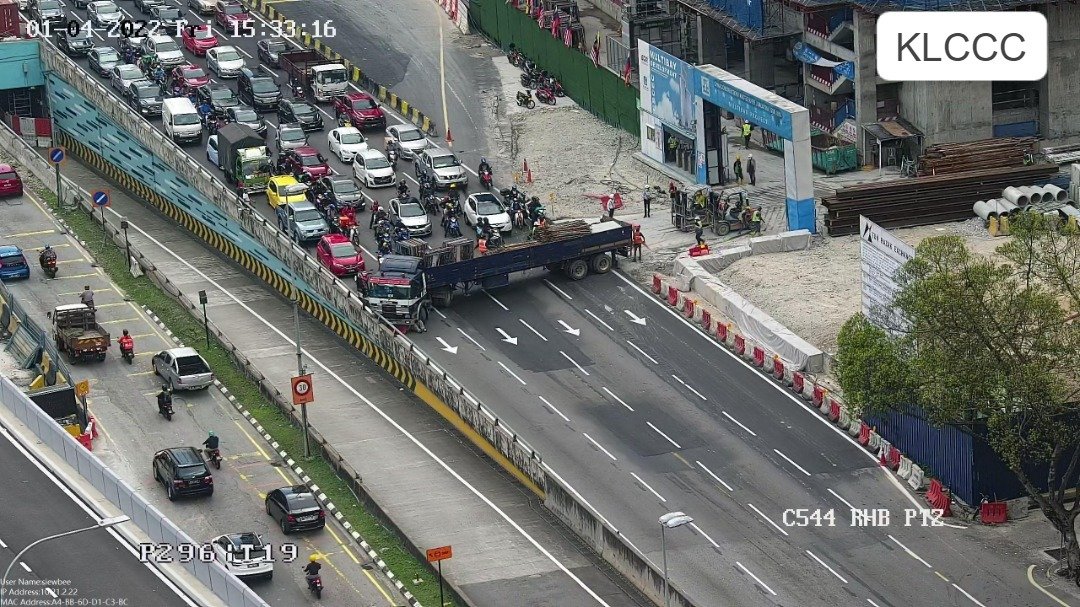
Abandoning damaged vehicle/vehicle involved in an accident: Leaving a damaged vehicle or one involved in an accident in the middle of the road without taking steps to remove it or without giving adequate warning to other drivers.
Using the emergency lane: Using the emergency lane for purposes other than an actual emergency, such as cutting through heavy traffic.
Stopping in the yellow box: Entering and stopping in a yellow box when conditions do not allow a smooth passage is an offence.
Unlawful activities on the road: Carrying out activities such as selling goods, waiting for passengers, or any other activity that obstructs the flow of traffic in unauthorised areas.
Temporary construction or obstruction: Placing cones, barricades, or any temporary structure on the road without a permit that may impede or block traffic.
Unmanaged traffic congestion: Not taking appropriate action to manage traffic congestion during major events, accidents, or emergency situations.