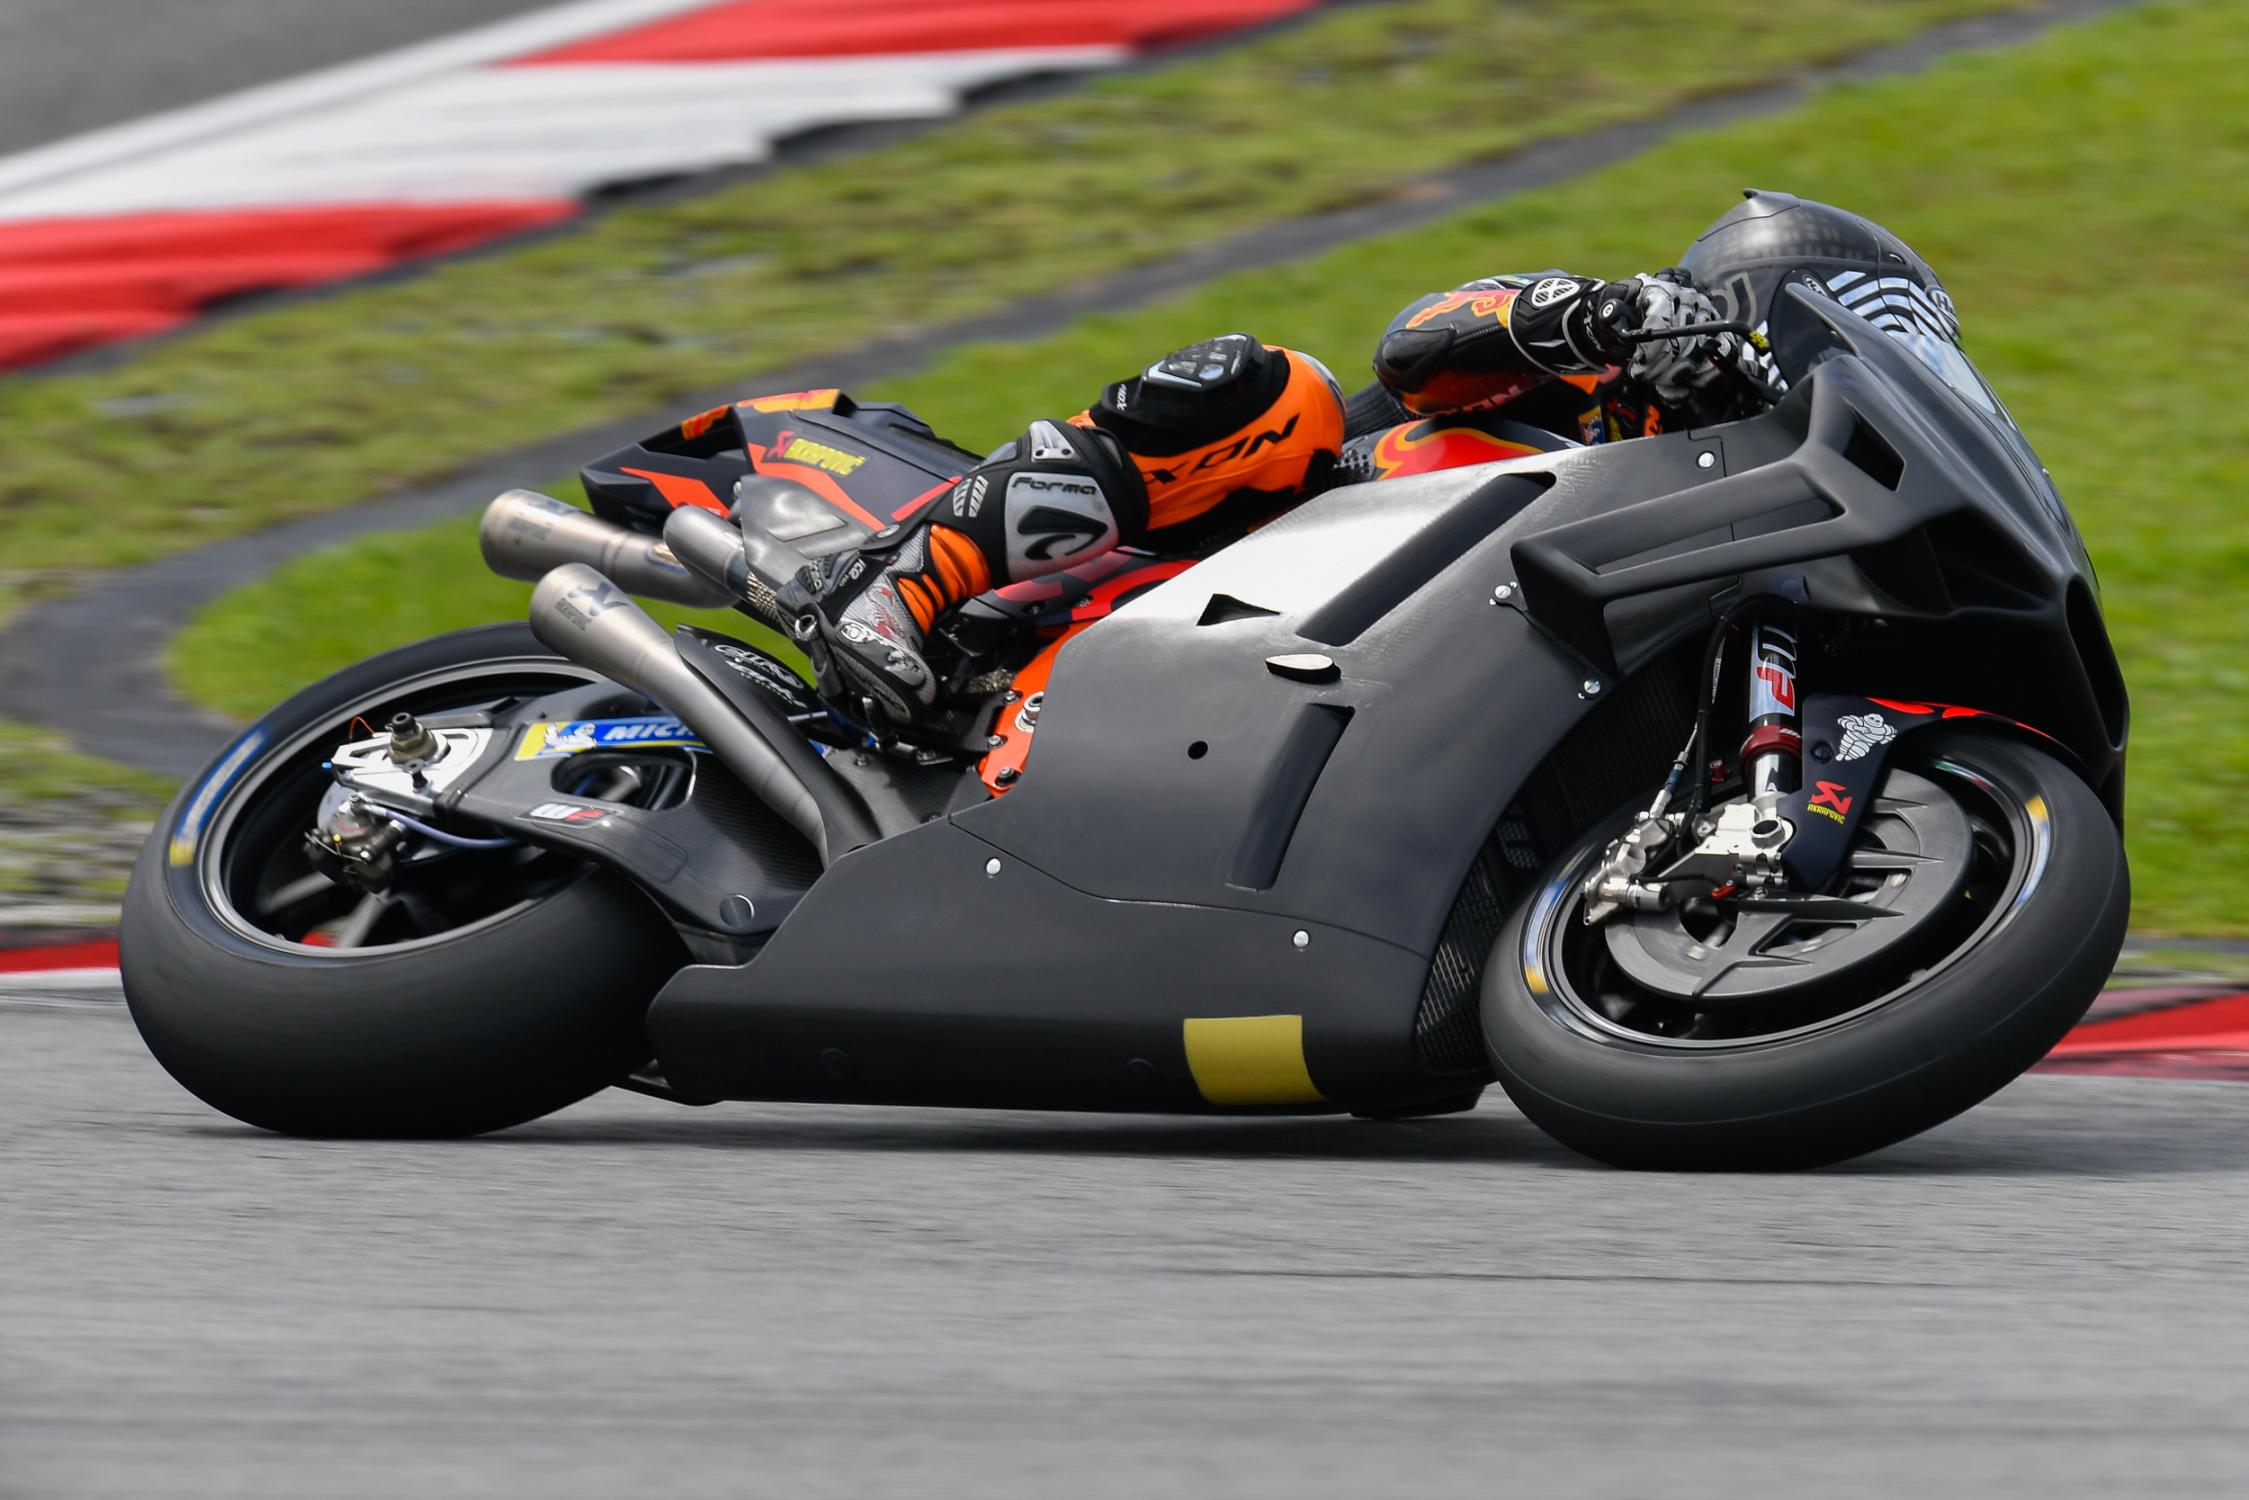
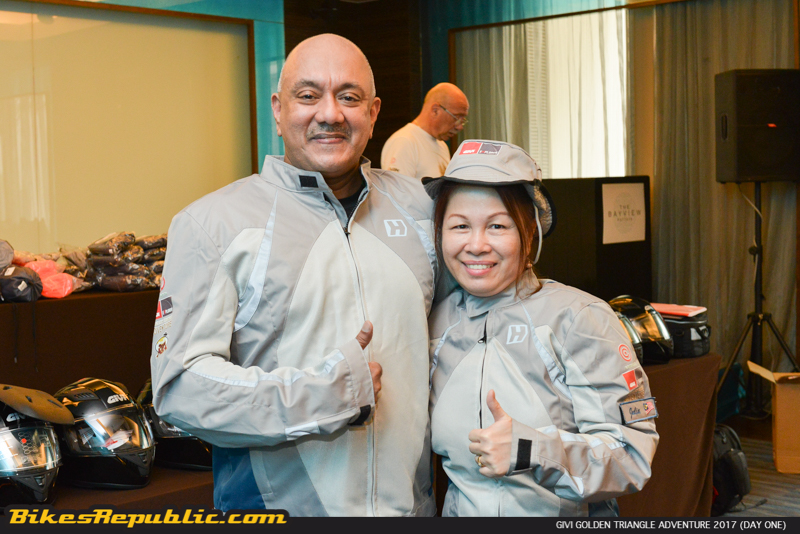
Dani Pedrosa blitzed the field, beating out a late charge by the Ducati factory riders.
Dani had always been strong and won at Sepang.
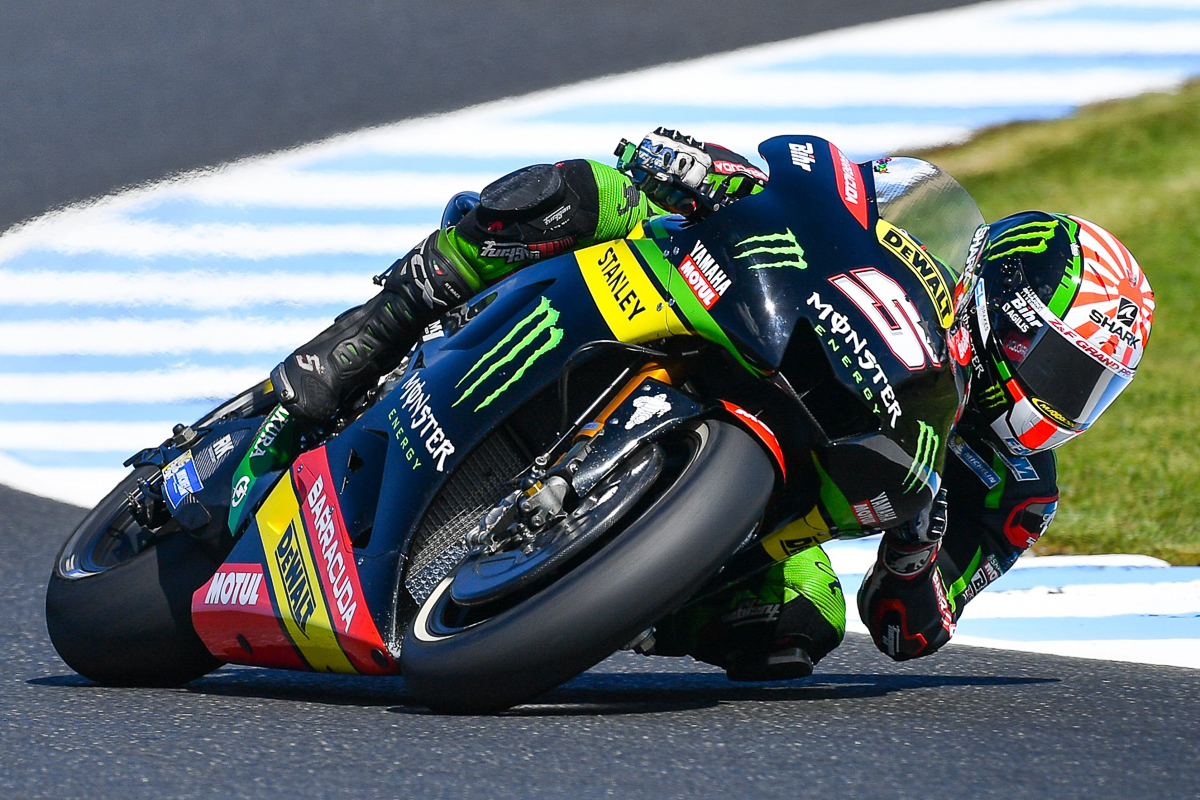
Early chargers Yamaha Factory Team were pushed down the order.
Dani Pedrosa staved off the Ducati charge to end the first day of the 2018 Sepang Official MotoGP Test as the fastest rider.
The late afternoon session saw a thrilling tussle between Honda, Ducati and Yamaha factory teams, with their riders swapping fastest times.
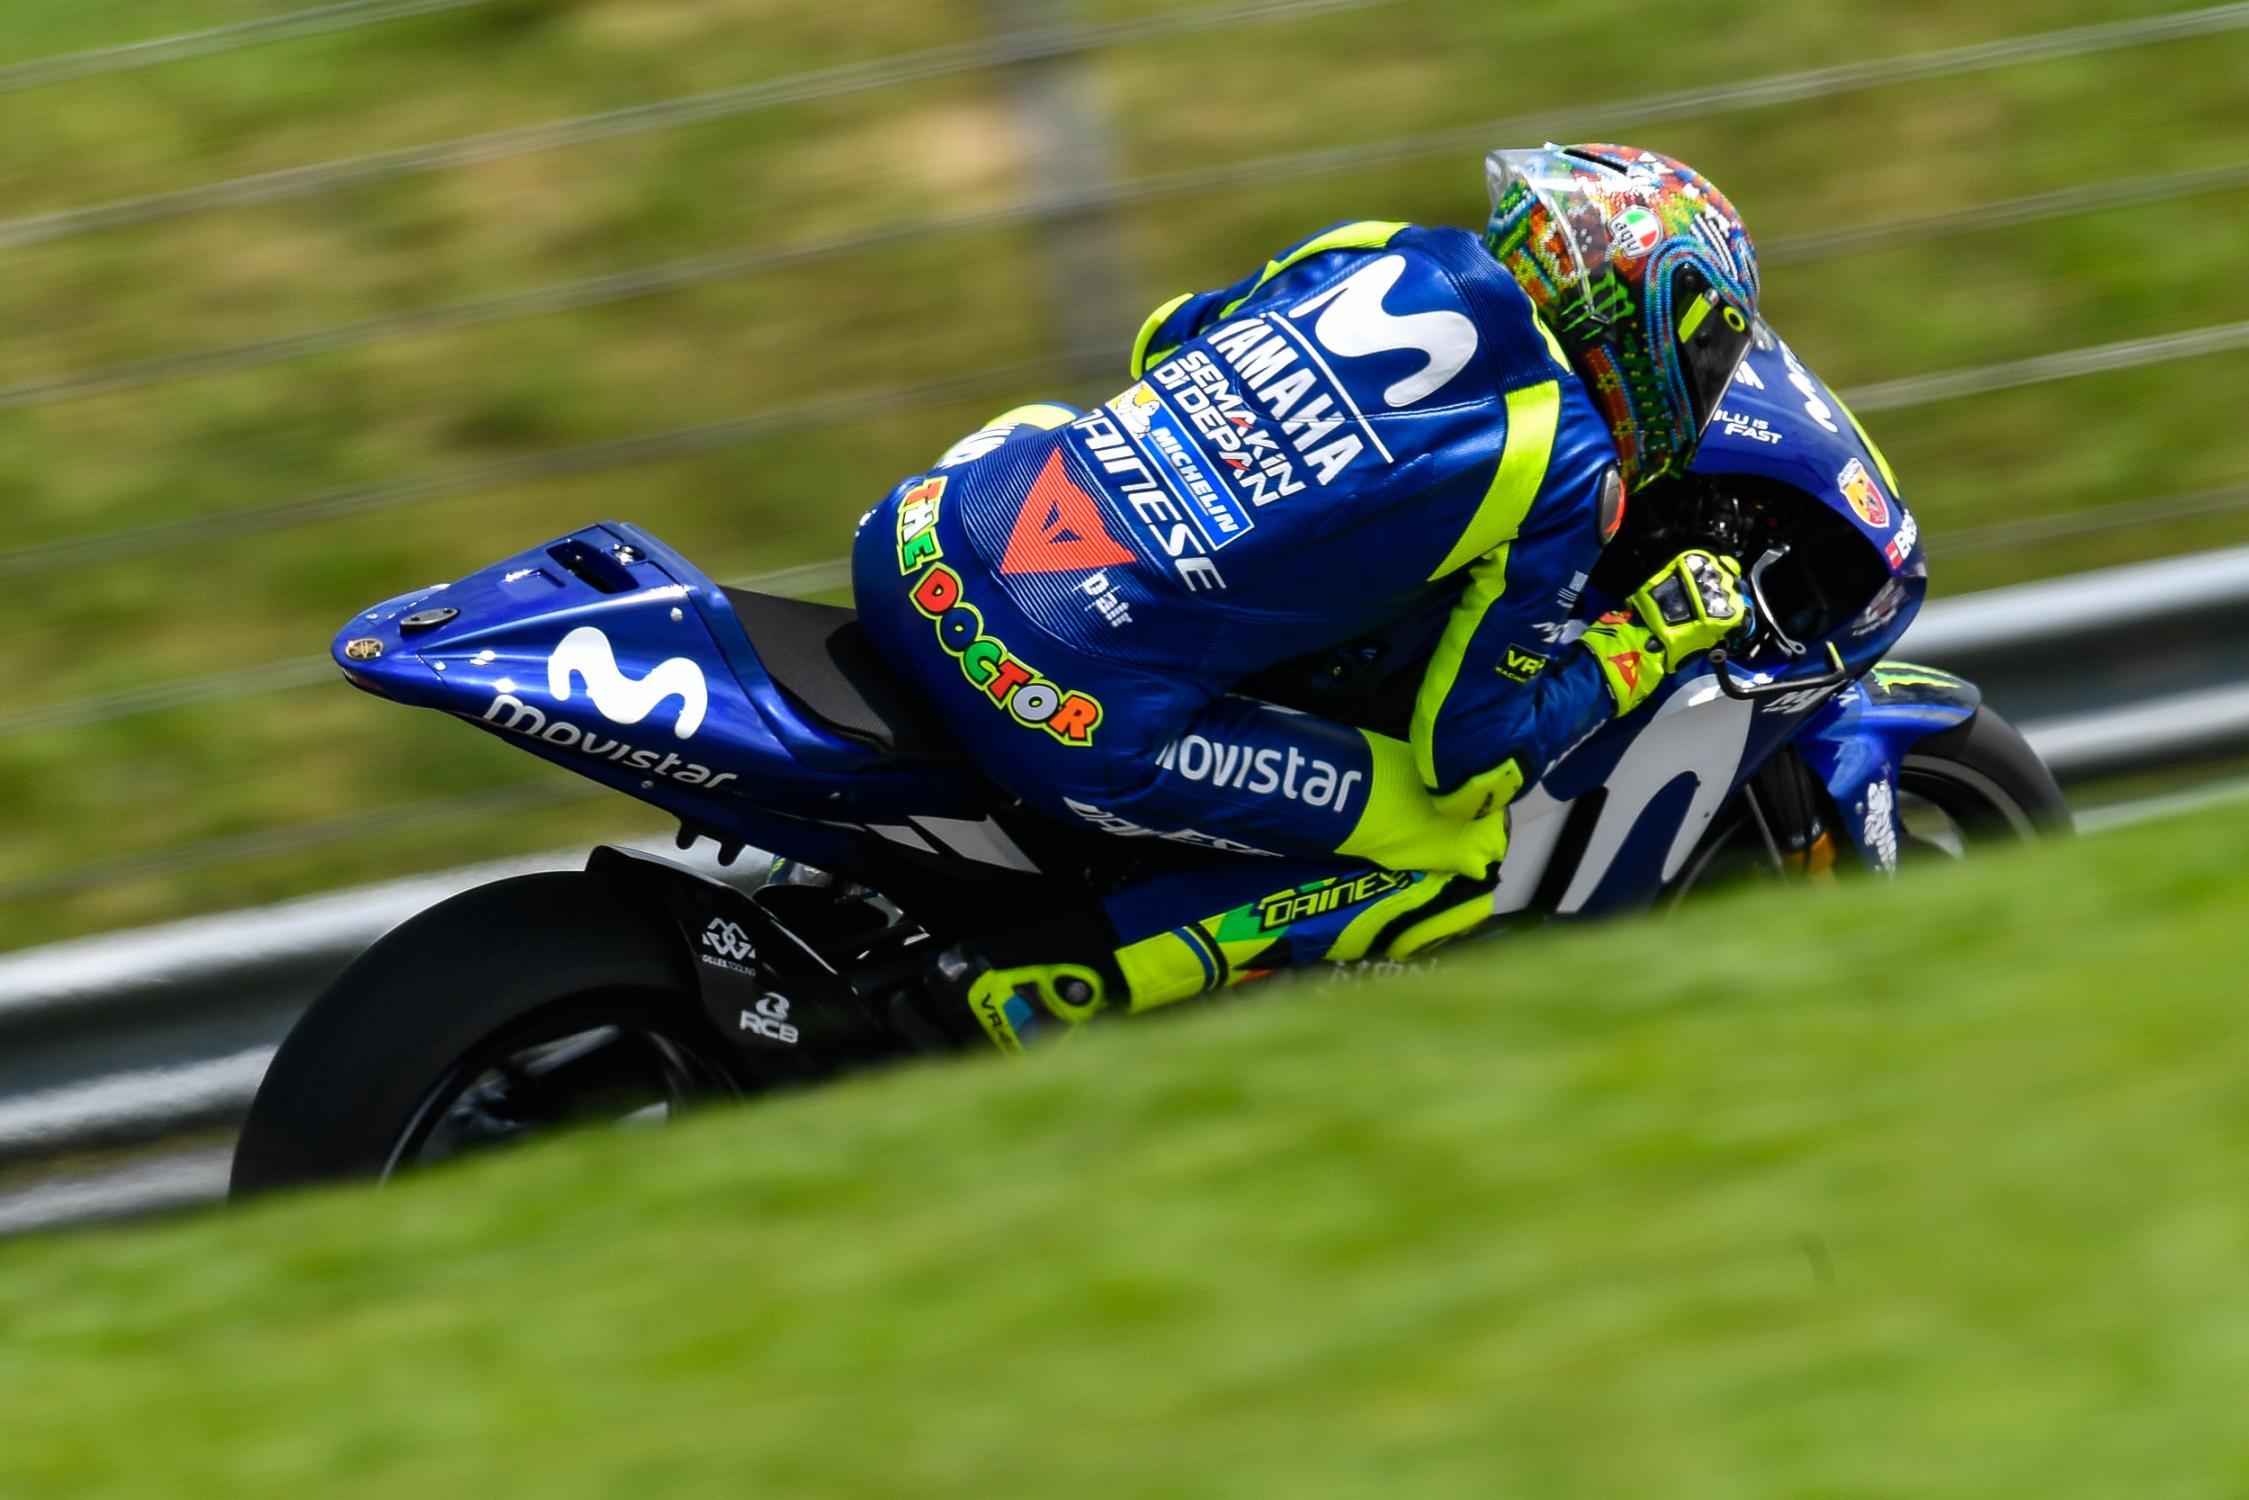
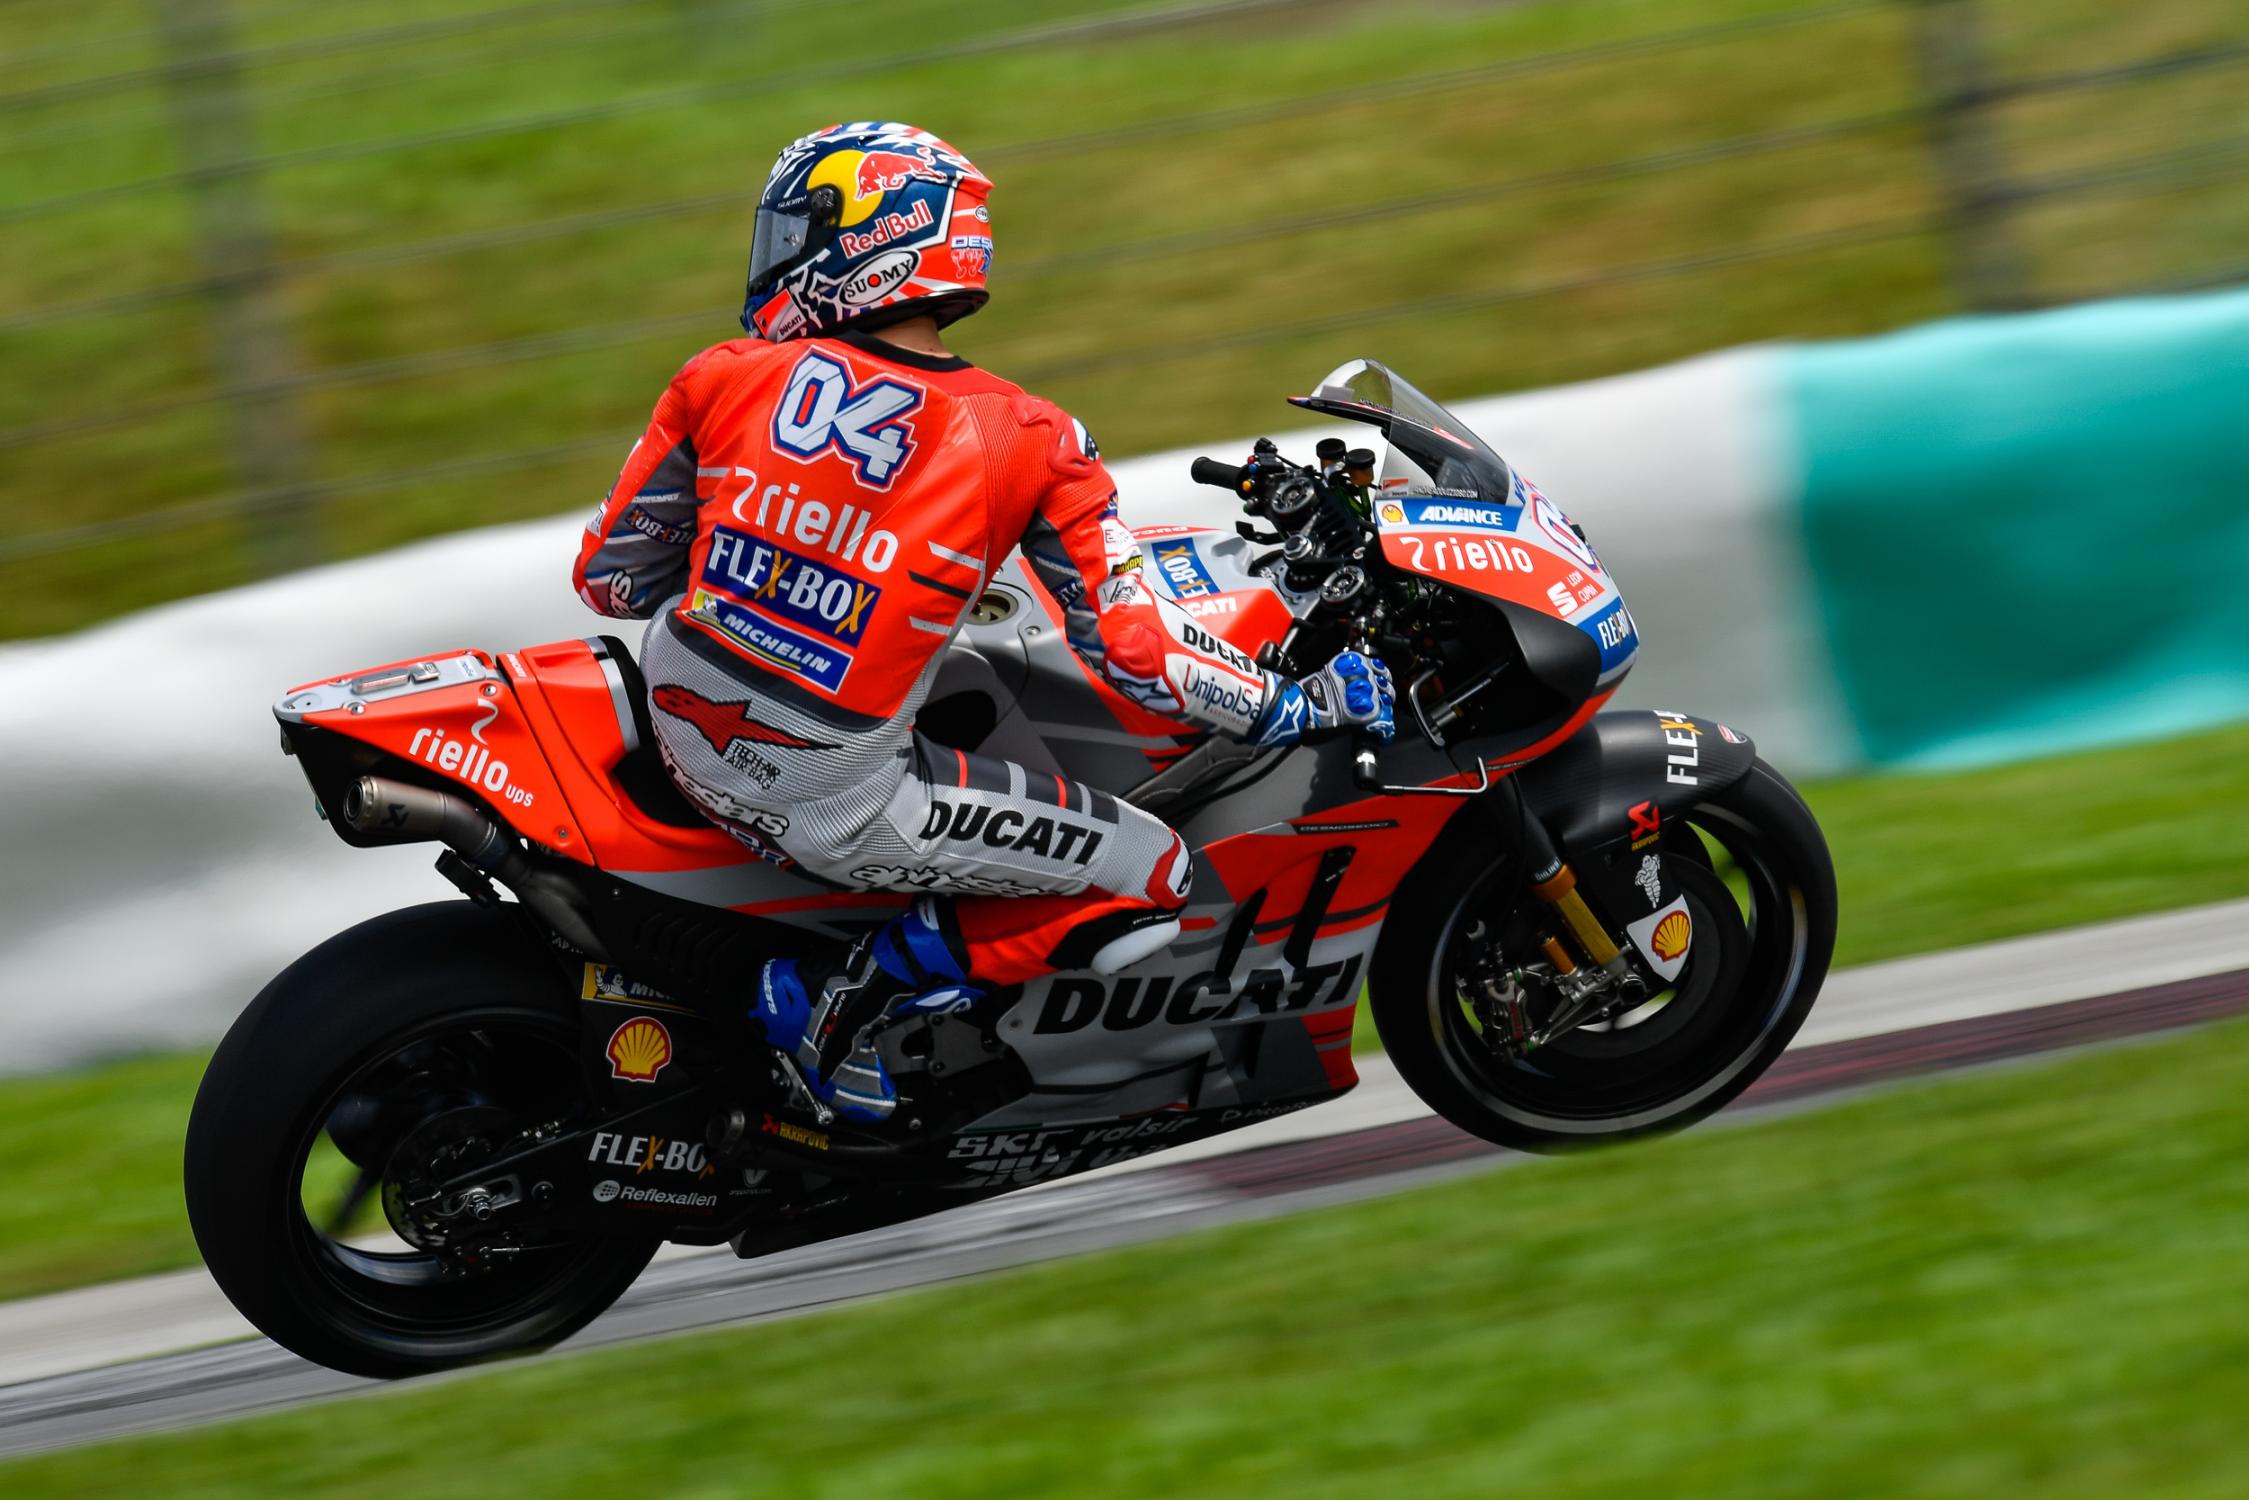
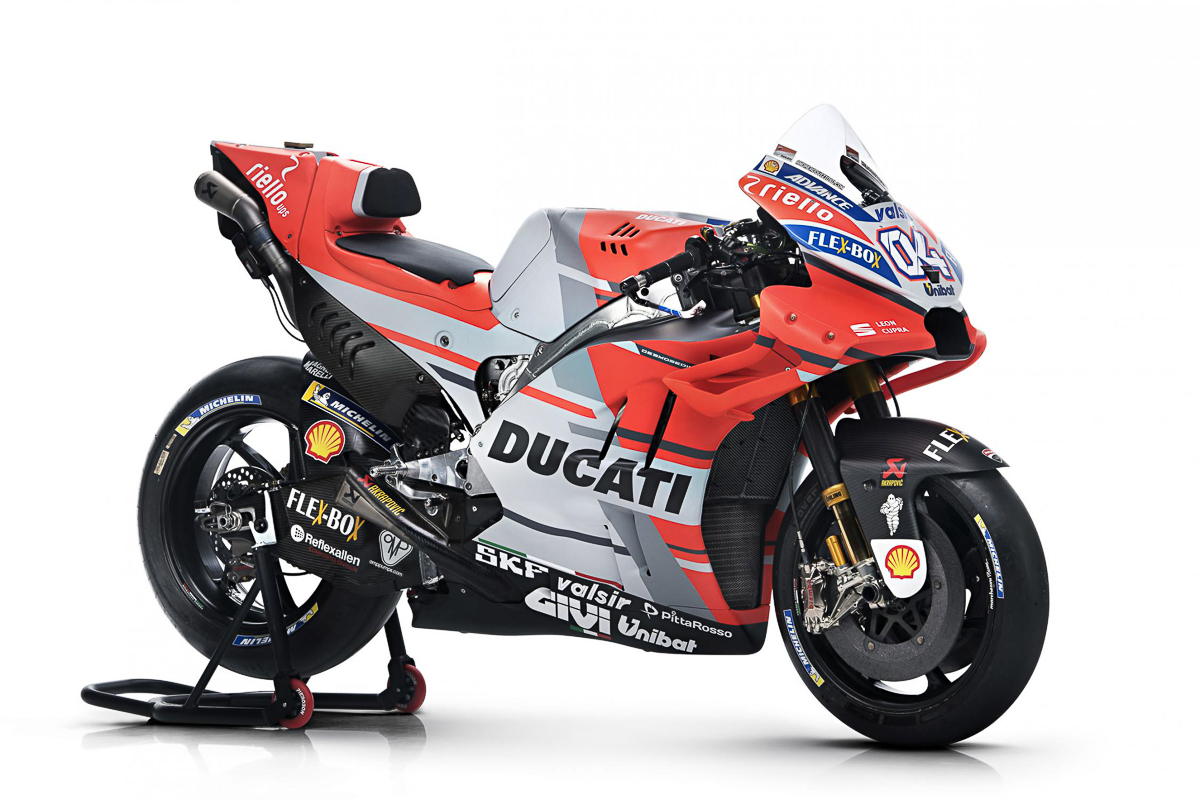
It was Valentino Rossi (Movistar Yamaha) who went fastest after lunchtime, only to see Andrea Dovizioso (Ducati MotoGP) go on top. Desmo Dovi then held on to the top spot for some time before the former fought back to record a 2:00.322 time.
Picture from MotoGP.com
But as the clock counted down to the end of the first day, most riders hit the track en masse. However, it was the Ducati-mounted riders who proved to be faster. Danilo Petrucci and Jack Miller of Alma Pramac Racing recorded the fourth and fifth fastest times of the day with 2:00.123 and 2:00.178, respectively.
Picture from MotoGP.com
As for the Ducati factory team, Andrea Dovizioso reclaimed the top spot with a time of 1:59.770, while his teammate Jorge Lorenzo clocked 1:59.802.
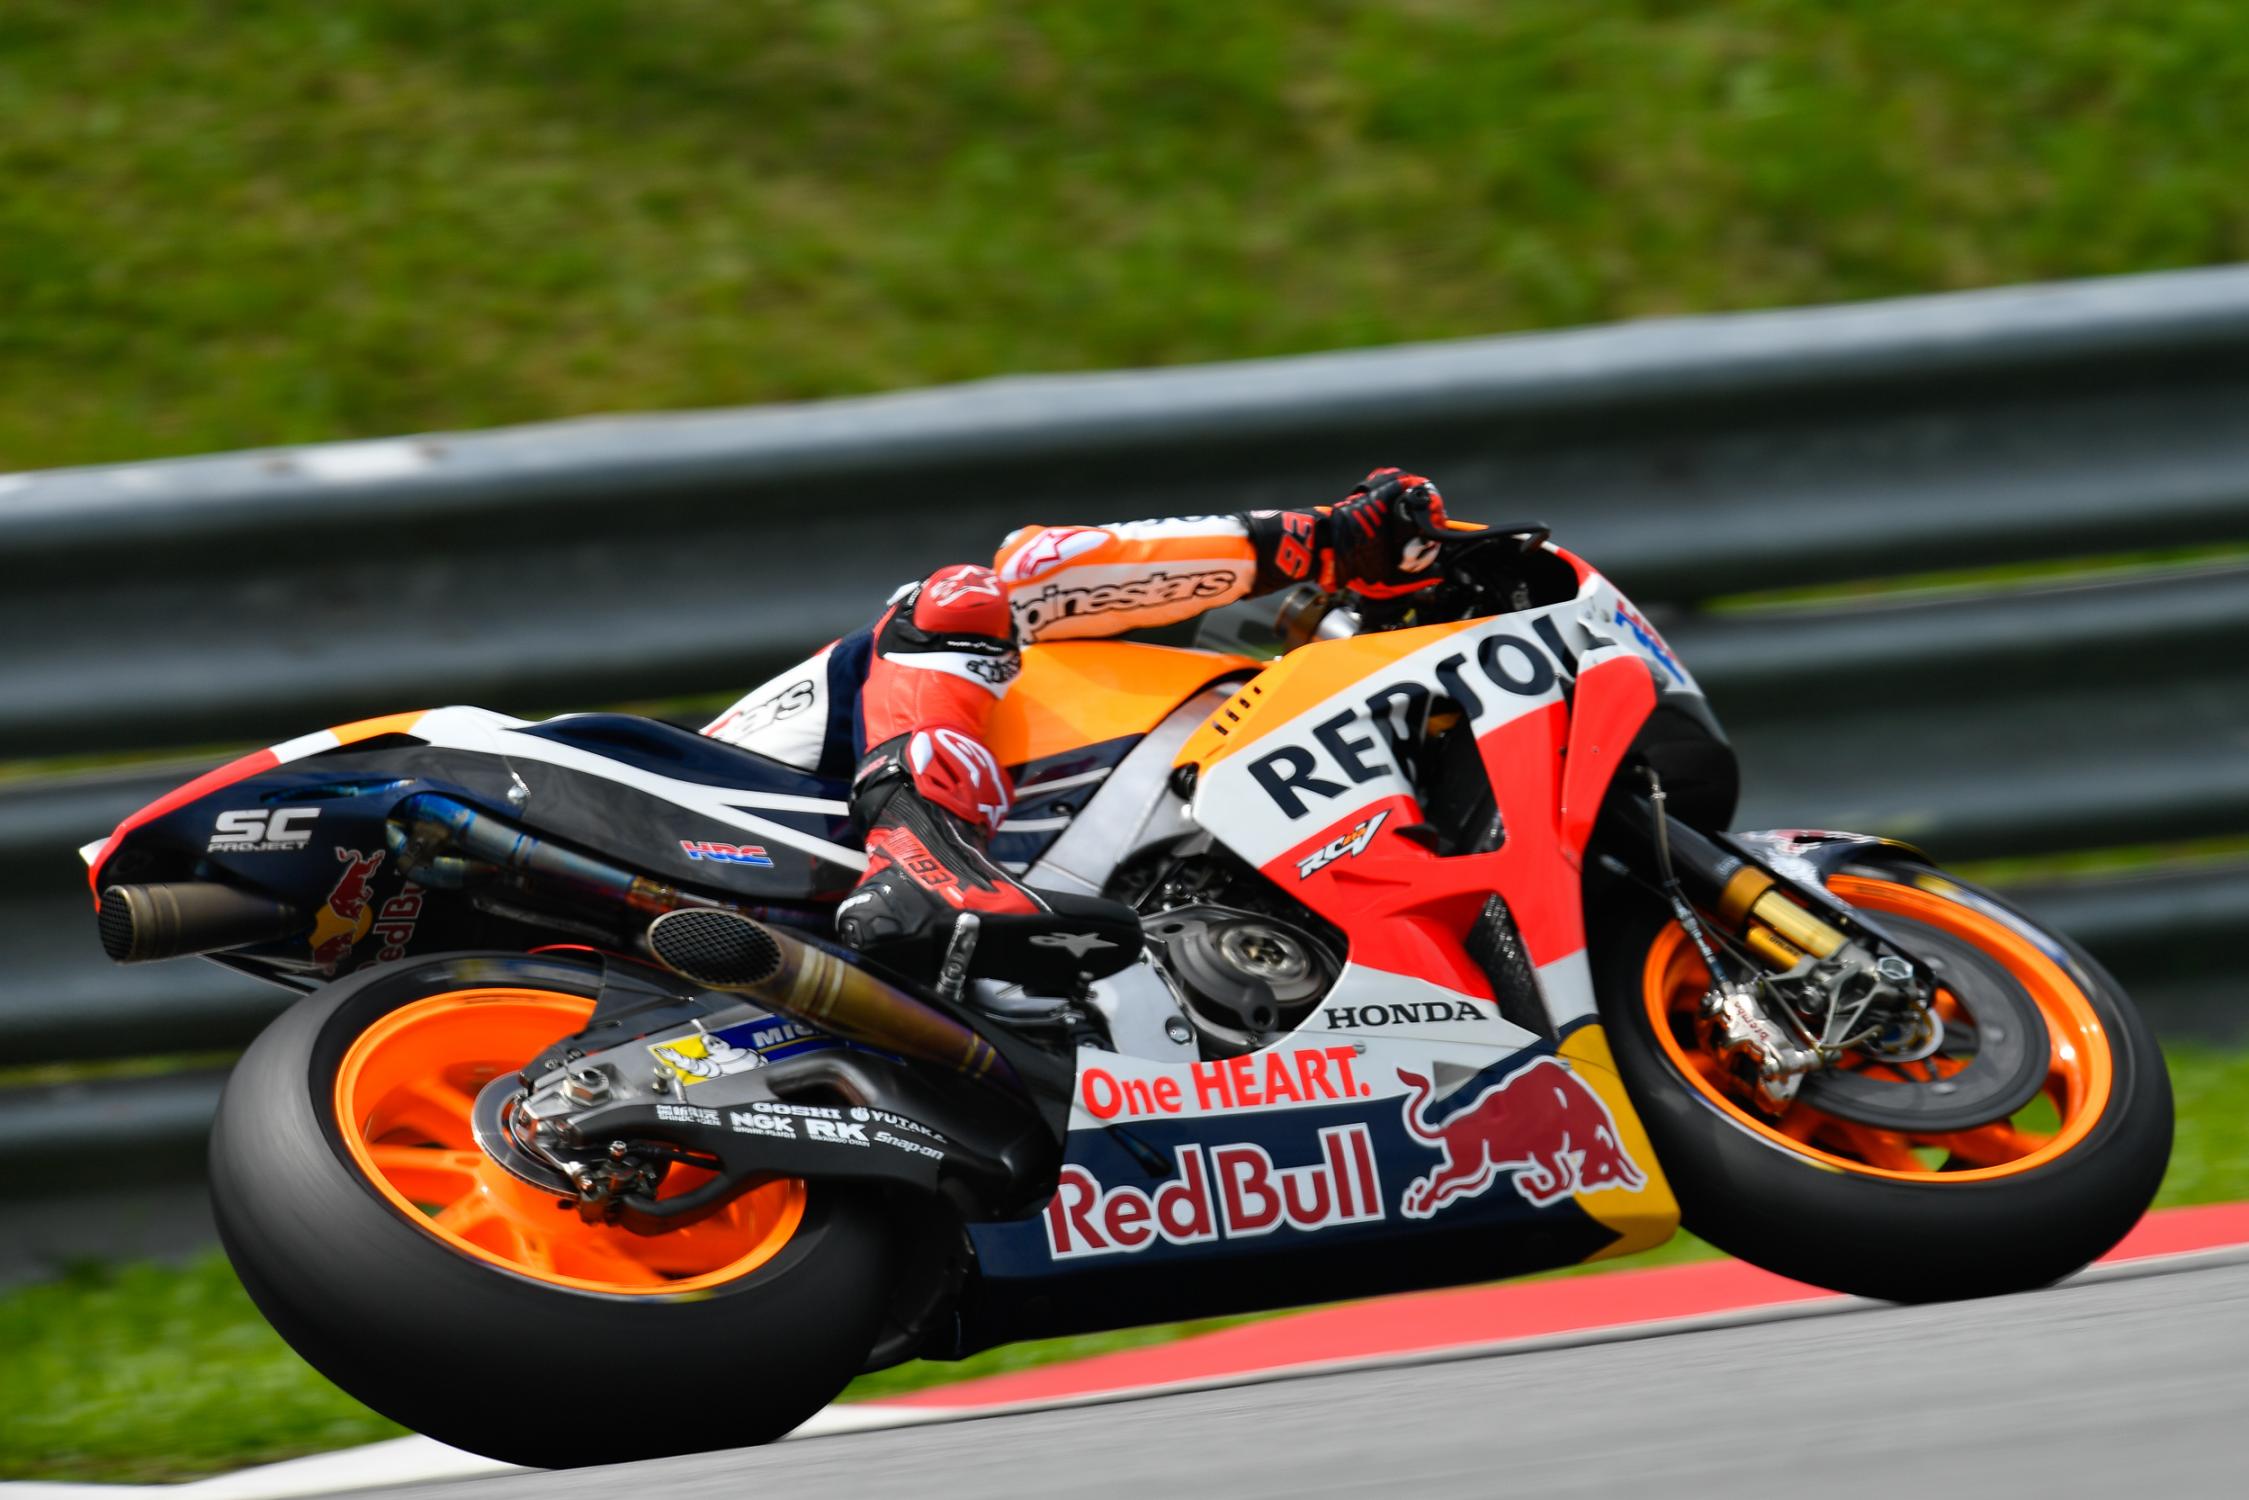
It was not to be an all-out celebration for Dovi, as Dani Pedrosa (Repsol Honda) charged into first place with a blistering 1:59.427 lap time. Dani’s time is just 0.235 seconds slower than his record-setting pole time in 2017.
Rossi found himself relegated to sixth, with Marc Marquez in seventh with his best lap of 2:00.290. The morning’s fastest man, Johann Zarco bested his earlier time (recorded on a damp track) with 2:00.421, ending the day in eighth.
Picture from MotoGP.com
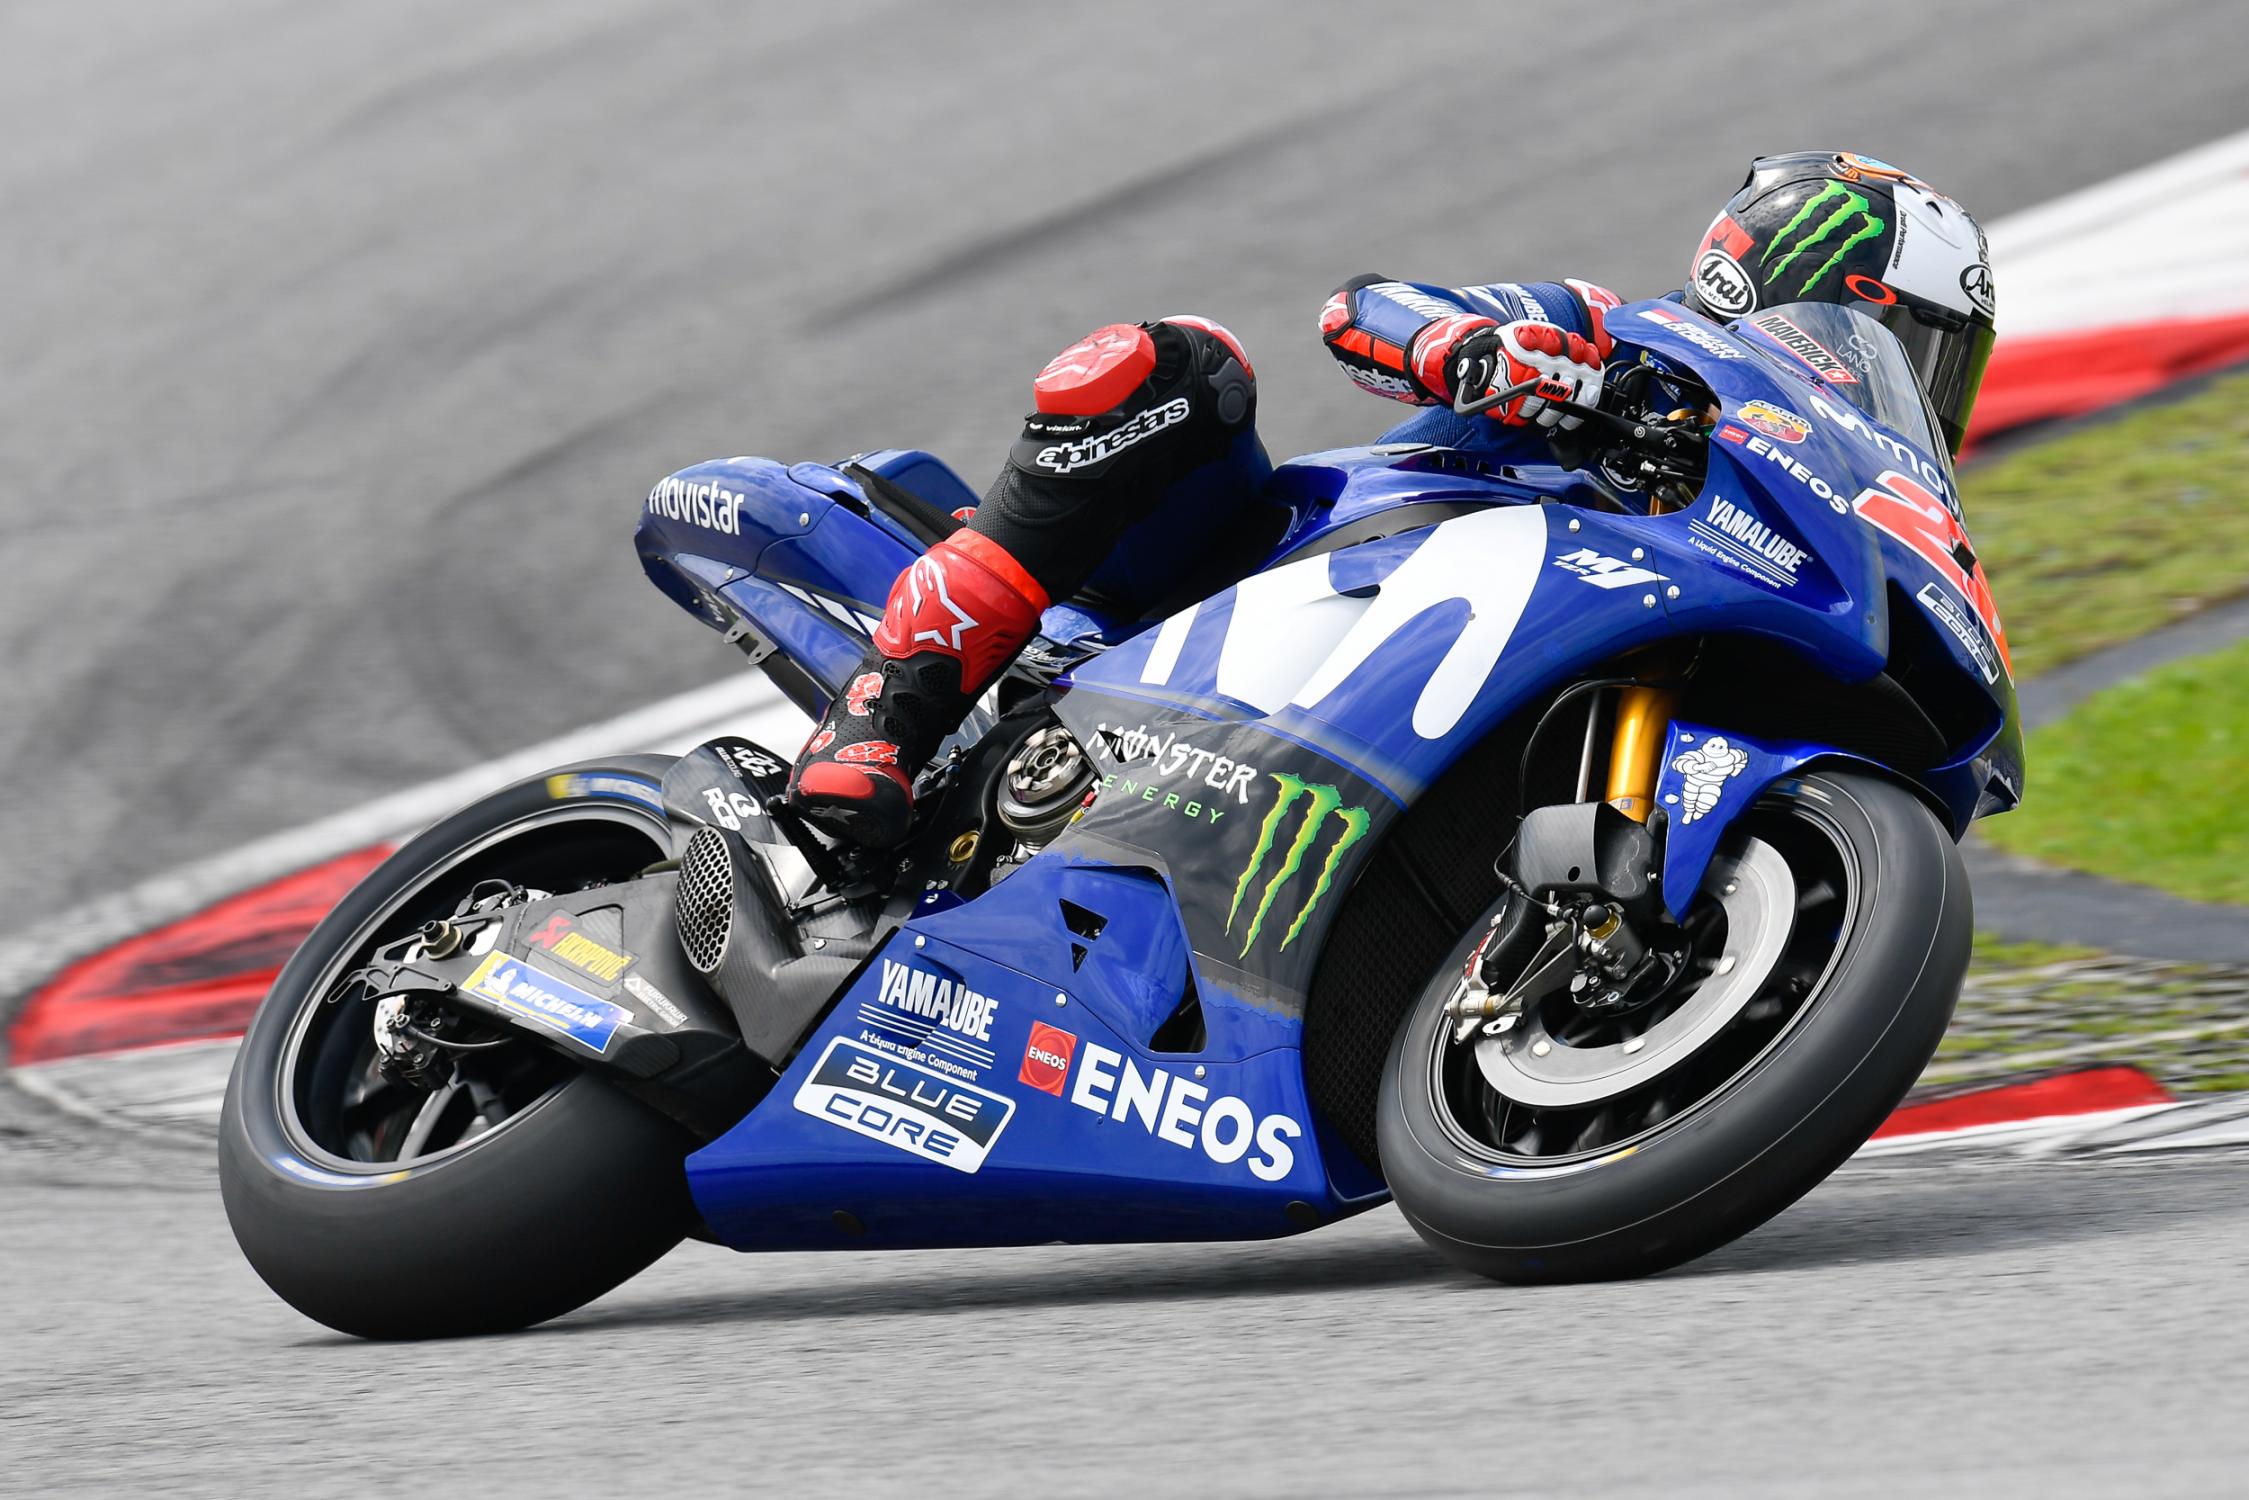
Rossi’s teammate, Maverick Vinalez had put in 72 laps on this first day, more than any other rider. He had posted an initially strong time at 2:00.714 but the advancing horde saw him pushed down to 13th.
Picture from MotoGP.com
With such a fast early pace exhibited by Pedrosa, how will it be tomorrow? The Klang Valley saw a heavy shower late in the evening, so how will that play out tomorrow?
Stay tuned as we continue to bring you more excitement from this test.
The 2018 MotoGP season has begun with the Winter Tests.
Held at the Sepang International Circuit, the teams are back to test their new machinery.
Dorna has put more restrictions on the number of tests this year, making this session all the more important.
While the first race of the 2018 MotoGP is a few months away, the riders are back for the MotoGP Winter Tests at the Sepang International Circuit, in which 2017 MotoGP Rookie of the Year, Johann Zarco sounded his intentions early by posting the fastest time.
The tests are customarily held in mid-February previously, but has been brought forward this year due the extra round at Buriram, Thailand in the 2018 calendar.
It goes without saying that the Winter Tests or also officially known as the Sepang Official MotoGP Test is one of the most important events of every MotoGP season. Sepang is the chosen track due to the weather which features high humidity, high temperatures and occasional torrential rain, besides the high speeds attainable. That makes SIC as one of – if not the only – track where they will look for “baseline settings” for this similar sort of variable weather and track layout, besides testing their new bikes, equipment and for the riders to get their mojo back after the holiday season.
In the first test session of the first day (28th January), Johann Zarco topped the timesheets with a time of 2:11.863 on his 21st and penultimate lap. Dani Pedrosa posted the second fastest time so far at 2:12.527 (0.664s behind) and Jorge Lorenzo in third with 2:12.897 (1.034s back).
Defending Champion, Marc Marquez is way back in ninth, having posted the time of 2:13.406, which is incidentally the exact time posted by Valentino Rossi in eighth. Rossi’s teammate Maverick Vinalez is seventh, with a time of 2:13.395.
The Yamaha pair is no doubt itching to test their 2018 machines which is utilizes the 2016 chassis, after they encountered the lack of rear grip in the rain in the 2017 season. The new bikes were officially launched just three days ago.
The times are still far behind the fastest Qualifying 2 time of 1:59.212 posted by Dani Pedrosa in the 2017 Shell Malaysia MotoGP round. Zarco recorded the second fastest Q2 time at 1:59.229 and Jorge Lorenzo was in sixth with 1:59.622.
The weather at SIC is overcast with the occasional light rain and the track is damp in certain spots. Its temperature has dropped from 30 oC to a low of 29.3 oC at the time this report went online.
Stay tuned as we continue to post results and findings throughout the day.
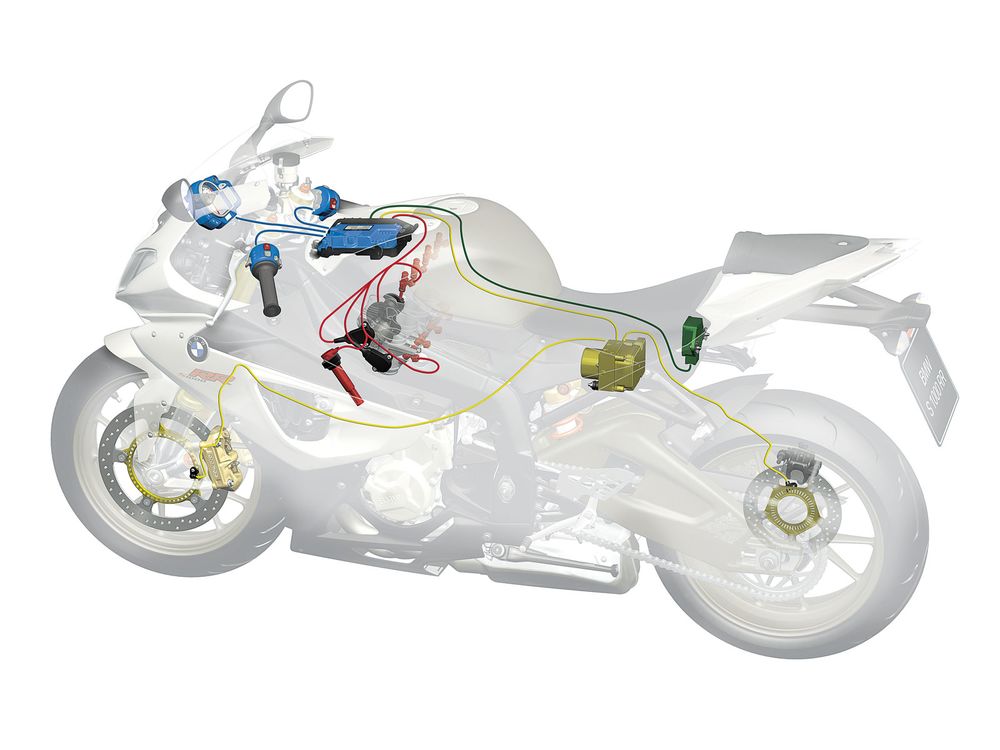
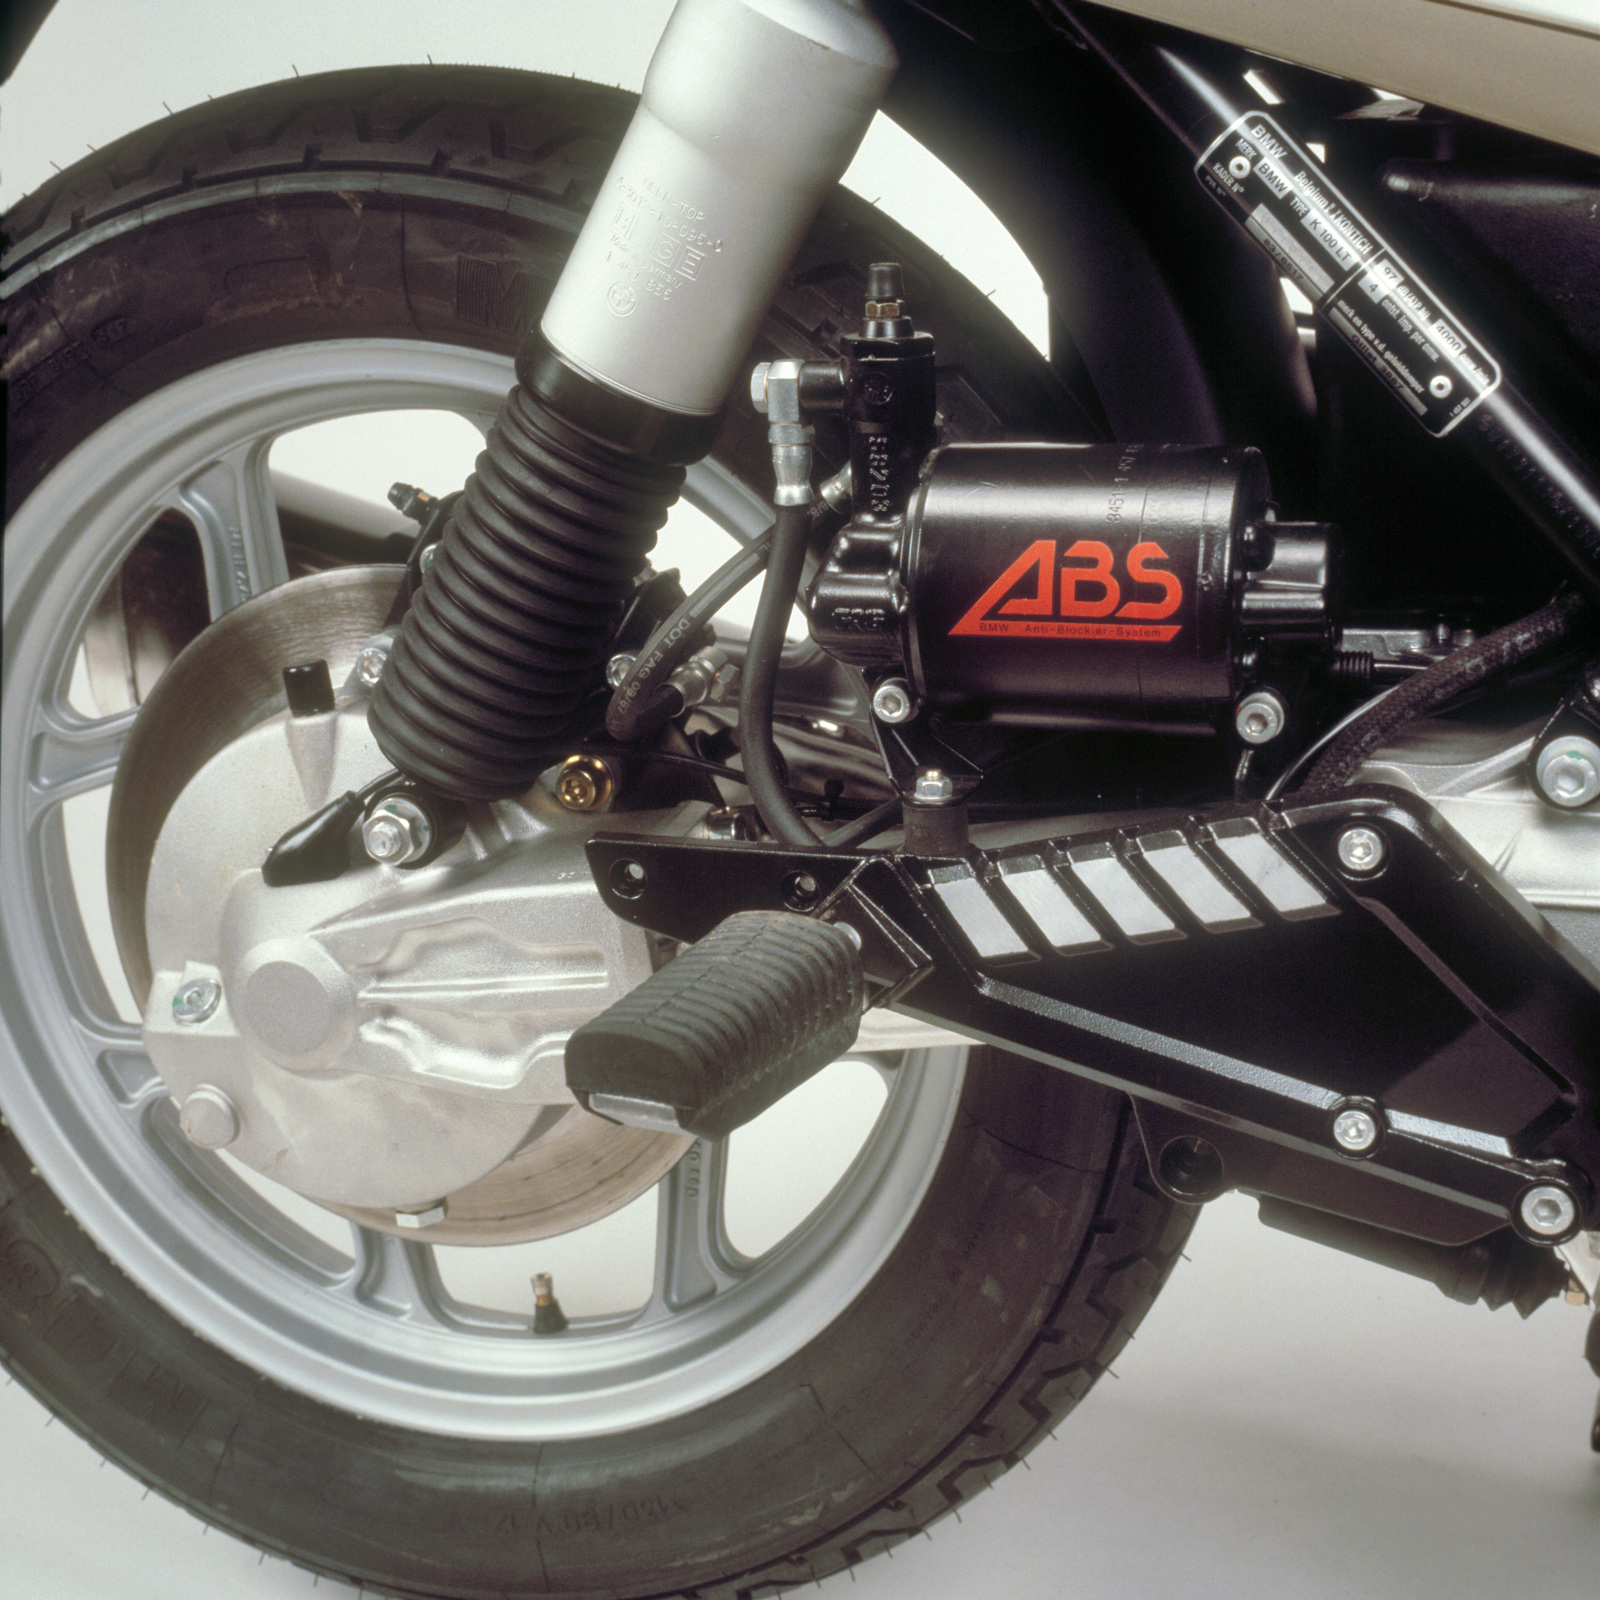
The ABS (Antilock Brake System) is now integral with motorcycling.
It allows the rider to apply maximum braking pressure without locking the wheel(s).
ABS technology has evolved to the stage that it allows for added functionalities.
We covered the basics on how a motorcycle brake system works in Part 1 and now let’s expand it to the Antilock Brake System (ABS). The basic premise of ABS is to prevent the wheel or wheels locking up (stop rolling or jem brek, as we call it locally) when the rider grabs a handful of brake lever or when braking hard on slippery surfaces.
ABS is now an integral part of motorcycling, although there are a number of models not equipped with it in Malaysia. The European Union has mandated that all motorcycles above 125cc are equipped with it since 2016.
BMW was the first to introduce an electronic/hydraulic ABS on a motorcycle, on the 1988 K100. It added 11 kg to the bike. Honda and Yamaha followed suit in 1992, offering the system as an option on the ST1100 and FJ1200, respectively. In comparison, the current system offered by Bosch weighs a scant 0.7 kg for the base version and 1.6 kg for the enhanced variety.
ABS was once viewed as a weight handicap, besides added complexity and cost, as such, most motorcycle manufacturers offered it as an extra option.
The first versions were adopted from cars. Whereas cars have all four tyres on the road and isn’t very prone to large fore-and-aft weight transfers, certain challenges were faced when adopted to motorcycles. For example, the system triggered too early even before a rider could really brake hard enough, in addition to the brake lever and pedal pulsating upon activation and surprised riders into releasing the brakes. It was an unnecessary distraction riders could live without.
However, the continual advancement in electronics has brought on many positive improvements in ABS technology to where it is presently. New ABS systems work almost imperceptibly.
Maximum braking force for any wheeled vehicle is when the wheel is just about to lock. However, it’s a different story when the wheel does lock up as there are many variables depending on road friction which in turn depends on weather and road conditions. Moreover tyre wear, tyre pressure, different tyre sizes, suspension, the dynamics of weight transfer during acceleration or deceleration, and cornering.
This is where ABS comes into play.
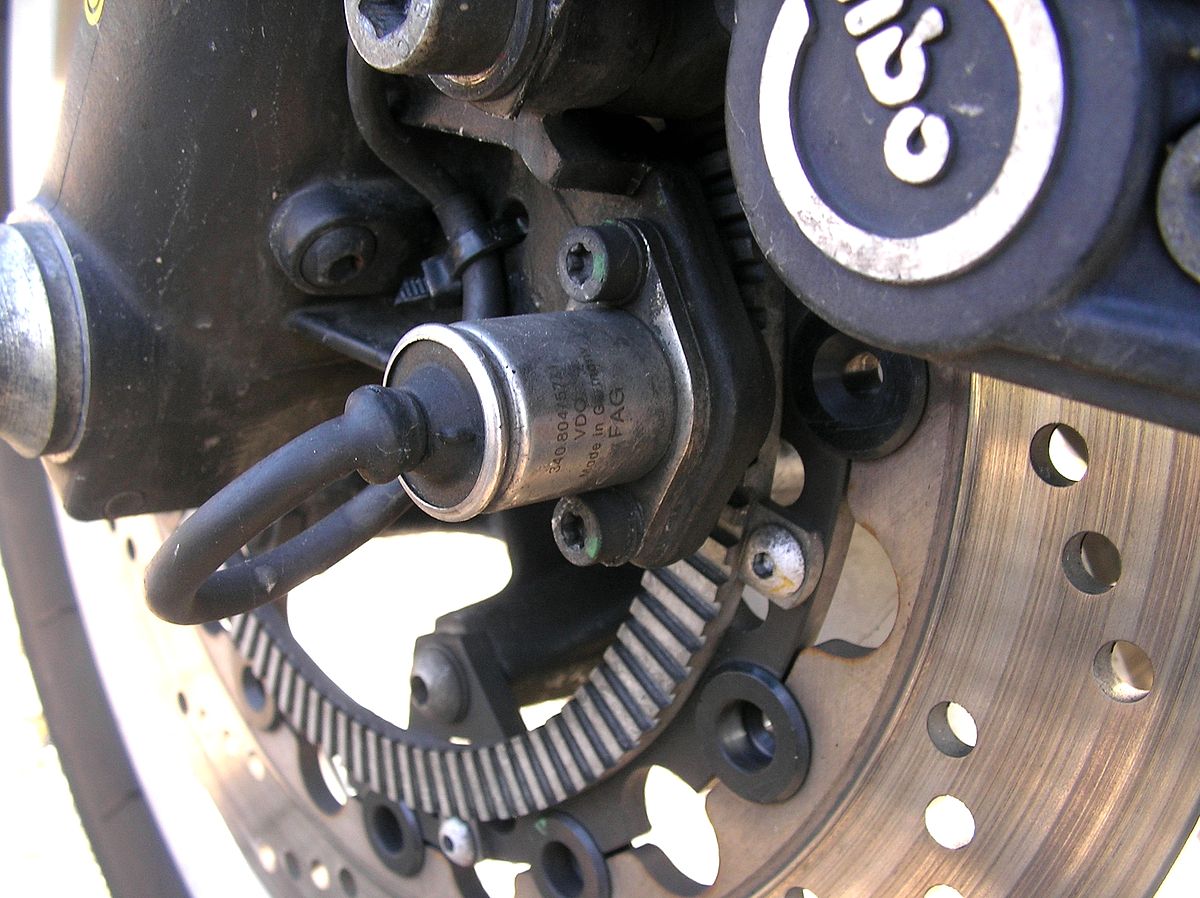
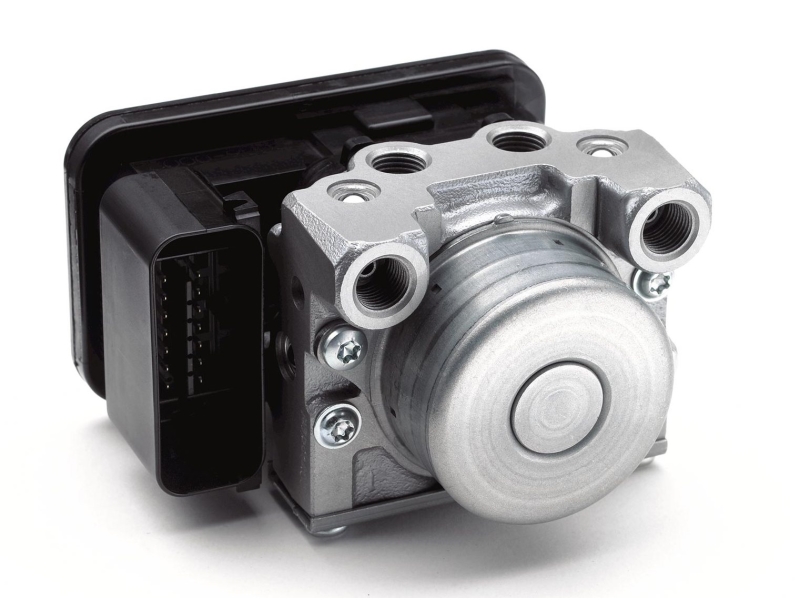
Wheel speed sensors are mounted above slotted rings on each wheel to measure and compare wheel speeds. The signal is sent to the ECU (electronic control unit) for monitoring. The ECU calculates based on information from both wheels for two parametres: whether the deceleration of one wheel exceeds a fixed threshold, and the other whether there is brake slip. These factors indicate a locked wheel.
The ECU signals the hydraulic unit to hold or release brake pressure, just momentarily before reapplying the brake pressure, to get the wheel back to the point of maximum braking force just prior to locking up. This pressure modulation allows the tyres to regain grip and enable the rider to control and steer his bike. In other words, ABS allows the rider to apply maximum braking force without locking the wheels and losing control. That’s why ABS is banned from top echelon racing such as superbikes, and all classes of MotoGP.
There are a few types.
The first and older ABS I (in 1988) was also known as piston systems. Using a spring-tensioned piston, a motor pulls back the plunger piston to open increase the space for the brake fluid, effectively lowering its brake pressure. ABS II (in 1993) still uses the spring-tensioned piston, but replaced the plunger with an electronically controlled friction clutch. Both were used on BMWs although Honda used the second system on their touring and large bikes.
The newer valve and pumps systems uses solenoid inlet and outlet valves, pump, motor and accumulators/reservoirs. When the system is activated, the brake fluid is stored in accumulators to release the pressure. A pump er… pumps back the fluid. That’s what cause the pulsation on the brake lever or foot pedal.
The best ABS systems cycle through this process at 24 Hz (Hertz, times per second). No human could possibility emulate this feat.
Again, with the advancement of electronics, the ABS has seen some intriguing added functionalities, too, such as dual-channel, combined braking, cornering, rear lift-up mitigation (anti-stoppie, or anti-wekang), supermoto, and offroad ABS. Even traction control depends on the sensors and ECU for speed and tyre slip signals.
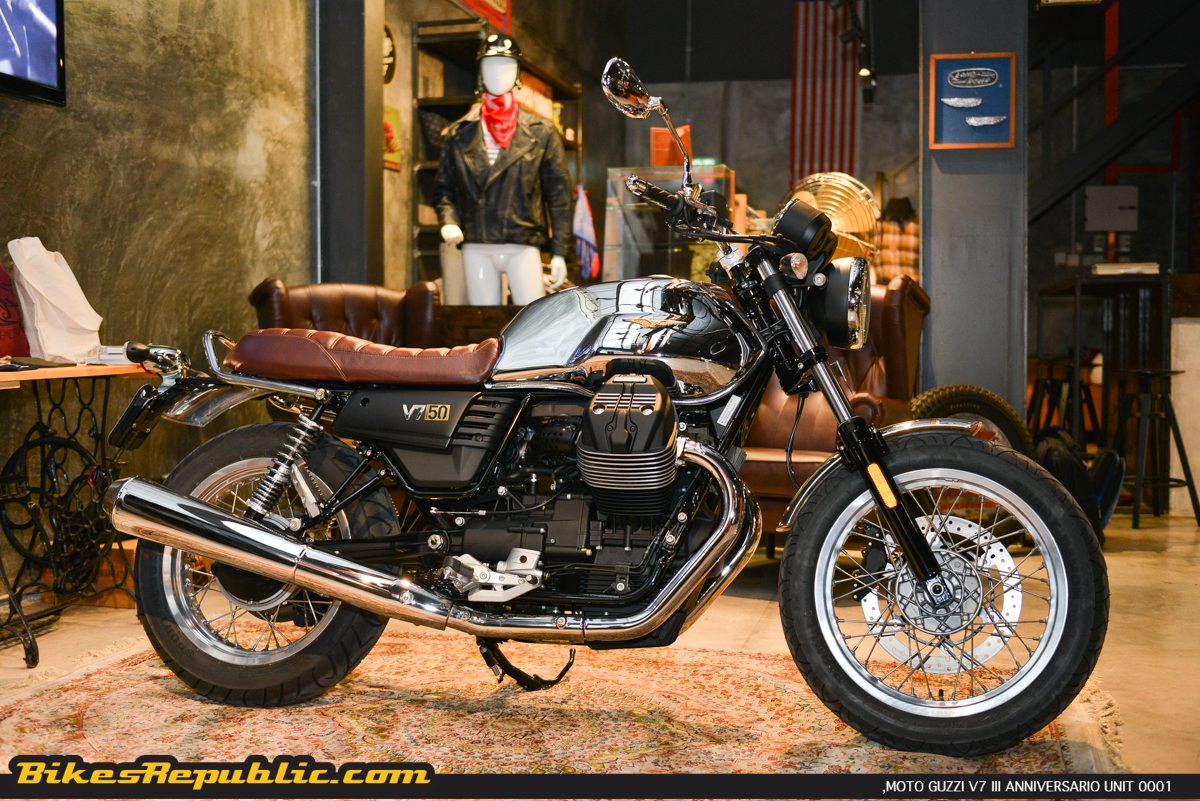
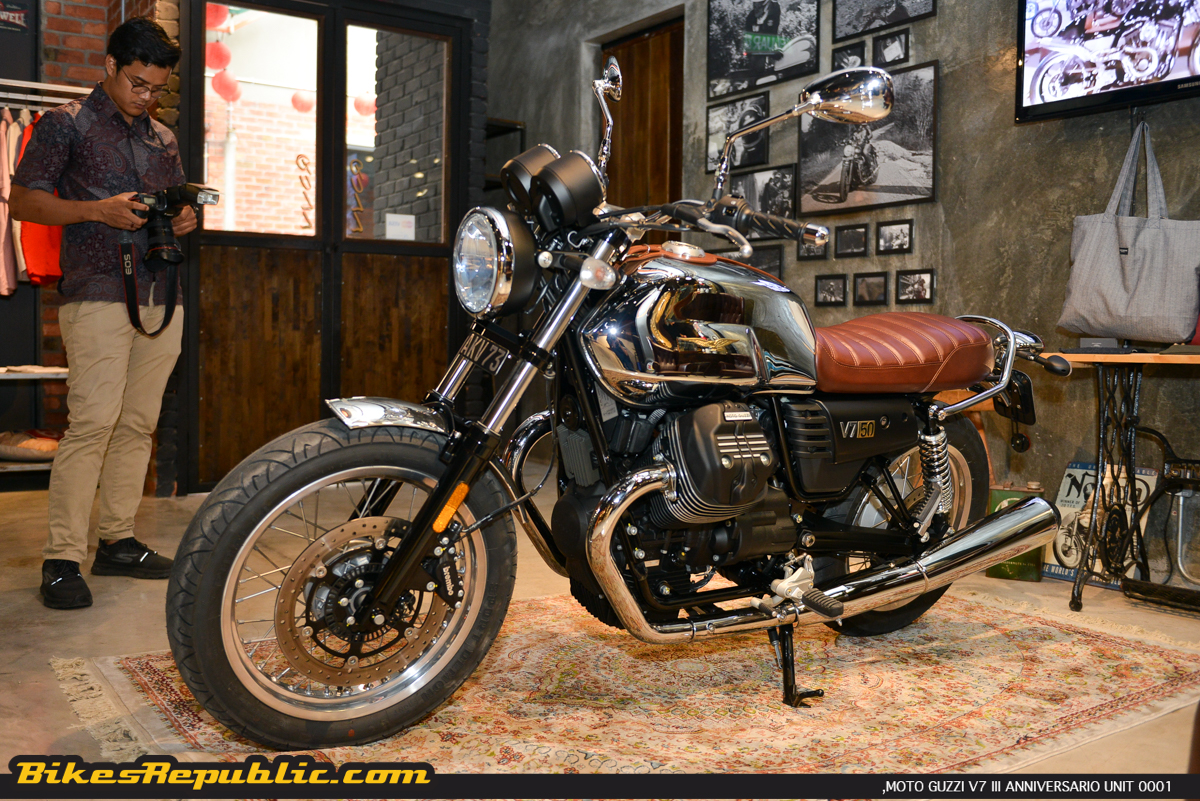
Moto Guzzi Malaysia has acquired Unit 0001/1000 of the limited edition V7 III Anniversario.
Production of the model is limited to only 1000 units worldwide.
The bike is priced at RM 80,900 (incl. of 6% GST, but not on-the-road).
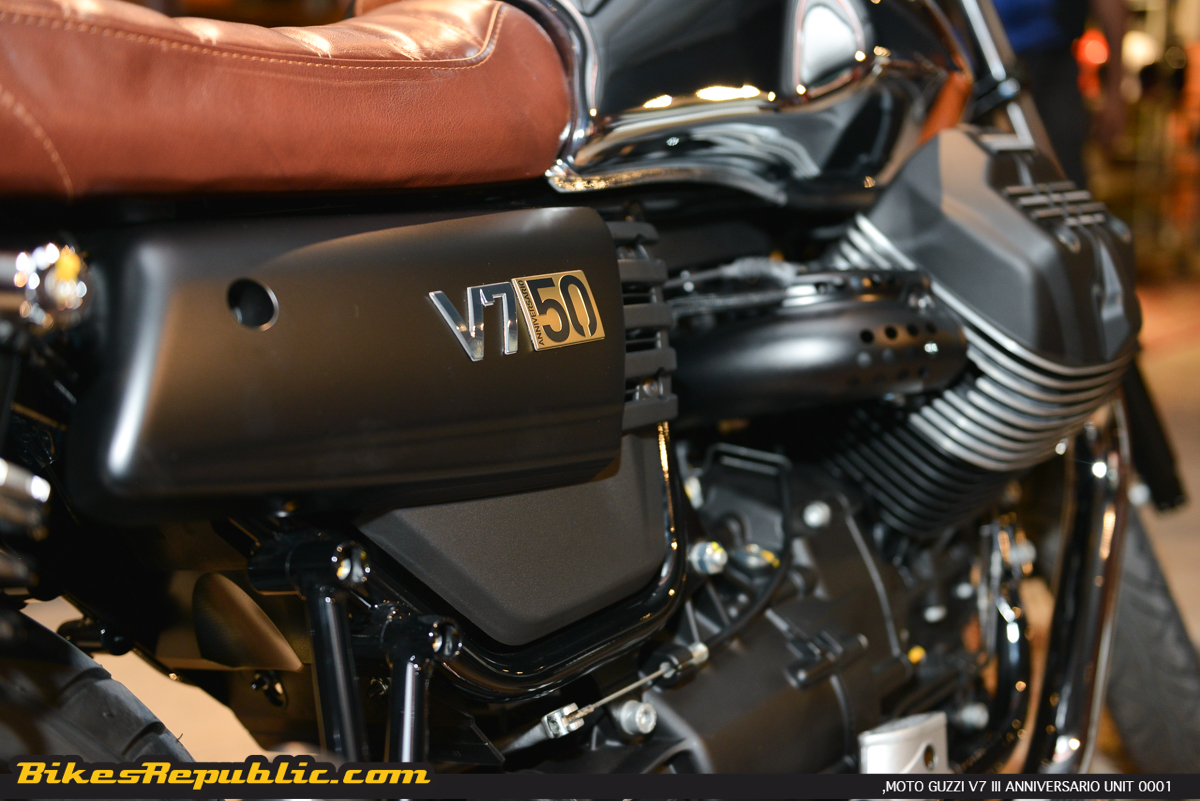
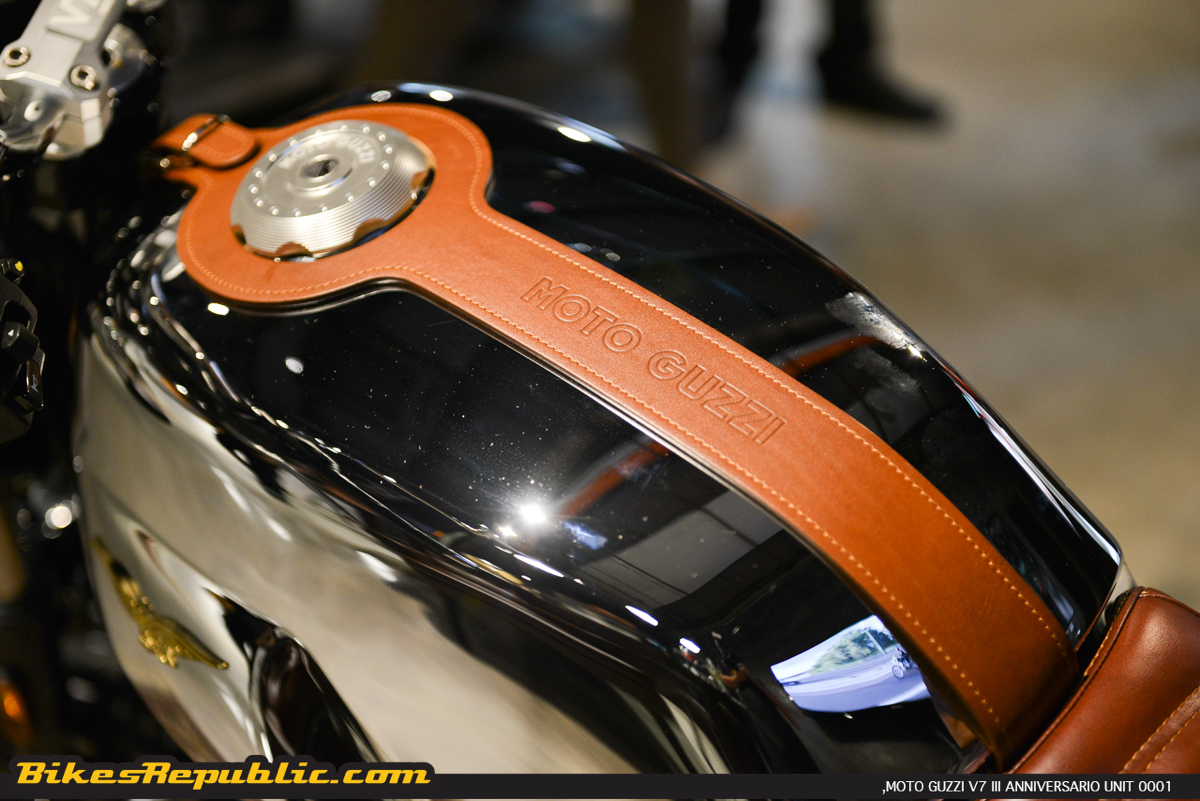
Moto Guzzi Malaysia has acquired Unit 0001 of the V7 III Anniversario. It’s of great significance as production of the model is limited to only 1000 units worldwide.
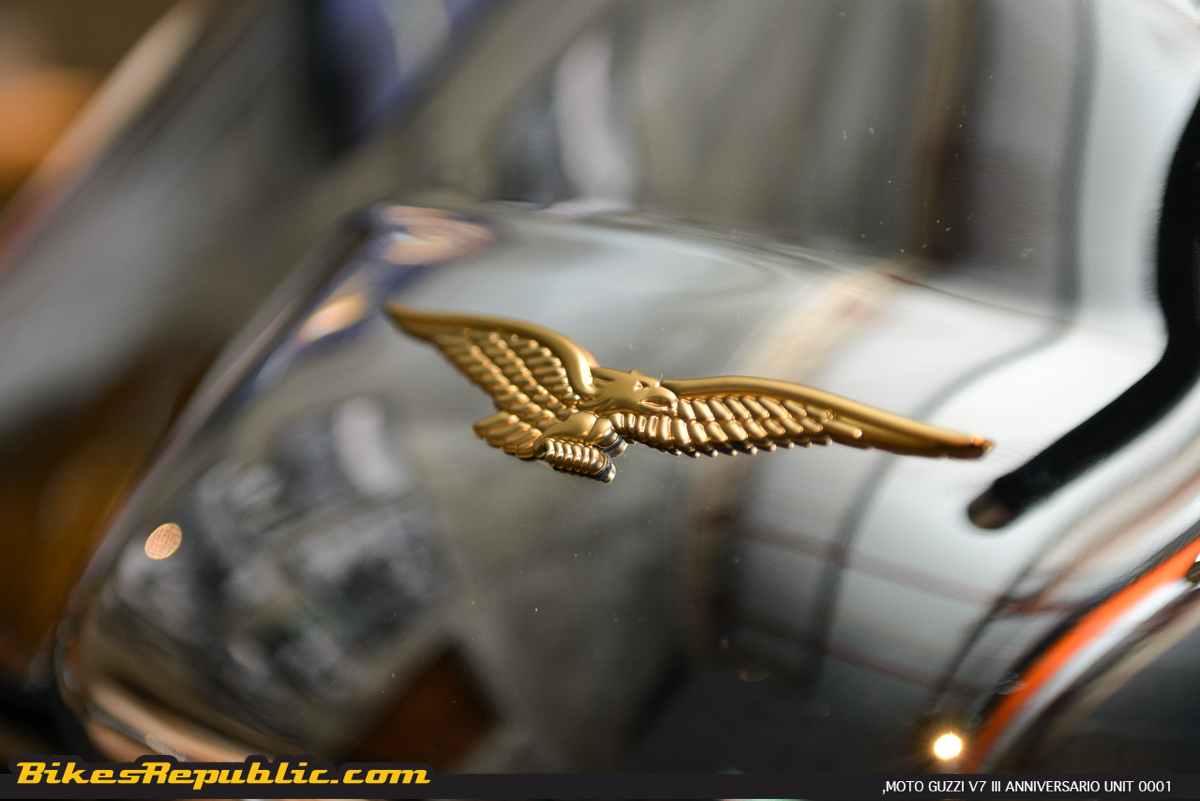
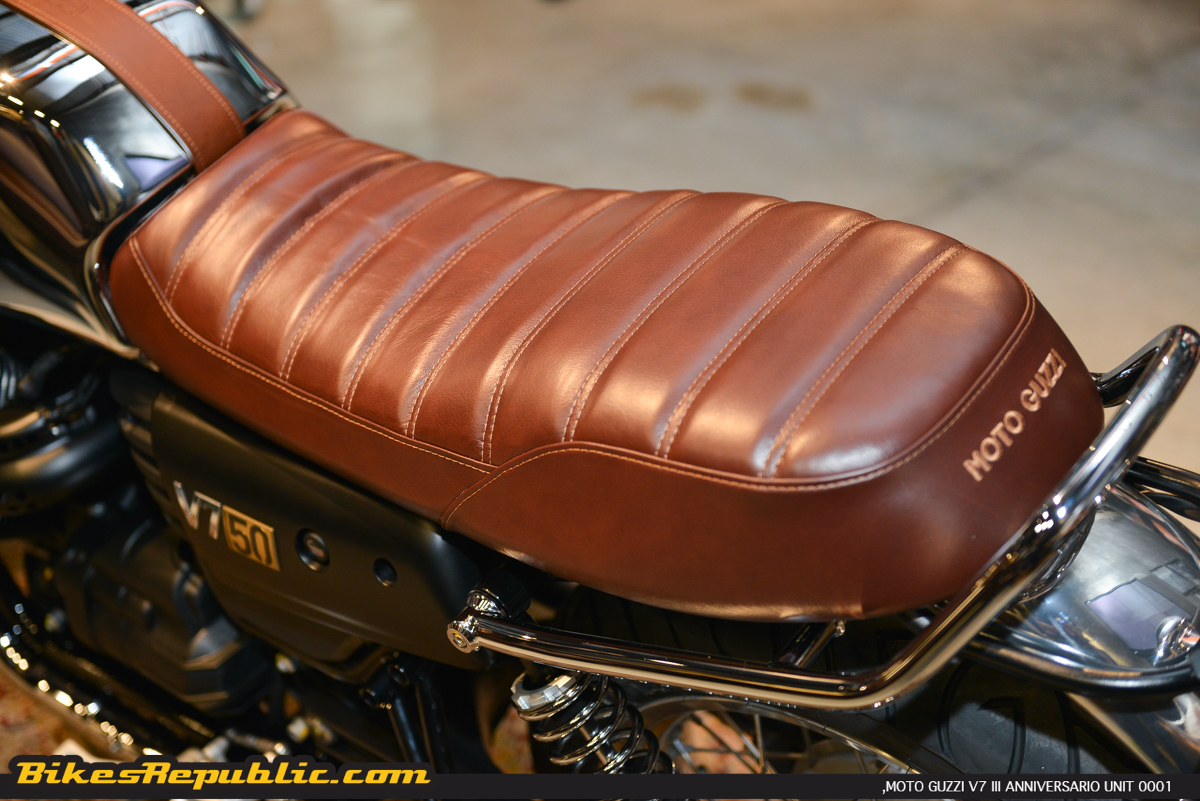
The V7 III Anniversario commemorates the 50th year of the legendary Moto Guzzi V7, and is distinguished from the unlimited run V7 III by numerous exclusive details such as the gold-coloured Moto Guzzi eagle emblem on the chrome fuel tank, brand new genuine leather seat, and billet aluminium locking fuel tank cap.
The mudguards are polished aluminium, the passenger grab bar is chrome plated steel, while the wheels get exclusive polished channels and grey hubs.
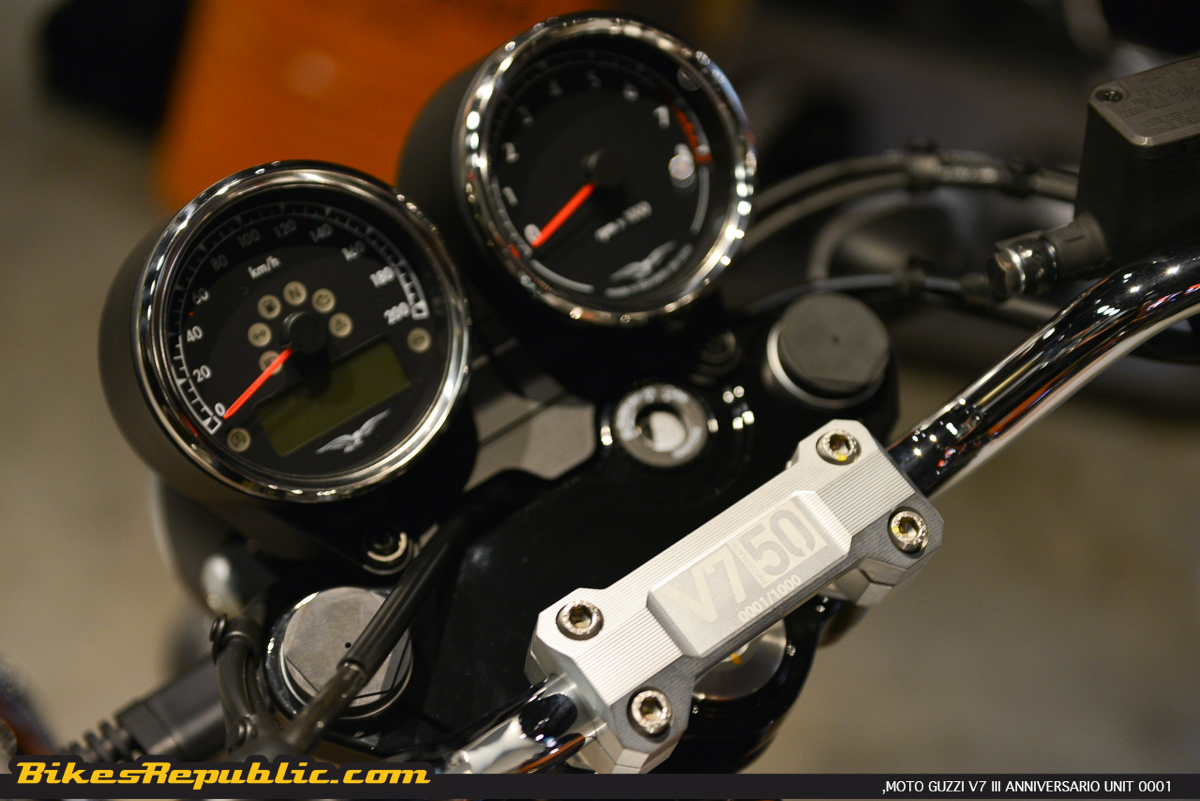
Perhaps most importantly, the handlebar riser is laser inscribed with the production number XXXX/1000.
While based on the V7 III Special, the Anniversario’s engine has been tuned for a 10% power gain. The steel frame with dismountable double cradle maintains the same 46/54% front/rear weight distribution, however the front portion has been revamped and reinforced with a new steering geometry for better handling, cornering and stability.
These features produce makes the Moto Guzzi V7 III Annivesario a handcrafted work of art worthwhile for collectors.
“I am proud that we managed to acquire the 0001 unit of the III Anniversario and this would also be a pride for Moto Guzzi enthusiasts in Malaysia,” said Rewi Bugo, Chairman of Didi Resources Sdn. Bhd. Didi Resources is the official importer and distributor of Moto Guzzi motorcycles in Malaysia.
Rewi Bugo, Chairman of Didi Resources Sdn. Bhd.
The Moto Guzzi V7 III Anniversario is available for viewing at The Gasket Alley, Petaling Jaya, and priced at RM 80,900 (inclusive of 6% GST but not on-the-road).
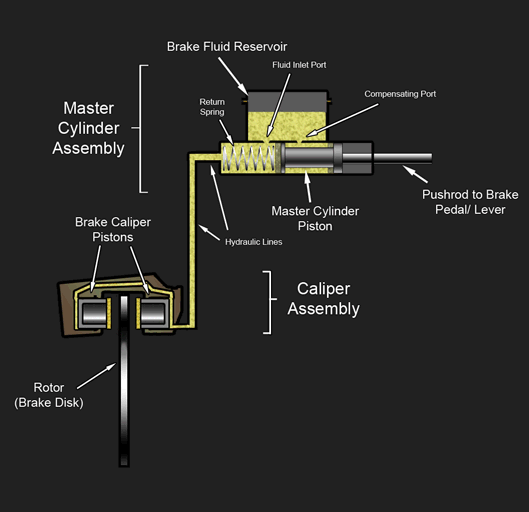
The hydraulic brake system’s operation is easy to understand.
It consists of only a few main parts.
However, pay attention to your brake fluid and hoses.
Everytime we squeeze and press down on the brake levers, the brake system causes the motorcycle to slow down. it works day in, day out, throughout the bike’s lifespan. But have you ever thought about how it actually works?
While the traditional cable-operated drum brakes are available on a certain number of bikes, they are being phased out for the hydraulic brake system, more commonly called disc brake system.
The brake system converts kinetic energy (contained in a moving object) to thermal energy (heat) by using friction. Brakes have evolved over time and some brake systems could actually slow a bike quicker than the latter could accelerate. In a recent overseas test on the BMW S 1000 XR, the bike accelerated from 0 to 160 km/h in 6.1 seconds, covering 151 metres. That fast! But it slowed from 160 to 0 km/h in 5 seconds in less than 100 metres.
The basic working principles of the hydraulic disc brake system is easy to understand. When you press the brake lever, the master cylinder pump pushes the brake fluid through the brake hoses to the calipers. In turn, this pressure pushes on the caliper’s pistons which have brake pads attached to them. The pads are compressed on to the brake disc.
Let’s look at the parts of a hydraulic brake system:
Master cylinder
More commonly called the “brake pump” or (“bulek pom” by your typical Chinese mechanic at the kedai motor), it converts mechanical force (when you press the lever) into hydraulic pressure. The brake lever pushes on a piston that presses on the brake fluid. The force with which you pull the lever is the leverage ratio and the size of the master cylinder piston determine the amount of pressure is subjected through the system, sometimes exceeding 1,000 kPa.
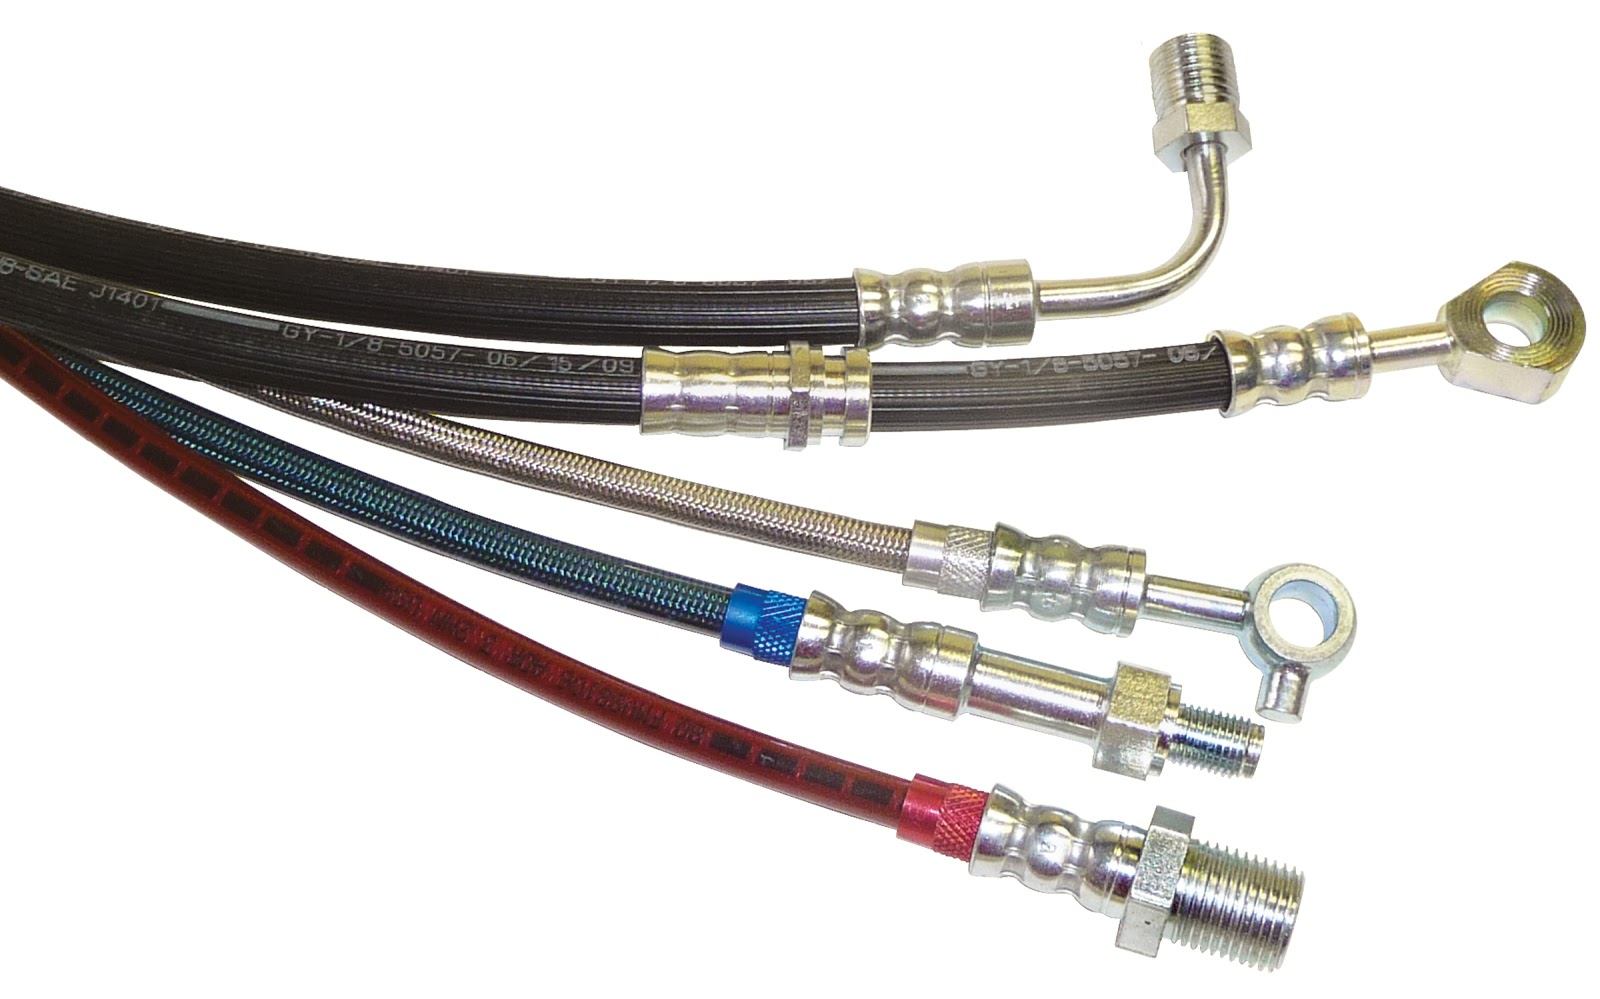
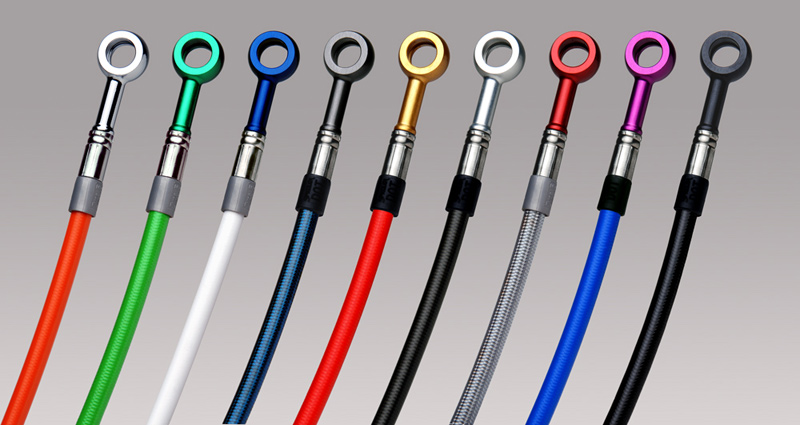
Brake Hoses
Hoses transmit pressure from the master cylinder to the calipers. They are typically multilayered, with a Teflon inner lining surrounded by braided nylon, or Kevlar, or stainless-steel reinforcing layer, and finally wrapped in a protective sheathing.
Contrary to popular belief, stainless steel-braided hoses DO NOT stronger braking. They provide a more consistent braking feel as they don’t expand like rubber hoses do when subjected to eyeball-popping hard braking.
Rubber hoses lose their strength over time, thus need to be replaced every four years.
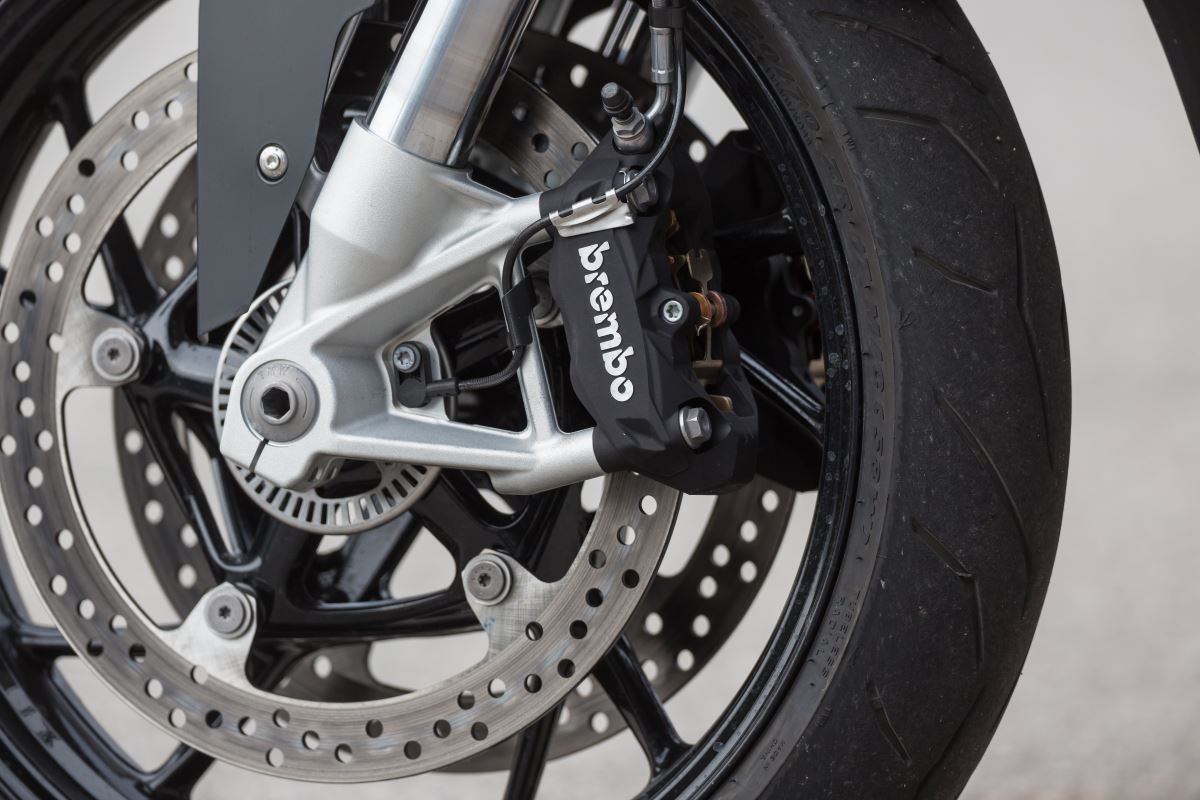
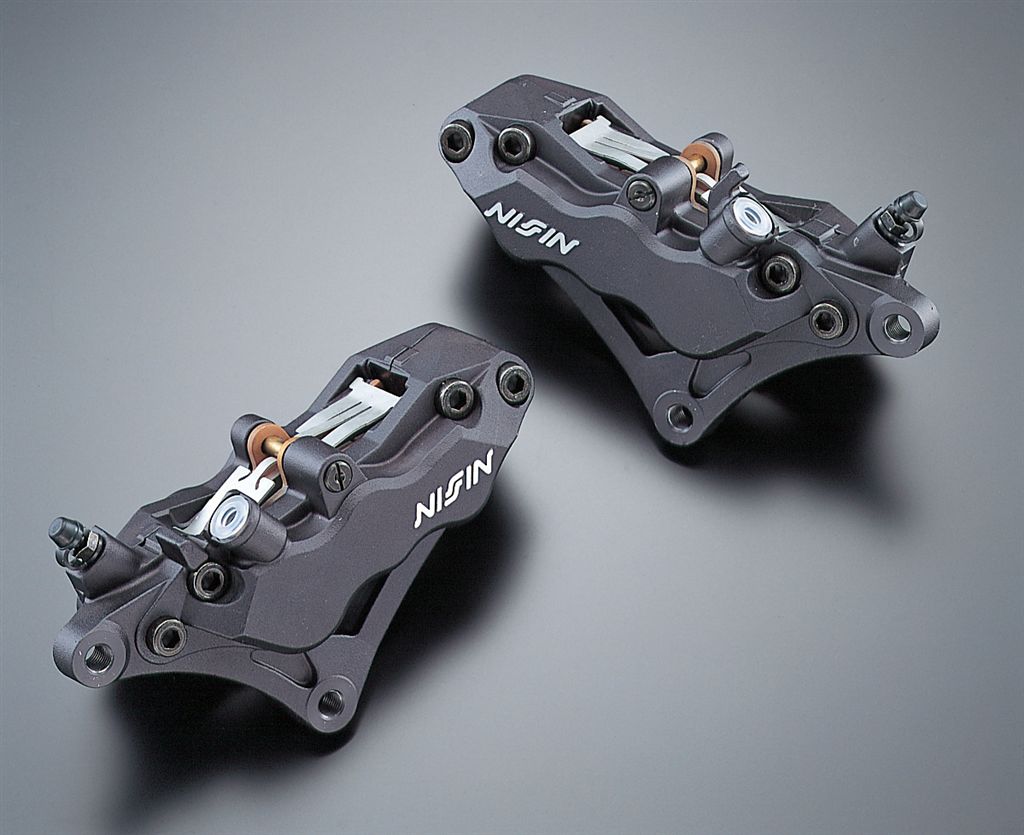
Brake caliper
This is also inexplicably called the bulek pom in the workshops. The real job of pumping braking fluid is handled by the master cylinder.
Anyway, it’s at the caliper where the hydraulic pressure is multiplied. This is because the pressure from the master cylinder is exerted uniformly on the much larger area of the caliper pistons. An adult male’s hand grip typically exerts only between 0.4 to 0.6 kPa, thus that has to be increased to more than 1,000 kPa.
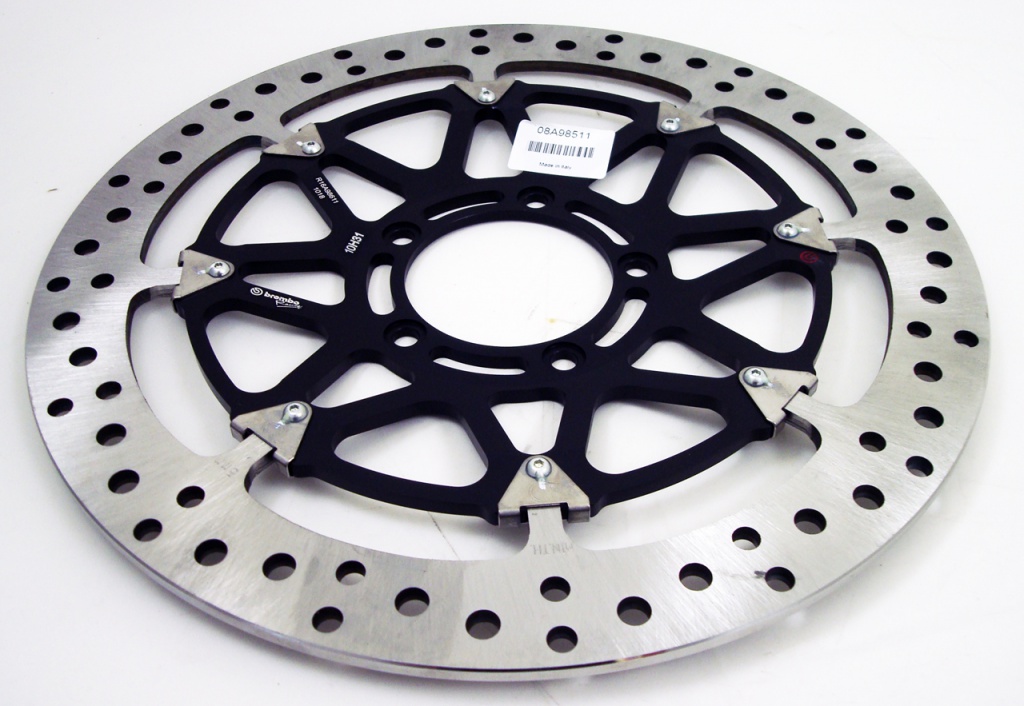
Brake Disc
The disc transfers the brake pads’ resistance to the tyre contact patch. Brake discs are usually made of stainless steel with variable amounts of iron. Modern discs are also drilled to assist in cooling, besides shedding water and debris.
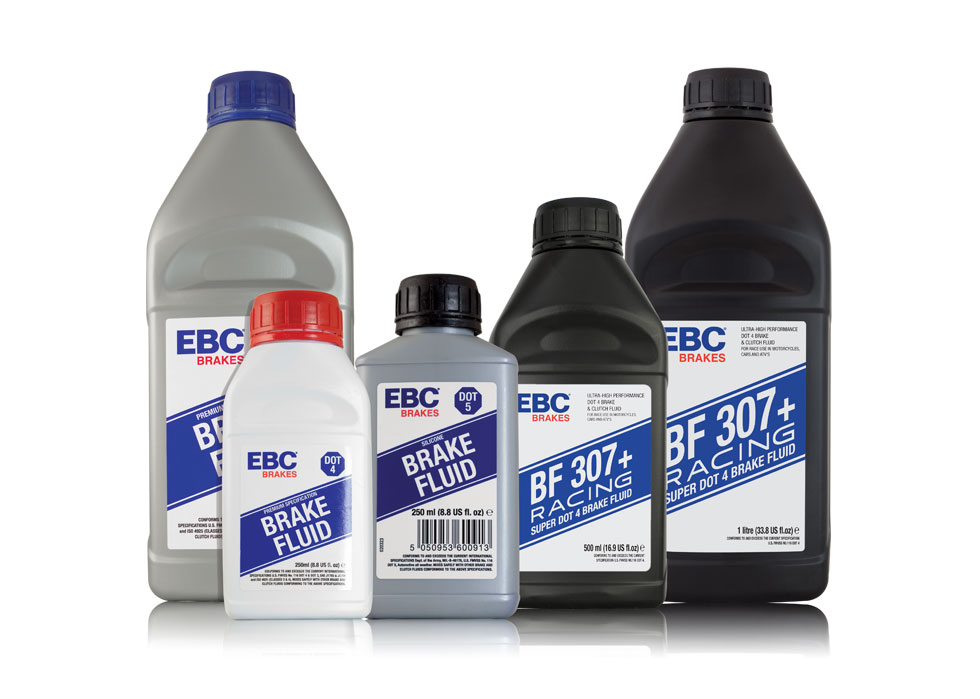
Brake fluid
Another incorrectly named item, usually called minyak brek (brake oil). It has nothing to do with oils. The misconception probably arose from being referred to industrial hydraulic fluids that are petroleum based.
The brake fluid is the medium which transmits force from the brake lever to the brake pads. The brake fluid isn’t as simple as one may be inclined to think. Other than being non-compressible to effectively transfer the pressure, it needs to have low viscosity to work with ABS components, has good lubricity for the master cylinder and caliper piston seals, offer corrosion resistance, and importantly has high boiling point.
There are four grades of brake fluids. Glycol-based ones are DOT 3, 4, and 5.1, hence are mixable. DOT 5 is silicone-based and can’t be mixed any other type.
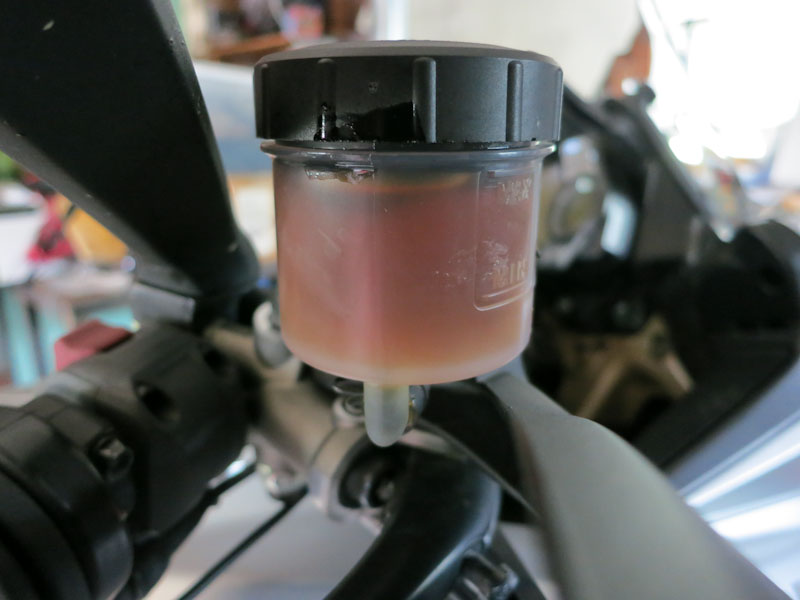
The glycol-based fluids are hydrophilic, meaning they suck in and absorb moisture from the air. Mixed with water, the brake fluid’s boiling point is lowered, causing brake fade. That’s why brake fluids need to replaced every two years.
DOT 5 on the other hand, is hydrophobic and rejects water. However, after repeated heating and cooling cycles, bad master cylinder and caliper seals, it will also ingest water eventually. However, DOT 5 brake fluid does not pull moisture out of the air own its own, thus have a longer lifespan. Military vehicles usually use DOT 5 since they sit idle for long periods of time.
Additionally, being silicone-based, it’s not caustic leading Harley-Davidson to using this previously.
Does this mean we should all convert to DOT 5? The short answer is “NO.” DOT 5 brake fluids are expensive, has high compressibility and higher viscosity (thicker) and thereby unsuitable for everyday use. Harley-Davdison has since reverted to DOT 4.
Each grade usually denotes the fluid’s boiling point, from the heat resulting from friction, rather than its chemical contents.
The US Department of Transport (DOT) specified each grade’s “dry” and “wet” boiling point. The latter is deemed to be completely free of moisture, while the latter contains 3.7% water, common after a year of regular use.
Observe how much performance drops away between dry and wet. That’s why brake fluid should be replaced every two years. Since the standard was set in the USA, we may need to replace it even earlier due to our climate’s high humidity and constant rain.
Water in the fluid lowers its boiling point, casing the brake lever to feel spongy and reducing braking performance – called “brake fade.”
That’s it for Part 1. We’ll talk about brake pads, caliper mounts, ABS, carbon brakes and so forth next time.
These are the five best ones, but there are still more!
Whether you ride a dual-sport, enduro or MX motorcycle, there’s no denying how fun these bikes could be, as well as being the most versatile motorcycles on the planet. Besides, being able to ride offroad does wonders for your road riding abilities. Ask Rossi and Marquez!
Attending a school such as Most Fun Gym (MFG) and receiving personalized coaching is the best way to learn the proper techniques about offroading, but supplementing those lessons will complete the entire learning process. Can’t have the practical lessons without the theories, right?
Here are a few great books to have for expanding your offroading knowledge and skills.
You may find most of them at Kinokuniya in KLCC or order online from them. Alternatively, you may also order these books from Amazon.com.
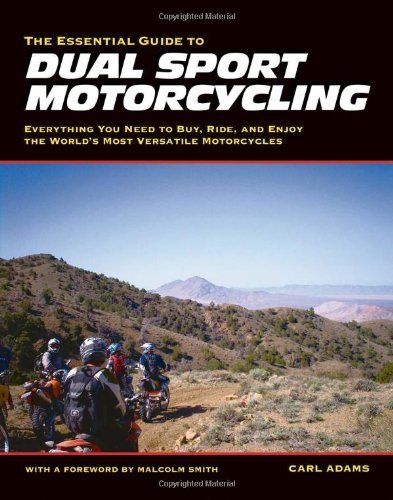
The Essential Guide to Dual Sport Motorcycling Author: Carl Adams ISBN: 9781884313714
If you could only find just one book, this is the one. It’s a good choice for beginners and the street rider who’s looking for more information on getting into the wonderful world of dual-sport motorcycling. The author covers everything from offroad riding techniques to what to equip yourself and bike with. There’s also a section on how to setup your bike for offroading, written in an easy to understand manner, with plenty of colour photos.
How to Ride Offroad Motorcycles: Key Skills and Advanced Training Author: Gary LaPlante ISBN: 9780760342732
While the title gives the impression of riding fully offroad motorcycles such as enduros and motocrossers, this book is a great companion to road riders who occasionally ride in the rough stuff.
Author LaPlante writes about how certain basic skills are shared for both offroad and road bikes, then building them for one another and ultimately producing the complete rider. Think of it as a cross-training book. That said, it’s covers all aspects of dirt riding in a step-by-step process, so beginners wouldn’t find themselves bewildered by advanced terminologies from the outset.
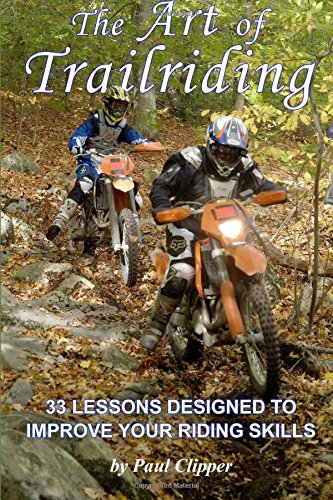
The Art of Trailriding: 33 Lessons Designed to Improve Your Riding Skills Author: Paul Clipper ISBN: 9781540549167
First up, Paul Clipper was the former staffer at Dirt Bike magazine before setting up Trail Rider magazine, and he digs into his 40-year offroad riding experience to describe how you bike works and the means to controlling it in simple terms.
Clipper covers proper setup, before going on to detail what to do and what to expect while riding offroad. As the title suggests, this book is meant for riders who like to “take it easy” in the rough i.e. trail riding, instead on motocross riders. However, a dirtbike is a dirtbike and motocross riders will need to first learn how to ride in the dirt before progressing to the more serious stuff. This means motocross riders may also find some to lots of useful info in this book.
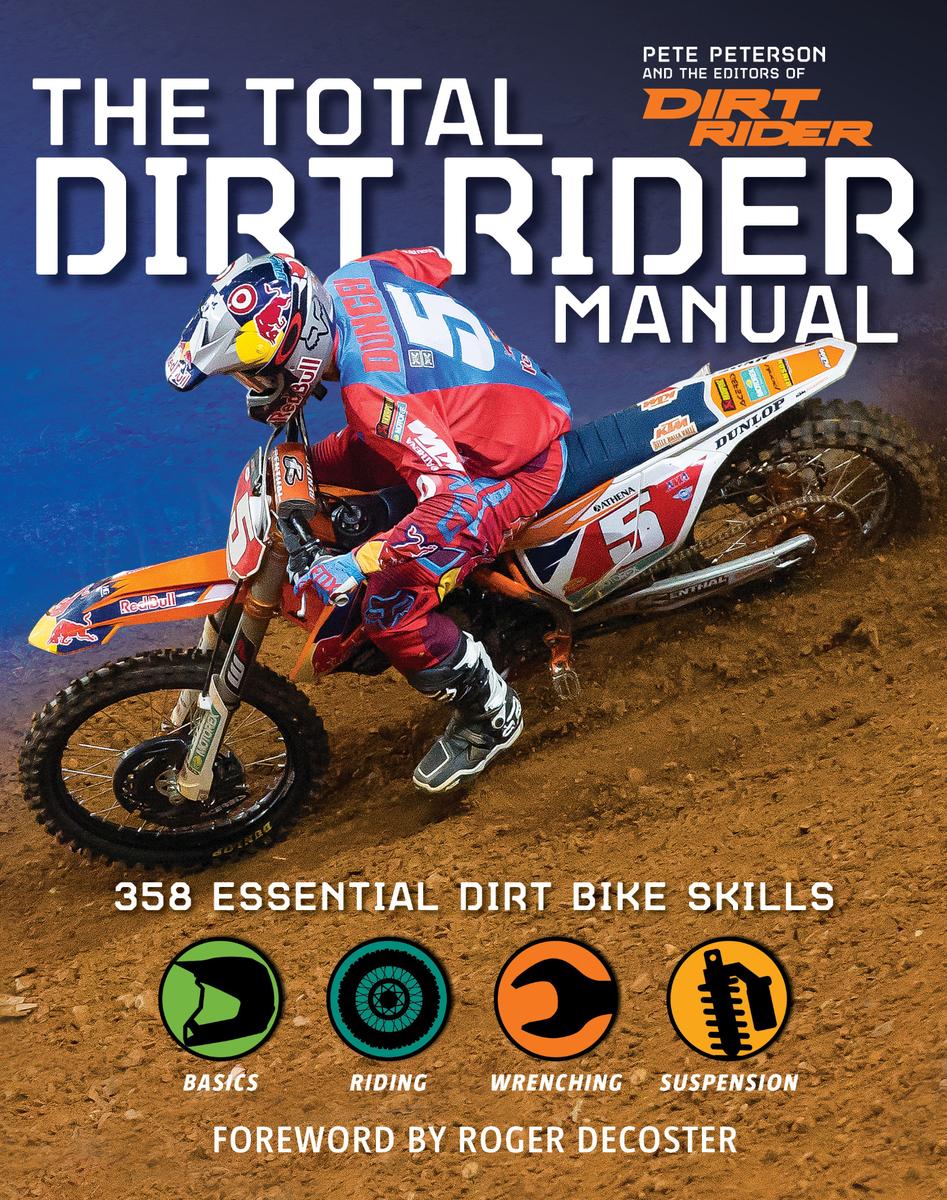
The Total Dirt Rider Manual: 358 Essential Dirt Bike Skills Author: Pete Anderson and the Editors of Dirt Rider ISBN: 9781616287276
Finally, a book for the more advanced riders out there. Yes, it starts with the basics of setting up the bike and riding techniques, but these guys who are the Editors of Dirt Rider magazine take it all the way up to pulling tricks like those in the X-Games.
Dirt Rider is well-known for its “Dr. Dirt” feature which provides great step-by-step info on repairs and maintenance, and the selection of the best ones made it into this book.
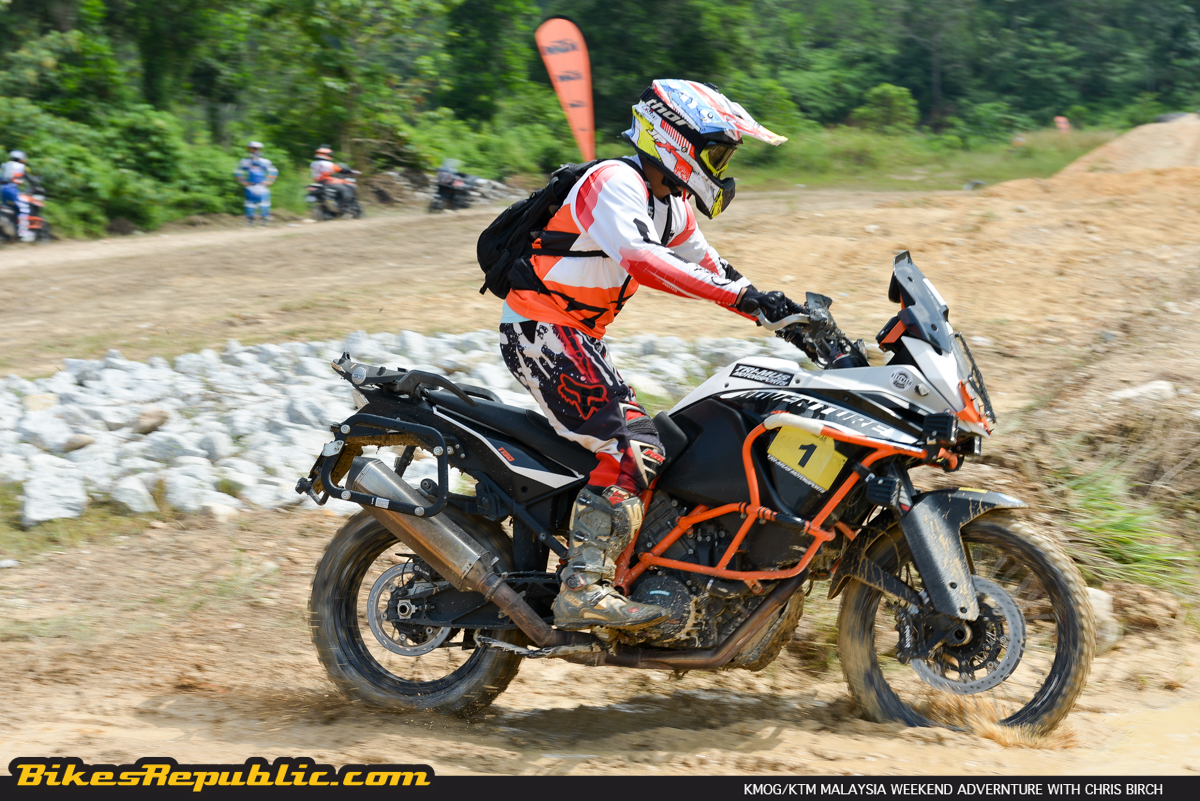
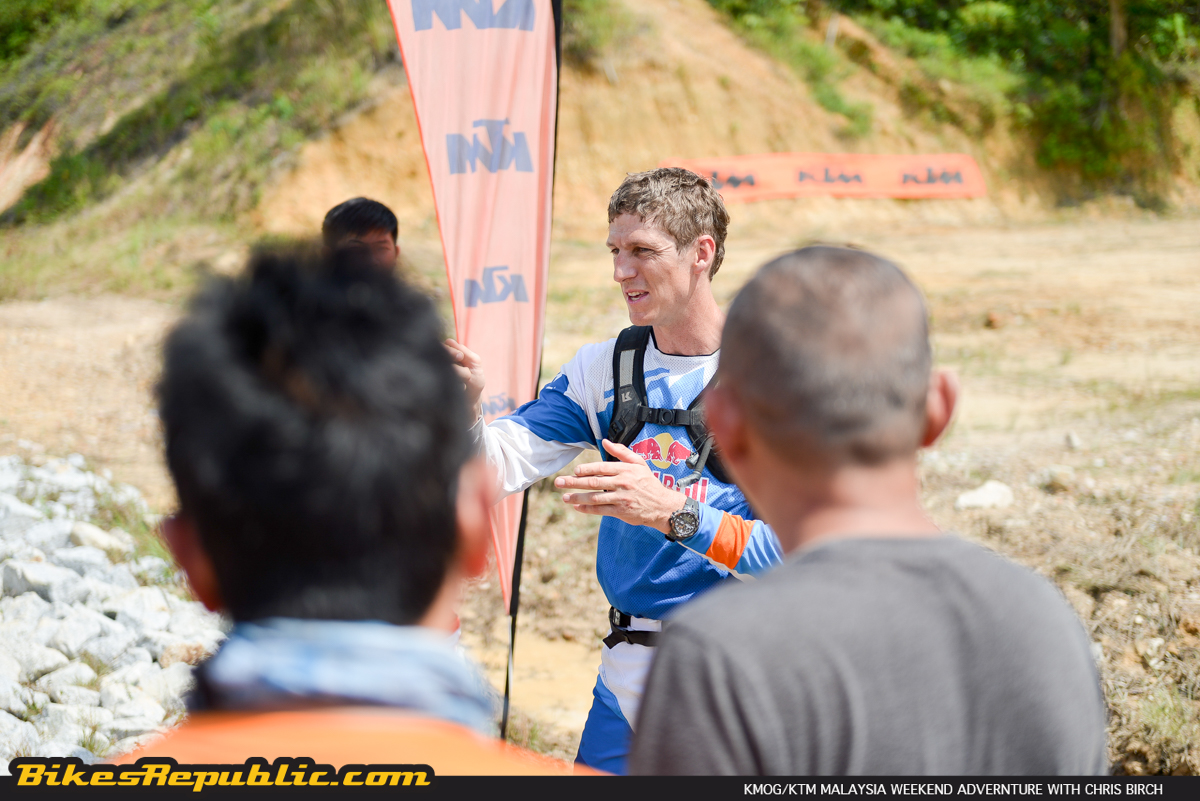
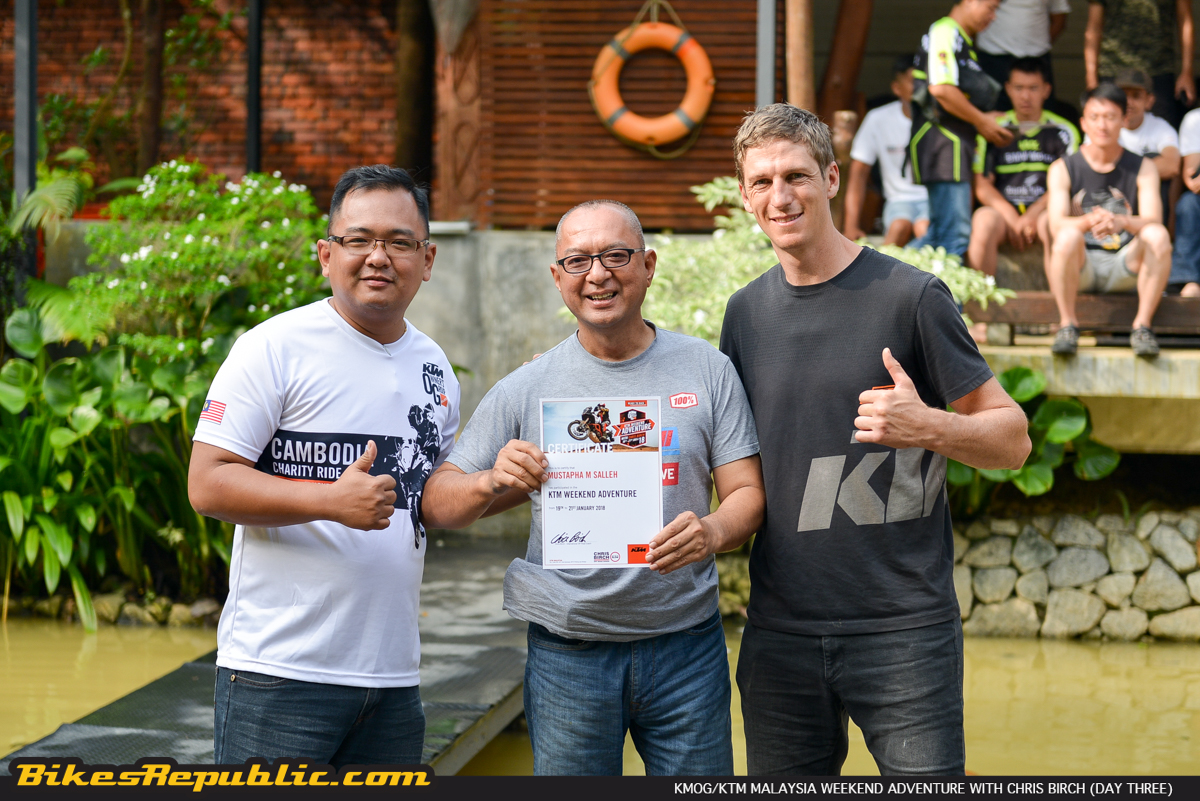
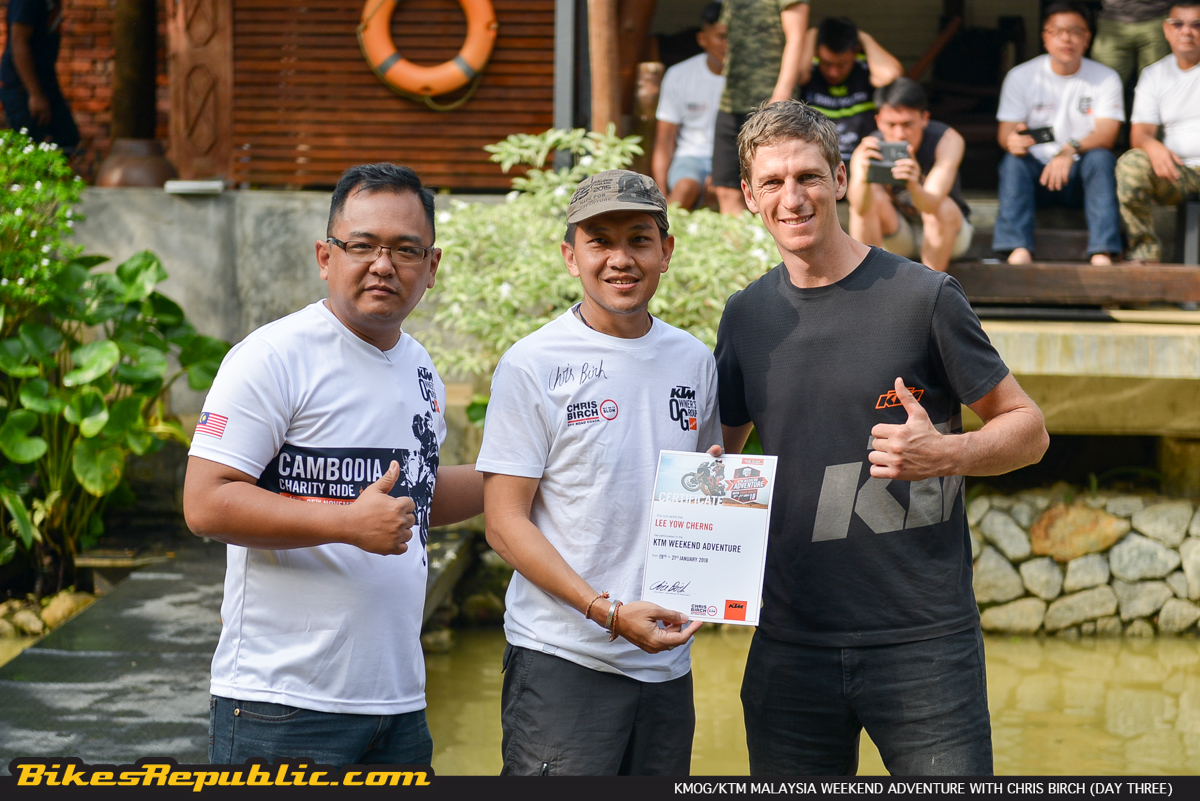
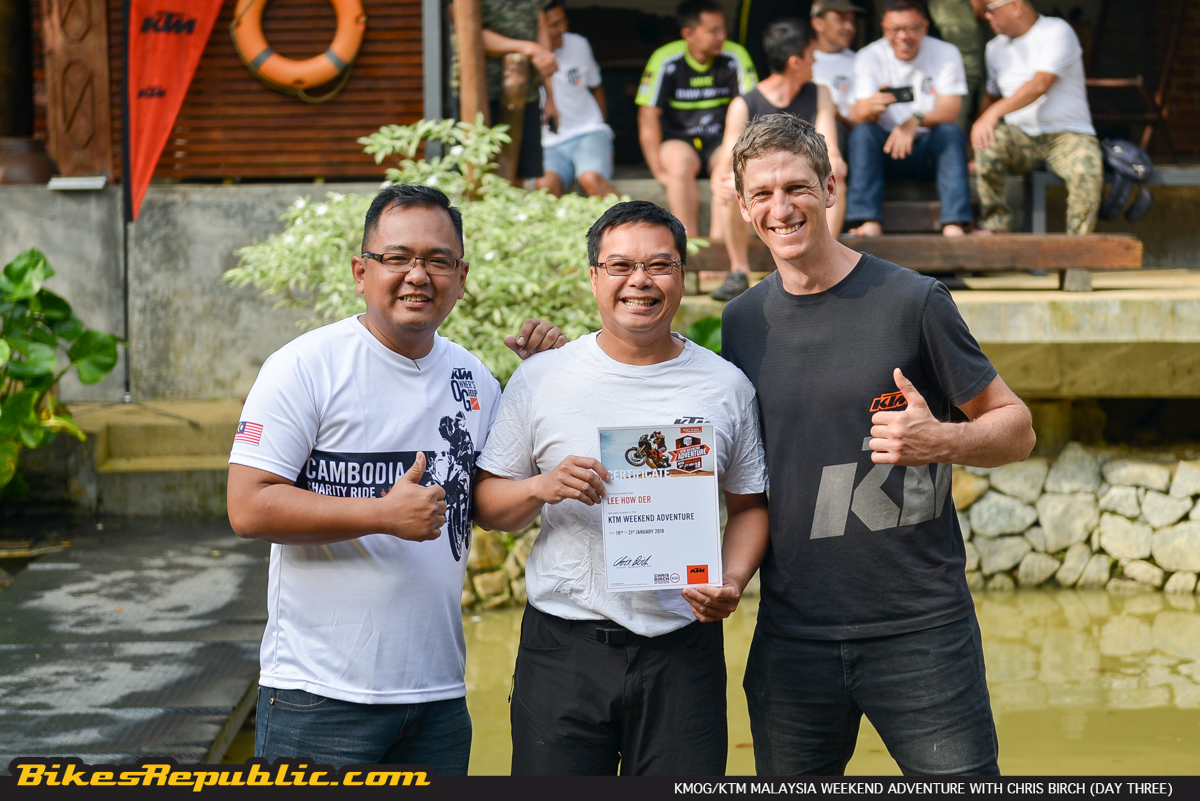
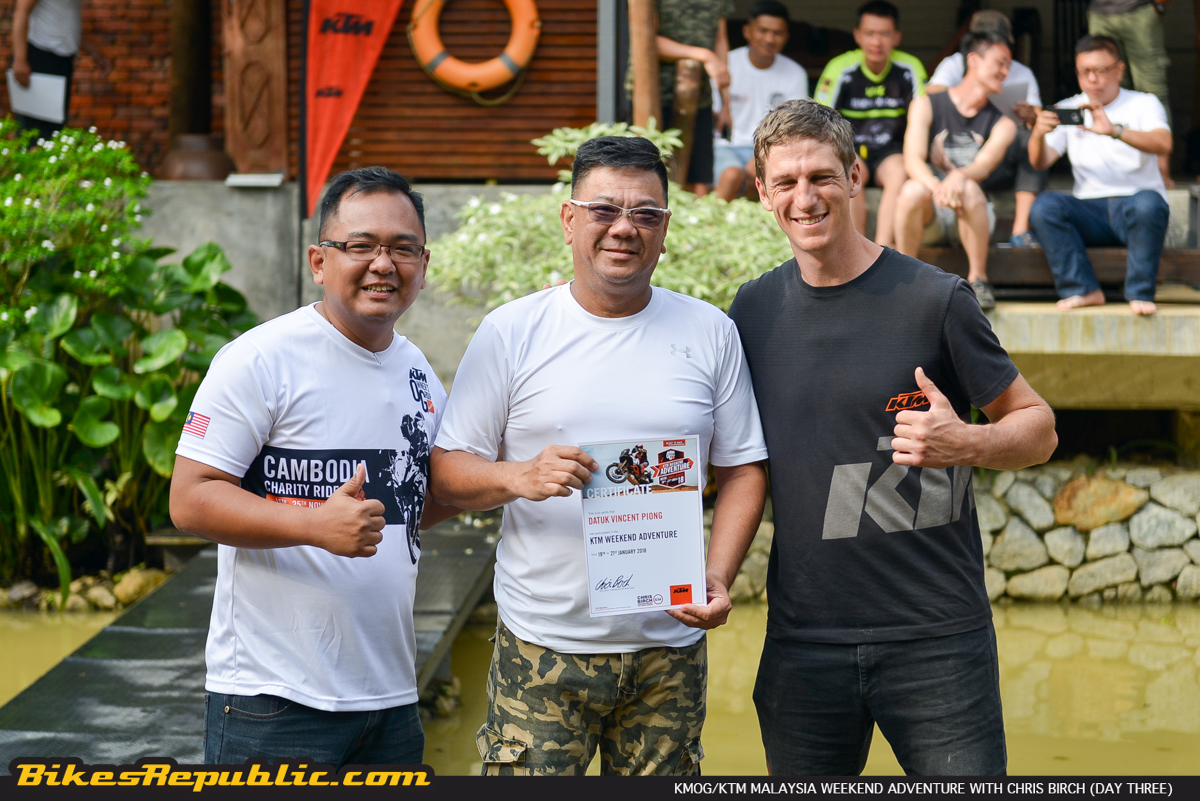
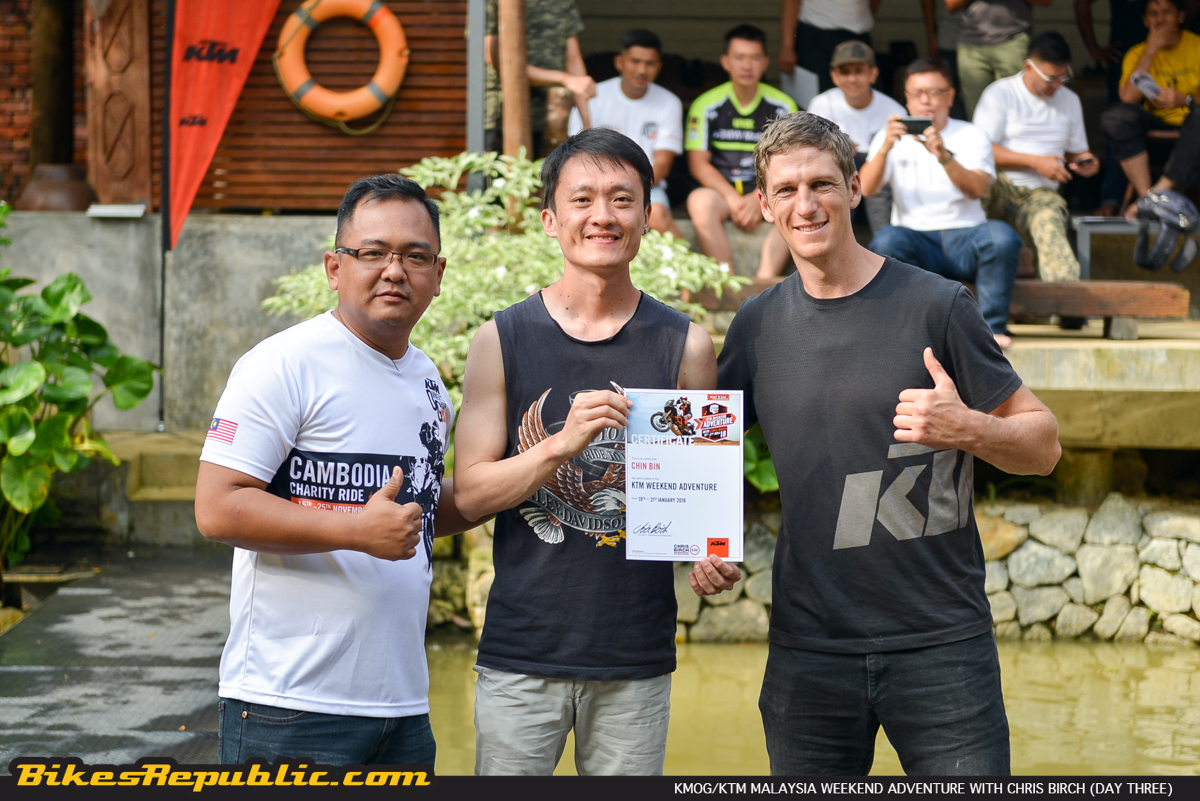
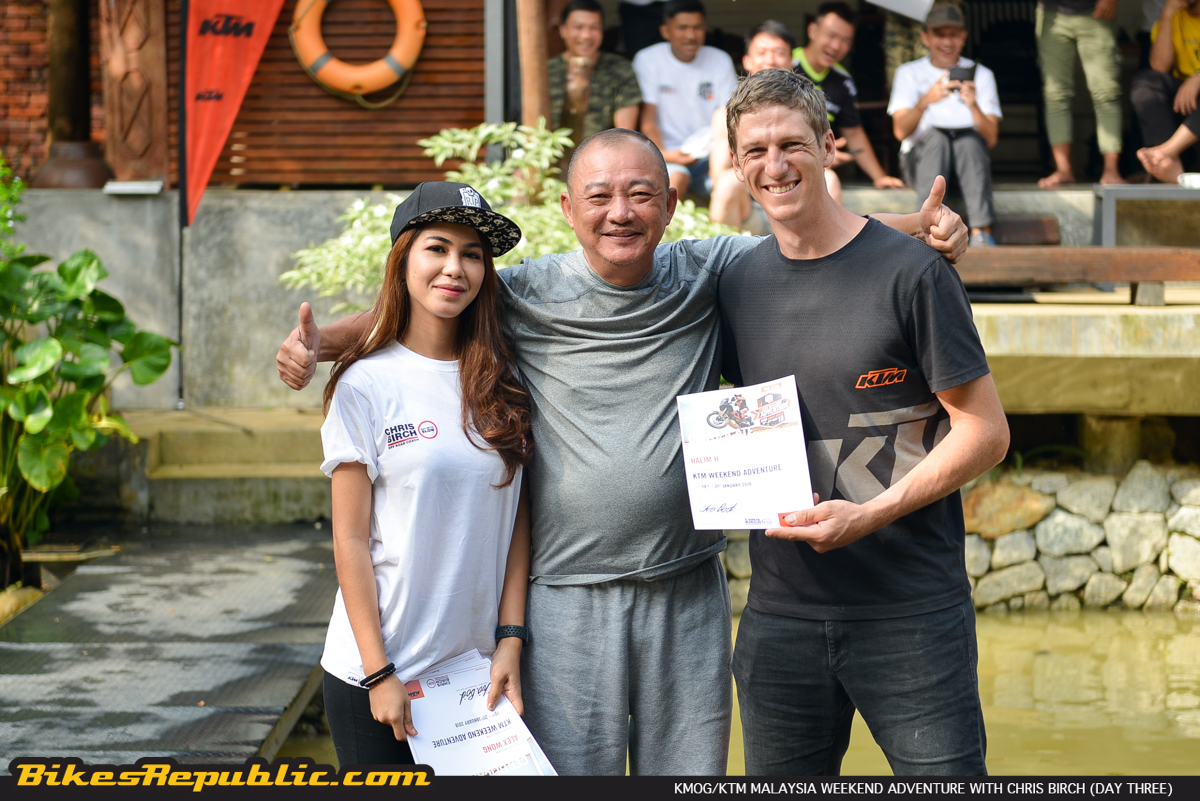
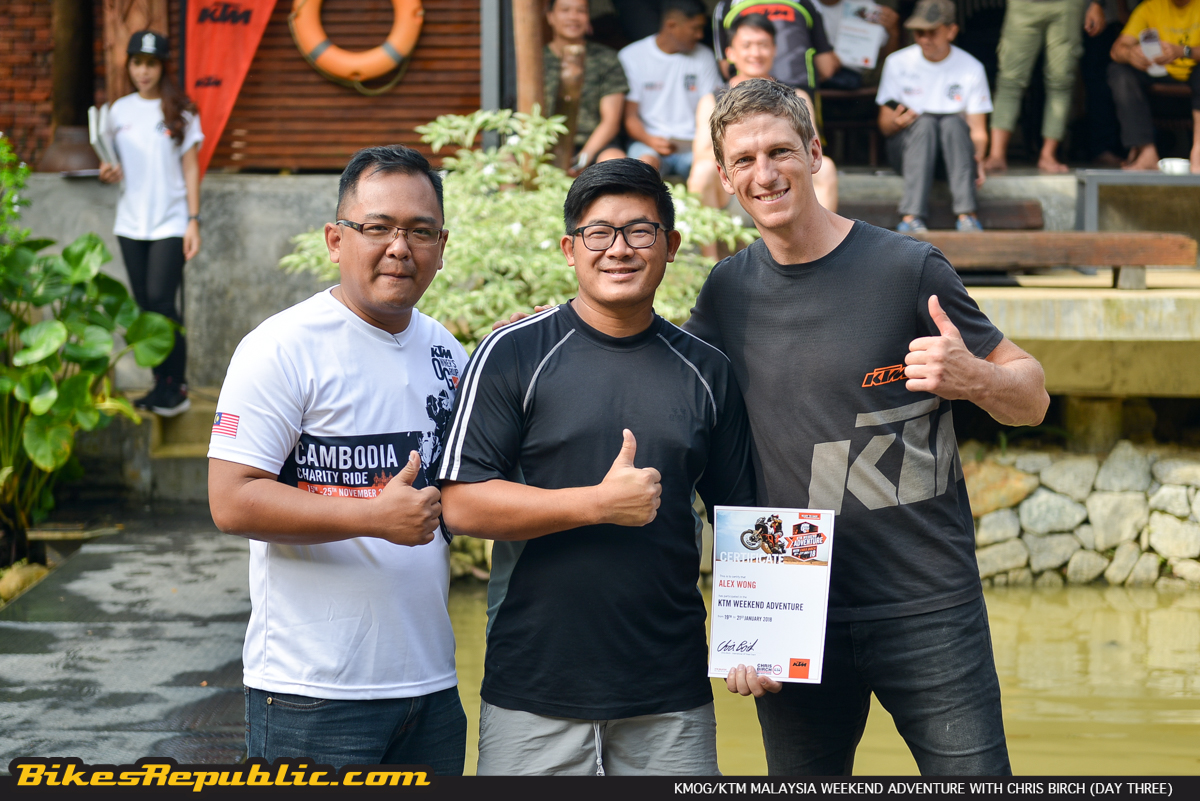
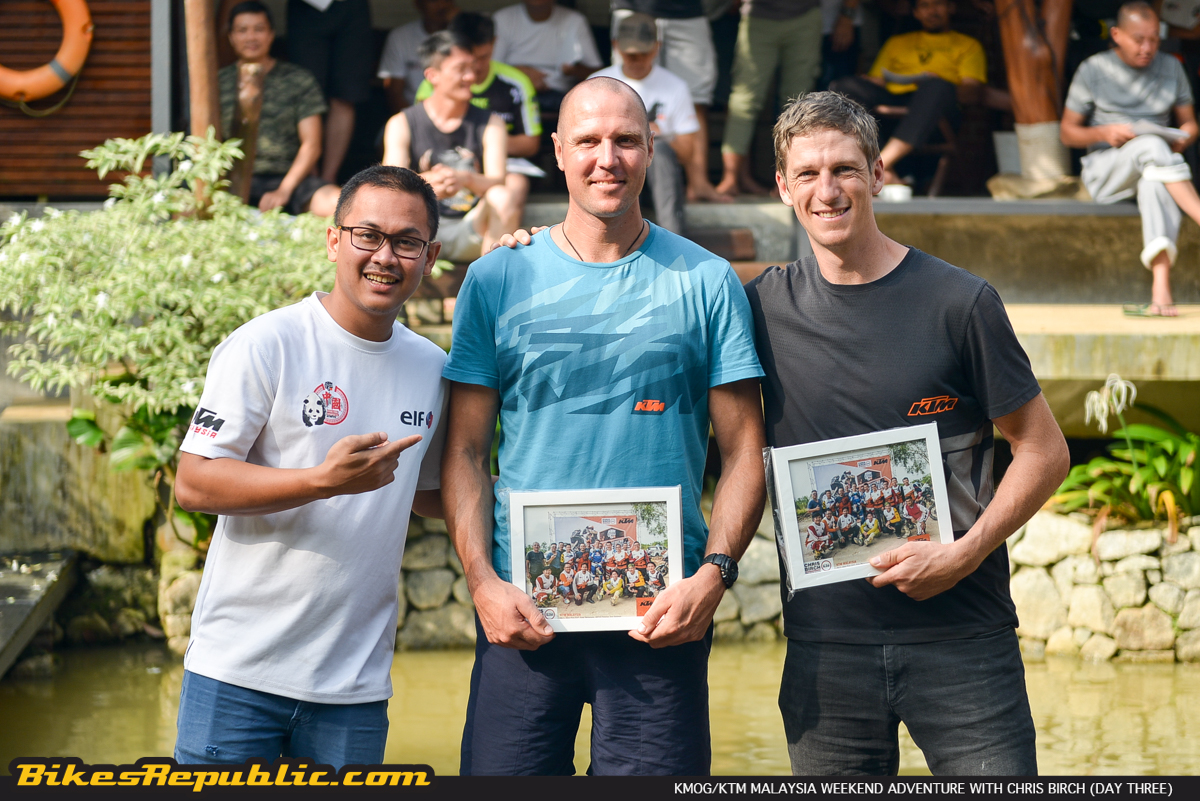
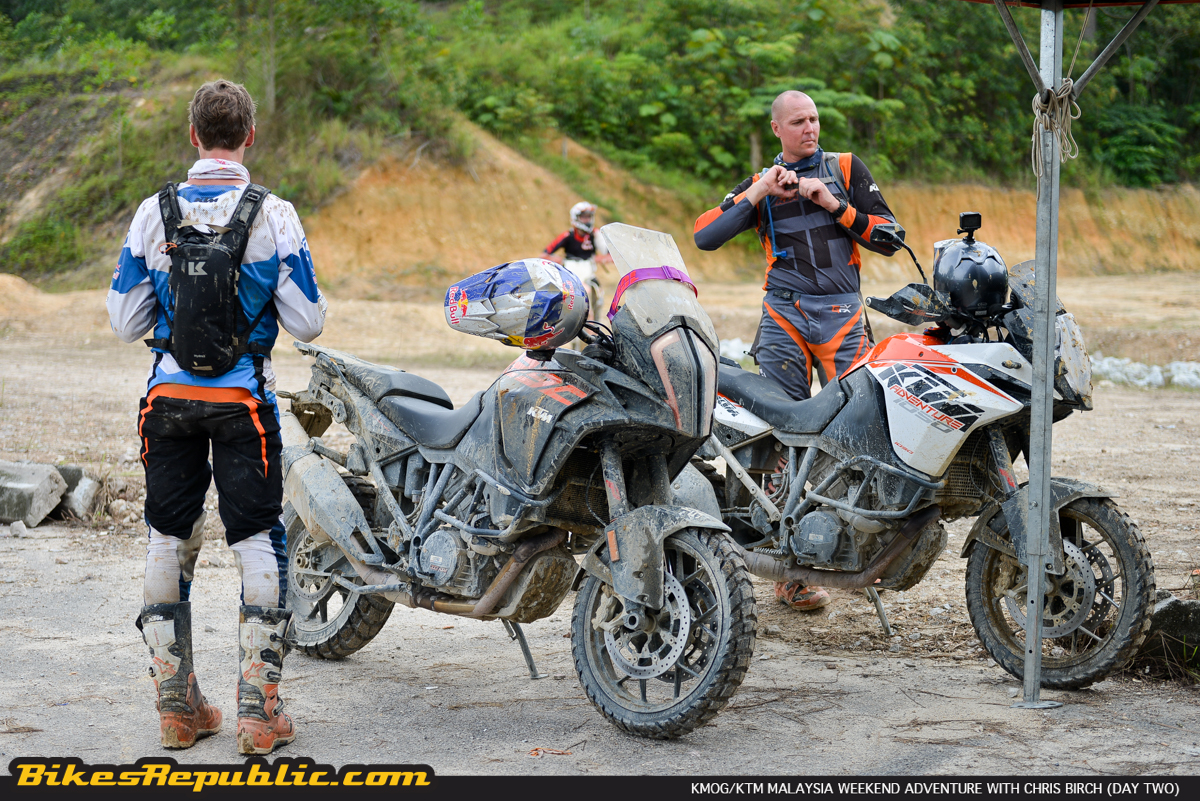
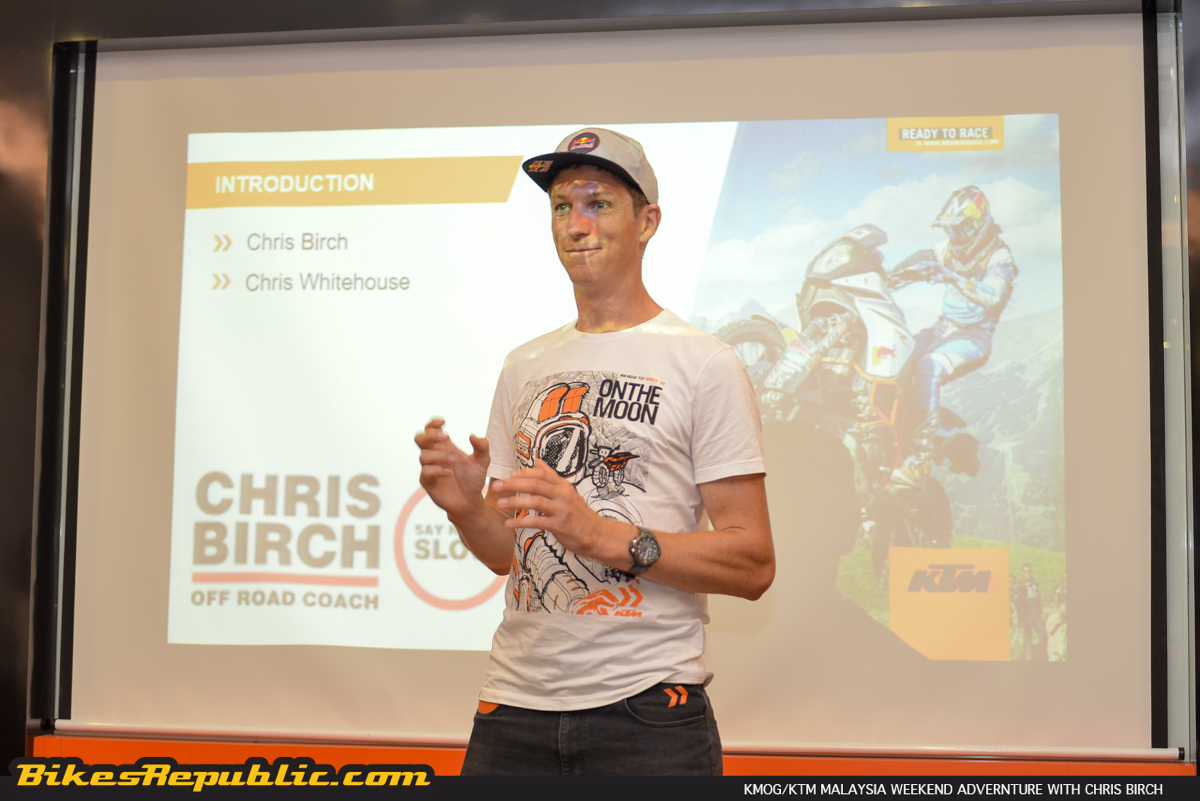
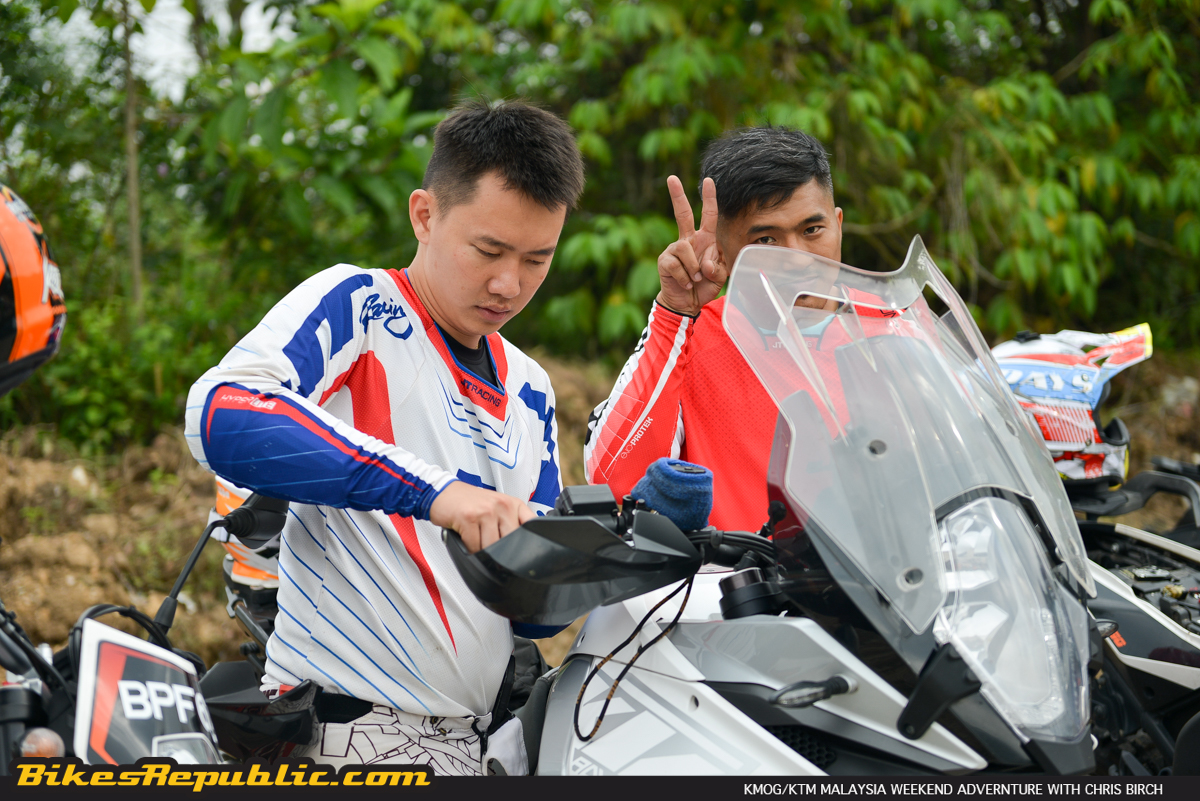
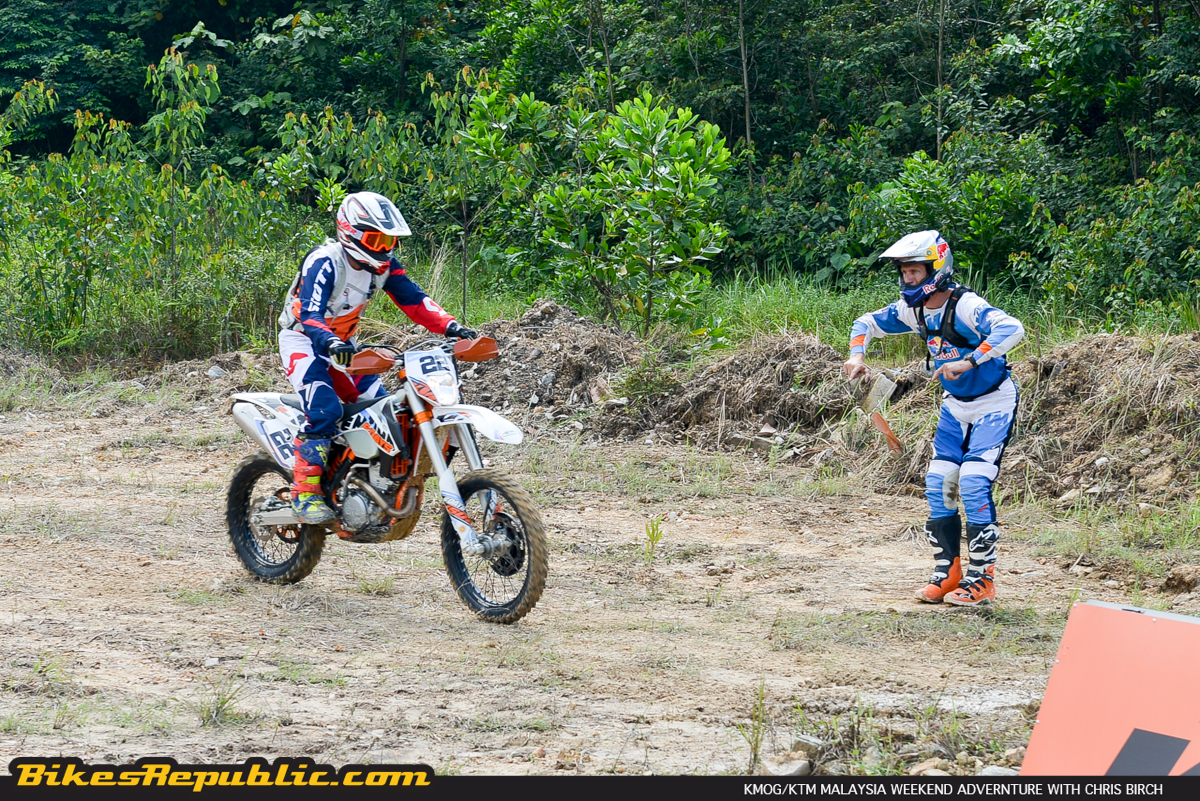
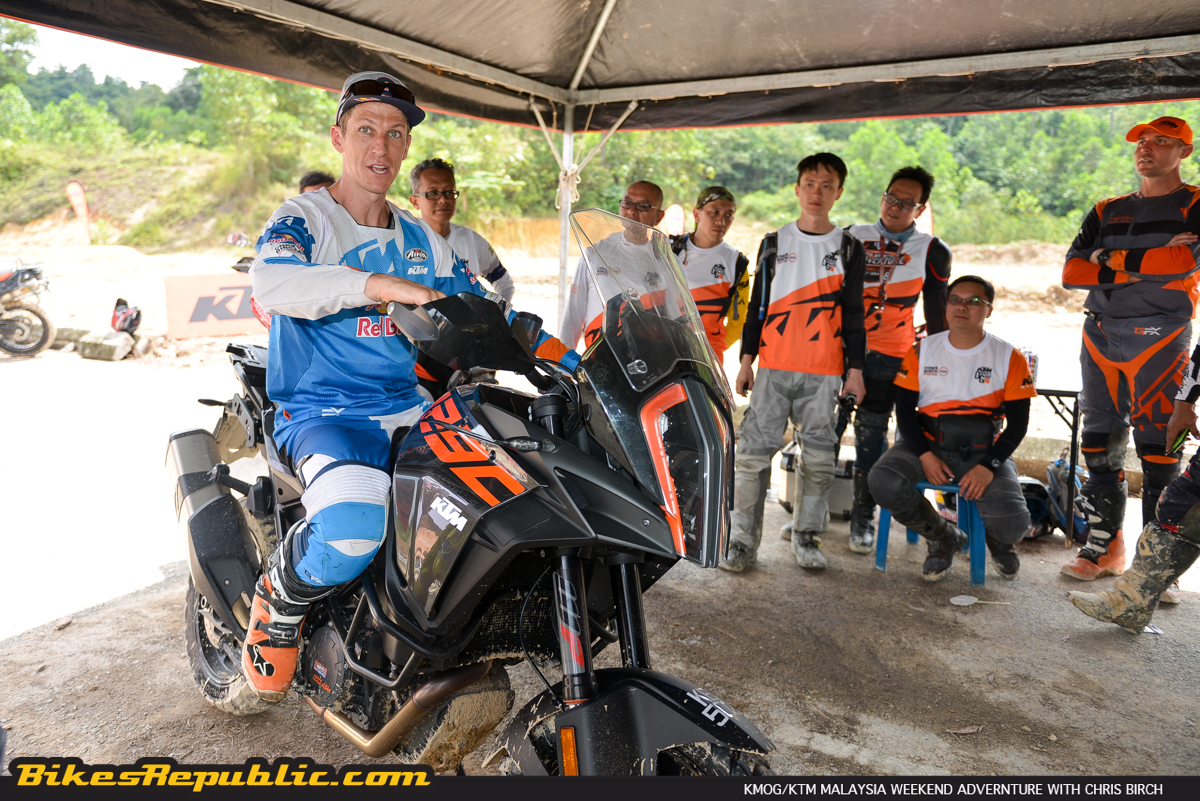
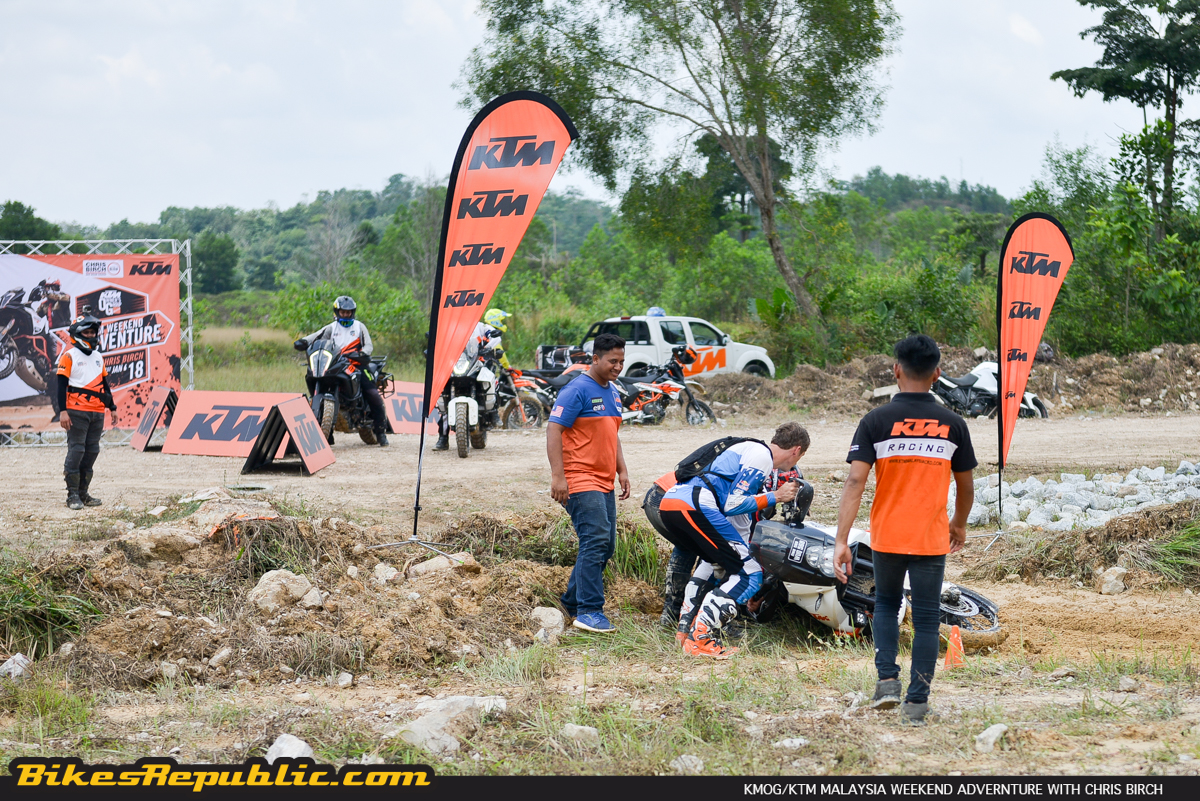
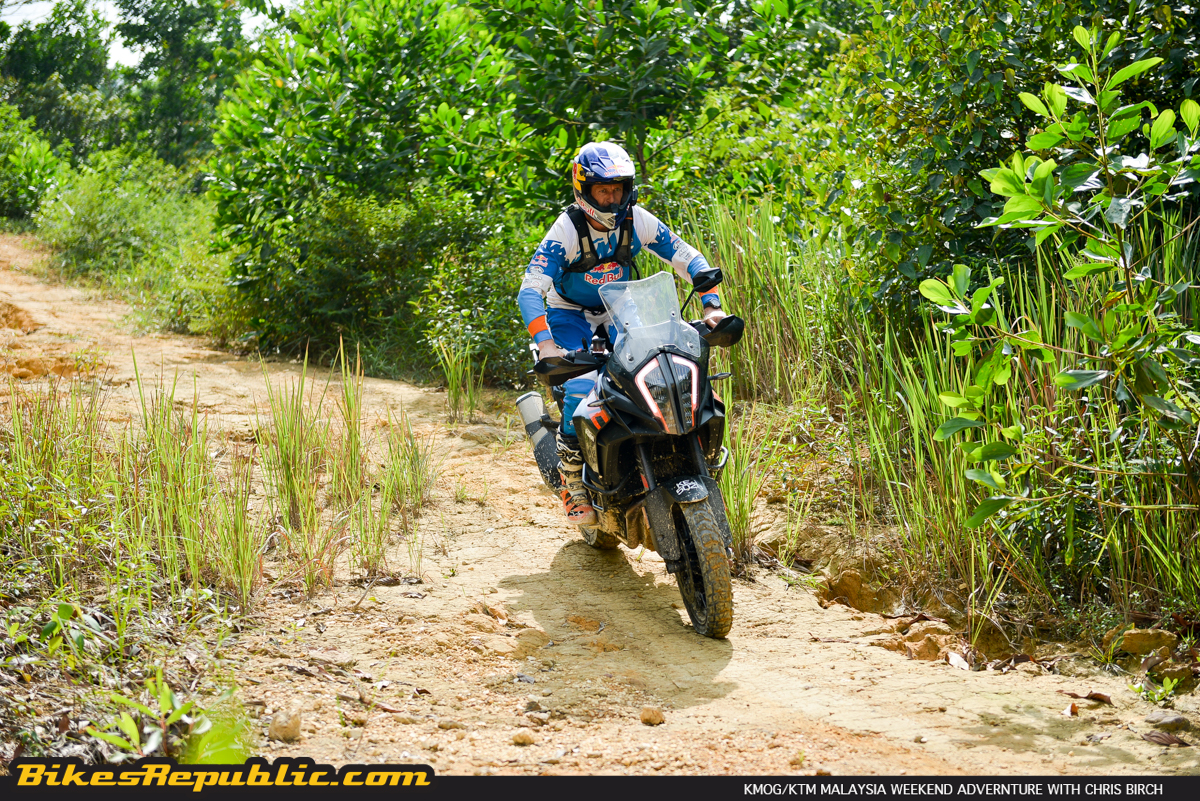
We had the opportunity to sit down for chat with Chris Birch.
Chris Birch was here to coach during the KMOG/KTM Malaysia Weekend Adventure with Chris Birch.
It was an eye-opening event to learn about what makes him tick.
We sat down for a chat with Chris Birch after the offroad clinic and trail ride. If there’s something to learn about the experience in the world’s toughest offroad competitions and KTM’s adventure bikes, there’s most probably no other guy.
The more we chatted through the night, the more we discovered that Chris isn’t just a champion, he’s a regular guy who loves bikes and offroading. Additionally, and no less importantly, he also coaches very well by articulating his instructions in easily-digested nuggets not only for the pros, but especially for the newbies. Let’s be honest, how many champ riders could truly teach? Participants could also get up right next to him and approach him at any point of time to post questions and chat.
Try that with No. 46.
Anyway, we decided to just have a relaxed chat with Chris Birch, rather than conduct a formal interview. A few of the participants had formed a circle around him at this point and it was an eye-opening experience for all of us.
Bikes Republic (BR): You’ve competed in the Dakar Rally and being New Zealand’s most successful effort. How was it like for you? Chris Birch (CB): It was difficult because my experience of The Dakar is not many people want to hear. For me personally it was okay. Yes, people say it’s “THE MOST GRUELLING EVENT EVER, THE MOST DIFFICULT OF ANY ENDURO” (with emphasis) – it’s not. It’s really not, from my experience.
The Roof of Africa was in December, The Dakar starts in January. I had a small injury before The Roof (in 2009) and my fitness was not where I wanted it to be and I came second. I did no training at all between The Roof and Dakar, (but) I had no problem whatsoever in Dakar.
I’d normally lose 3 – 5 kgs of bodyweight during the Romaniacs, I actually put on a kilogram during The Dakar. (Everyone laughed.)
It’s very mentally challenging ‘cause it’s very long days and the navigation was difficult, but I didn’t find it very physically challenging at all.
BR: Is it because it (The Dakar) was more speed-oriented? CB: Yeah, yup.
I think also because I had the skills in the technical stuff, so I didn’t find the difficult parts that difficult. The high-speed parts, however, there were a few high-speed stages where I got off the bike and started trembling, “S**t, that was fast! Wooow!” We averaged more than 100 km/h in offroad stages (we rode around 50 – 60 km/h in the fastest sections earlier in the day). It was freaking scary.
You’re completely blind and navigating as well.
Also, I found that raising money for it was really, really stressful. It put a lot of stress on my family as well. That’s the reason I haven’t done it again. It’s so stressful finding the money.
BR: What was your best experience in the Romaniacs? CB: The best experience was in the first year. It was my first year in extreme enduro. Many people told me I was crazy, even for going, and I came on the podium on that first year. So that was a real life-changing experience.
BR: What was your worse experience? CB: Nearly chopping my private part off. (Laughs).
I went over the handlebar in the river and caught it on the handguard. Lots of blood, I was like, AAAAGH NOOOO! Definitely that was the worst experience.
BR: How about The Roof of Africa? Is it still running? CB: Yeah, it is! I’d love to join again, but I won’t be able to compete for the win. I’d probably still get a Top Ten finish, that would be really nice.
BR: You’ve also competed in Hells Gate. CB: The problem with Hells Gate is it’s in Italy in February. So, it’s freezing cold, it’s snowing, there’s ice in the rivers and while almost everyone in New Zealand is going to beach (it’s summer down there), and I kept thinking, what is wrong with me! Why am I doing this to myself? This is stupid!
BR: (Someone questioned about something in the Romaniacs). CB: The event isn’t just about straight up riding. You need to look after yourself over five days on the motorbike. It’s tough.
BR: What you did today at the track looked a lot like trial riding? (Climbing over a huge boulder, climbing a nearly vertical hillside, etc.) CB: That’s true, most people say it looks like trial riding, I guess it is both. I ride my enduro 70% more than my trail bike at home. I can do stuff on my enduro bike that I couldn’t on my trail bike.
I get to Australia and people say, “That’s a trails thing.” I answer, “No, it’s really not.”
BR: (Philip Ho asked, “What can’t you do on a trails bike?”) CB: The last trials competition I did was a 2-day event. On the first day, I used my 300 KTM (KTM 300 EX/C two-stroke) and I put trials tyres on it. I used a trials bike on the second and did the same stuff on the KTM.
It was funny. There was one section with a steep hill climb. It had mud and a big rock. None of the trials guys could get up it. It was really muddy, so you couldn’t get the drive on the rock. I just went wide open in third gear and jumped the whole thing. It took me just 10 seconds for the whole section.
The marshals called out, “You ready?” I replied, “YEAH!” and just went “Rrrrrrrrrrraaaaaaaaargh” (the sound of the engine). The trials guys went like, “F*** you!” while flashing the “birdie.”
But there were a few sections where I couldn’t get the enduro to fit in there. I was great fun.
BR: Here’s a bit of a philosophical question. You’ve competed in the toughest events. You know it’s tough, but what makes you push yourself? CB: It comes to the type of person you are. It becomes addicted too like the greater the challenge, the greater the high you get in overcoming that challenge. So, if you go to an extreme enduro and it’s not giving you enough challenge you go like, “Awwww,” (in disappointment) I don’t get the satisfaction at the end of it. It’s that the feeling of achievement. The deeper you have to dig inside yourself, the better the feeling at the end.
BR: It’s a lot like what’s for us today? CB: Yeah, yeah! It’s like the Ironman or a marathon. It’s not that fun while doing it, but it’s the feeling you get after that, right?
BR: You’ve been involved with KTM and Red Bull since 2007? CB: Actually, KTM since 2004. Red Bull was since 2007.
BR: How have they helped you? Have you been riding KTM all the way? CB: Actually no. (Laughs.) KTM approached me in 1999/2000 and I looked at the bike (back then) and went “Uhhhh…..” I remembered thinking if this KTM brand was going to last, I think I’ll stay with Kawasaki. (Everyone laughed.)
It was different years later, the KTMs improved.
BR: Do you ride road bikes? CB: No, just enduro.
I got on the KTM and thought this thing’s amazing. KTM improved an awful lot in those three years (2000 to 2003). The earlier bikes didn’t handle that great, but took a big leap forward. I got the (new) bikes and loved them straight away.
BR: (Philip Ho): So the earlier KTMs were bad? CB: It’s not to say they’re bad, just different. You get off a Japanese bike and onto a KTM and they (KTM) felt very different.
BR: How long have you been riding and competing? CB: I started riding when I was four. I started doing trials when I was ten. I started riding around with my Dad.
BR: (Philip Ho): How old you now? CB: I’m thirty-seven.
BR: We were in Australia or a supermoto race a couple of years back. We saw a father buying a Yamaha PW50 for his two-year-old son. Is that why New Zealand has produced many champions? You guys start early? CB: To be honest, I can’t remember starting to ride a motorbike.
Dad told me I used to drag all the cushions onto the floor and turned them into obstacles for trials riding for my plastic motorbike. My parents must have seen that was my interest.
My Mum and my Dad both ride
My Mum always said I went for my trials competition when I was two weeks old.
BR: You’ve been here a couple of times in Malaysia. What’s your observation of the offroad scene here? CB: I think it’s pretty much growing and developing scene, which is exciting for you guys. It’s nice to be here at a time when it’s growing.
I followed what the guys had been doing down in Ulu Choh (Dirt Park). I see and watch on Facebook that they’re getting bigger and bigger, it’s gotta be good.
BR: How do you see the future here?
CB: The picture’s good. Definitely with the big bikes here (today). You guys are connected to big land masses, your opportunity to go on adventures and explore is huge. You can get on your bike and ride to different countries; we can’t do that in New Zealand.
BR: What’s your best enduro experience, if you have to pick just one?
CB: It’s definitely winning the Romaniacs. It was something I worked so hard for, for many year. I had to sacrifice so much of life to get there.
BR: What was or were the most difficult thing you encountered in these events? CB: The most difficult thing has always been the lack of money. There’s not much sponsorship in New Zealand.
And people tend to think that I’m sponsored by Red Bull and KTM, there’s no concern for money, but I’d regularly be sleeping in people’s vans, like hitching a ride, that sort of stuff. Like not near enough money to do it.
BR: Really? That’s surprising! CB: Yeah, it’s surprising. People think everything is taken care of, no issues, so I was always having to work, train and race at the same time. It’s really challenging and racing on secondhand tyres, that sort of thing.
People are like, “We want you to go to The Dakar again!” Man, if I could find the money, I’d do it in a heartbeat.
BR: What’s the best part about coaching? CB: It’s when like I see these “lightbulb moments.” They come up and say, “That’s WHY I was struggling with that!” The number one goal is always to make people want to ride their bikes more often.
BR: What about difficult participants? CB: When people are unwilling to change.
You can see people like thinking, “Yeah, yeah, I know better.’ It used to really bug me but now it’s like whatever. I’d rather focus my energy on those who really want to learn.
We used to get people coming and not listening. Then we put the prices up and they (the difficult people) went away.
No more people showing up late, showing up on broken bikes, all problems solved.
BR: Now it seems whenever there’s a new KTM adventure bike, you’re the first to have a go. CB: Yeah, my role now is the KTM Adventure Ambassador for the factory.
BR: Thanks for the time, Chris. Hope to see you again! CB: My pleasure, hope to be here again too!
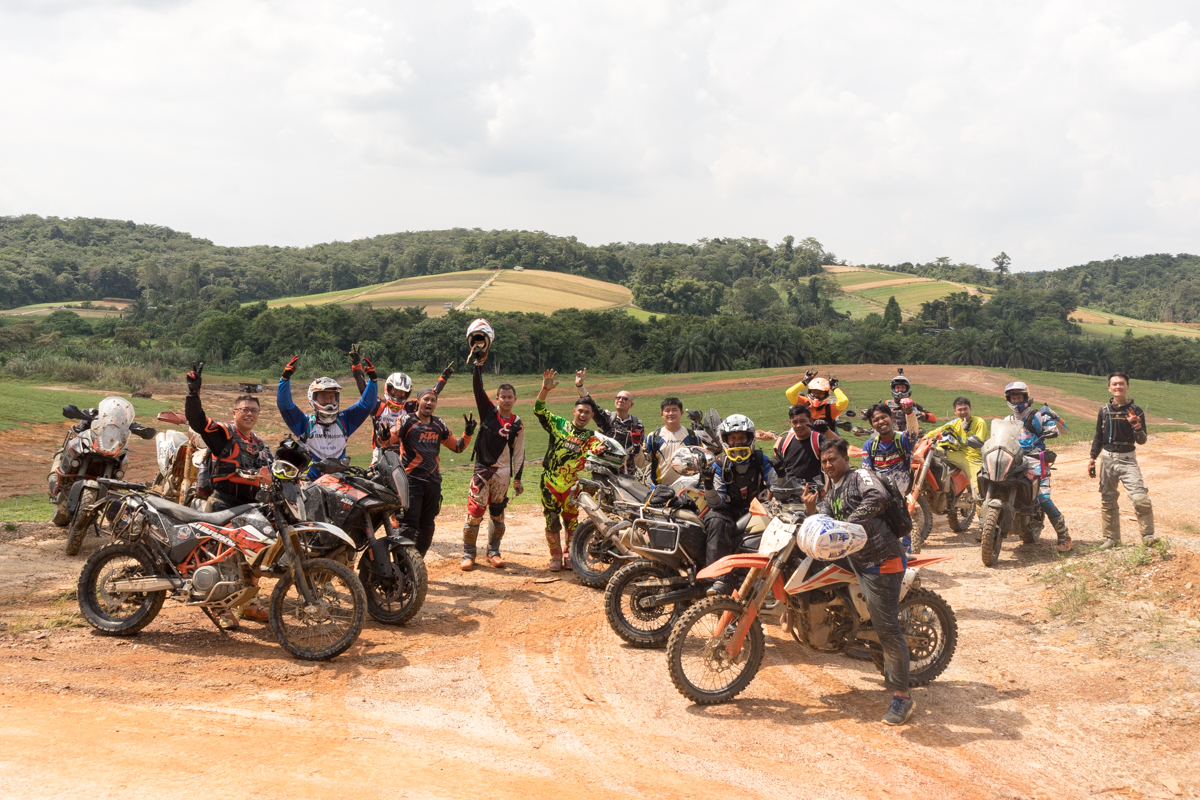
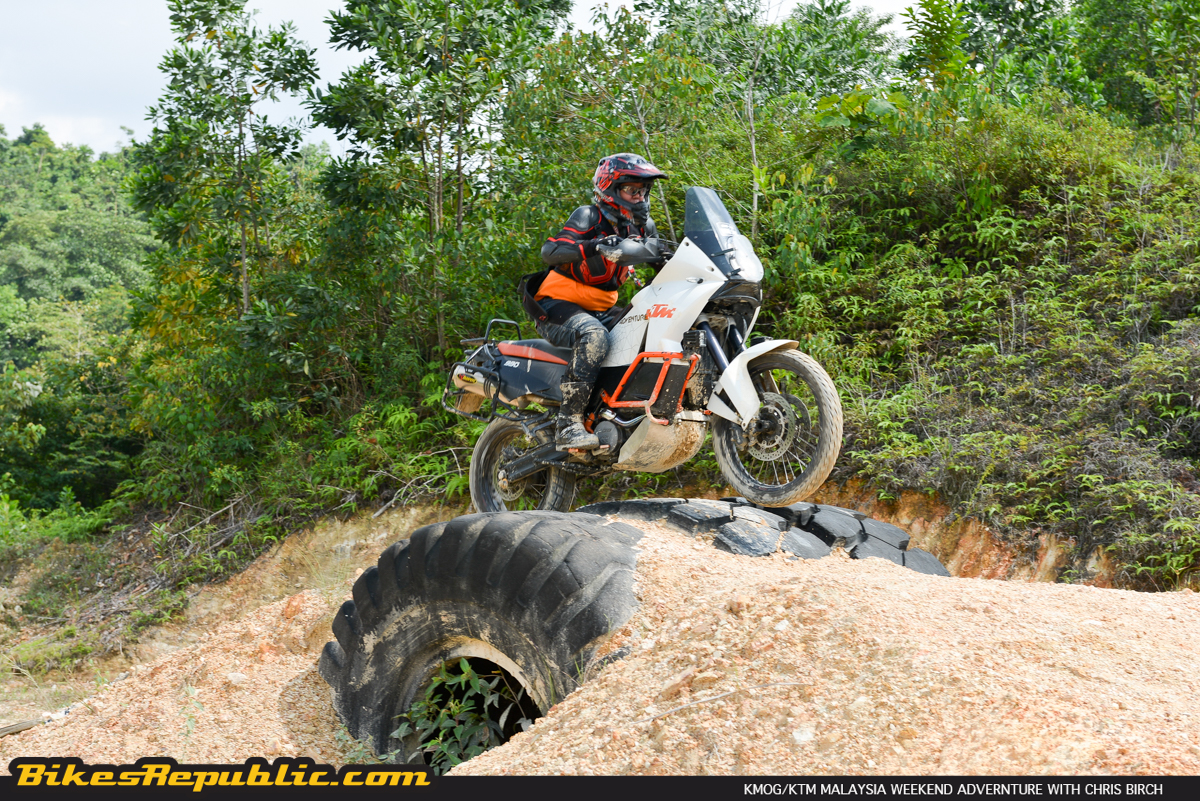
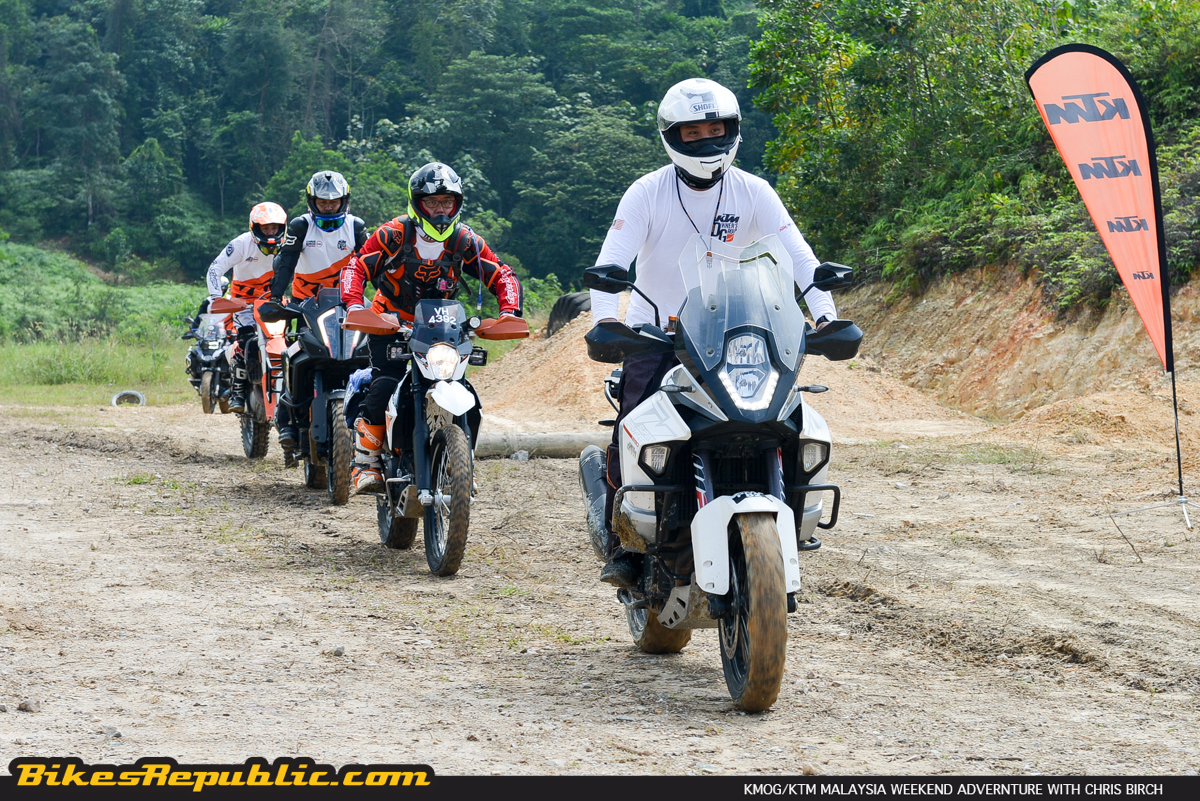
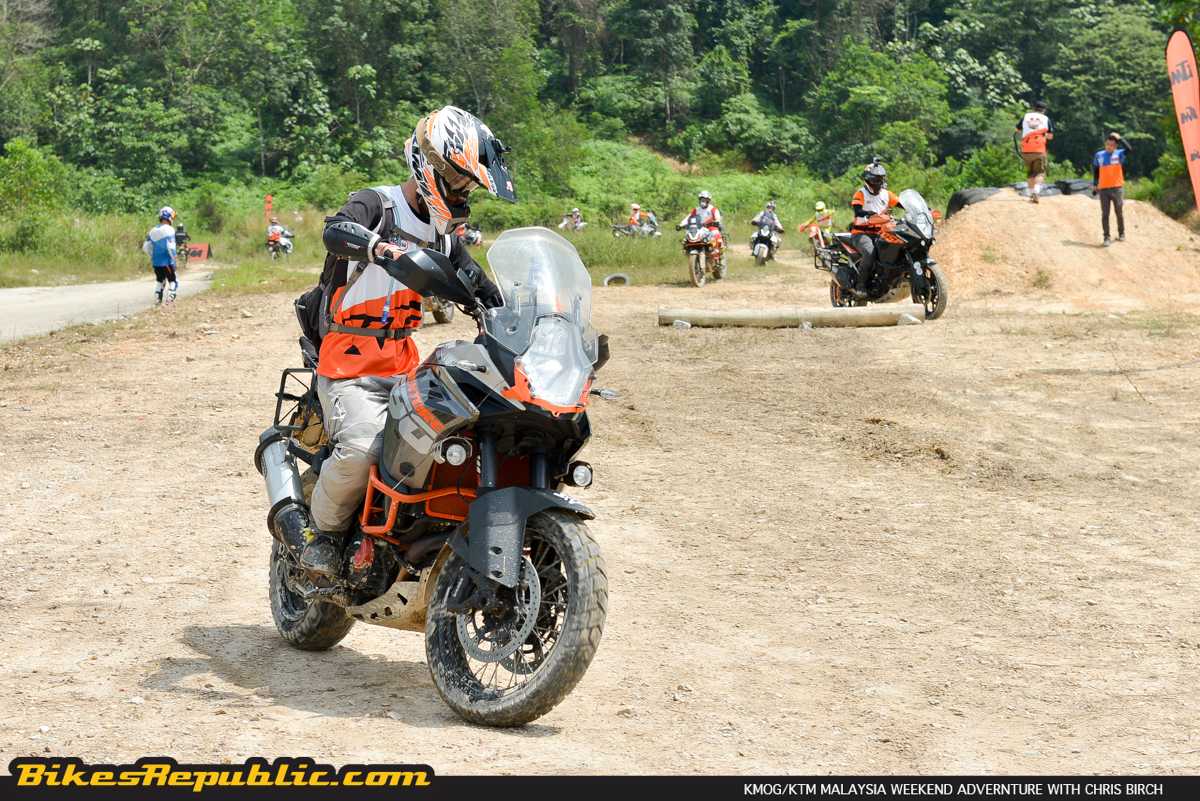
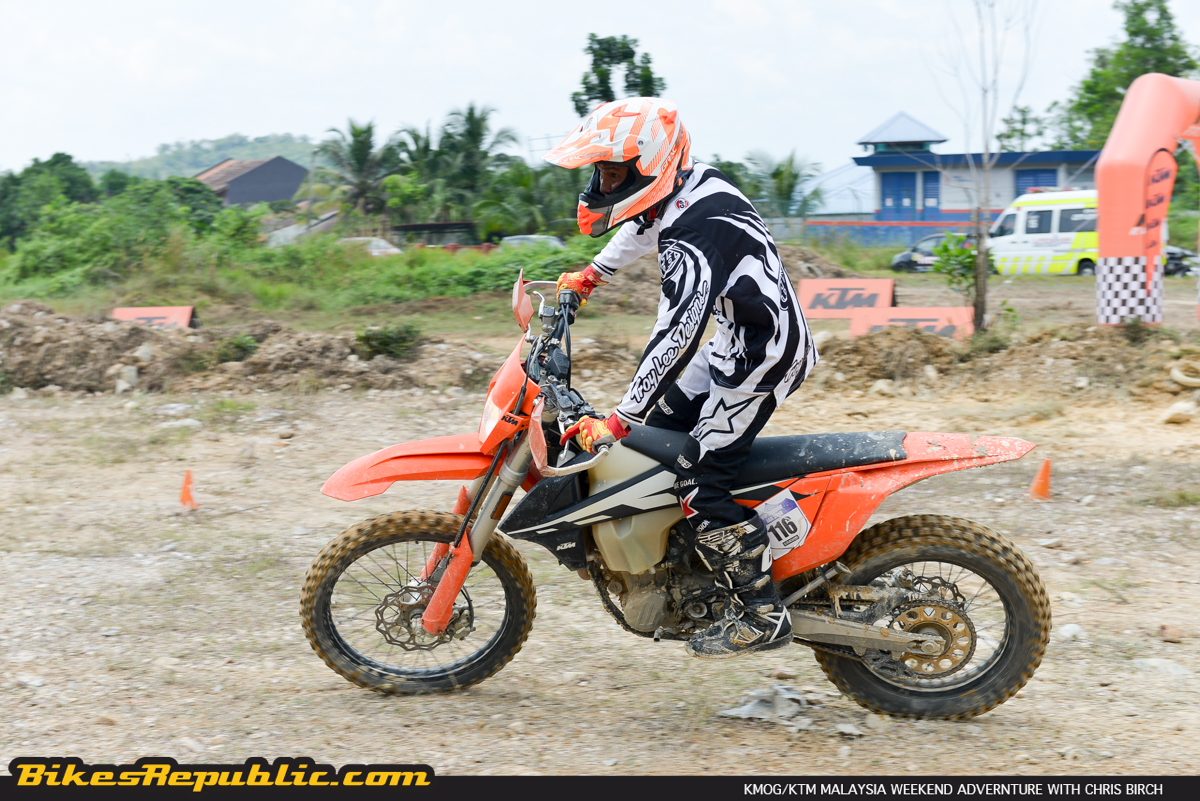
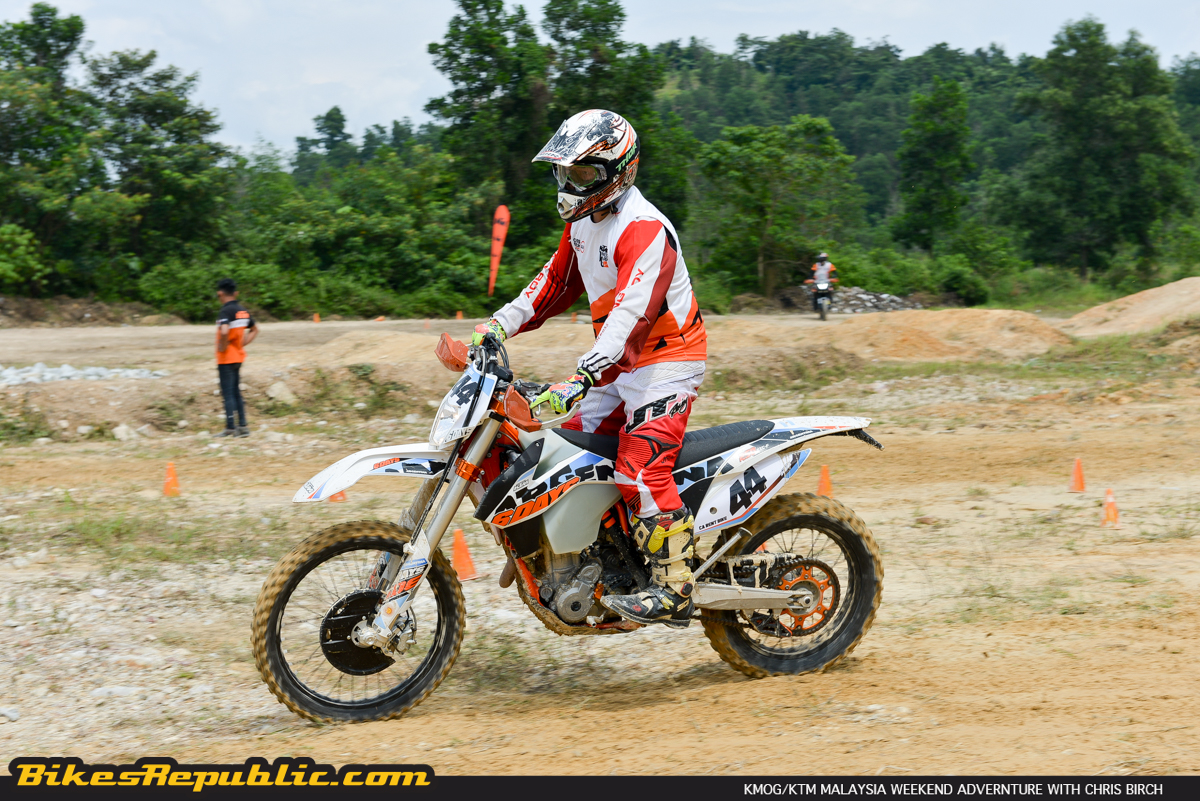
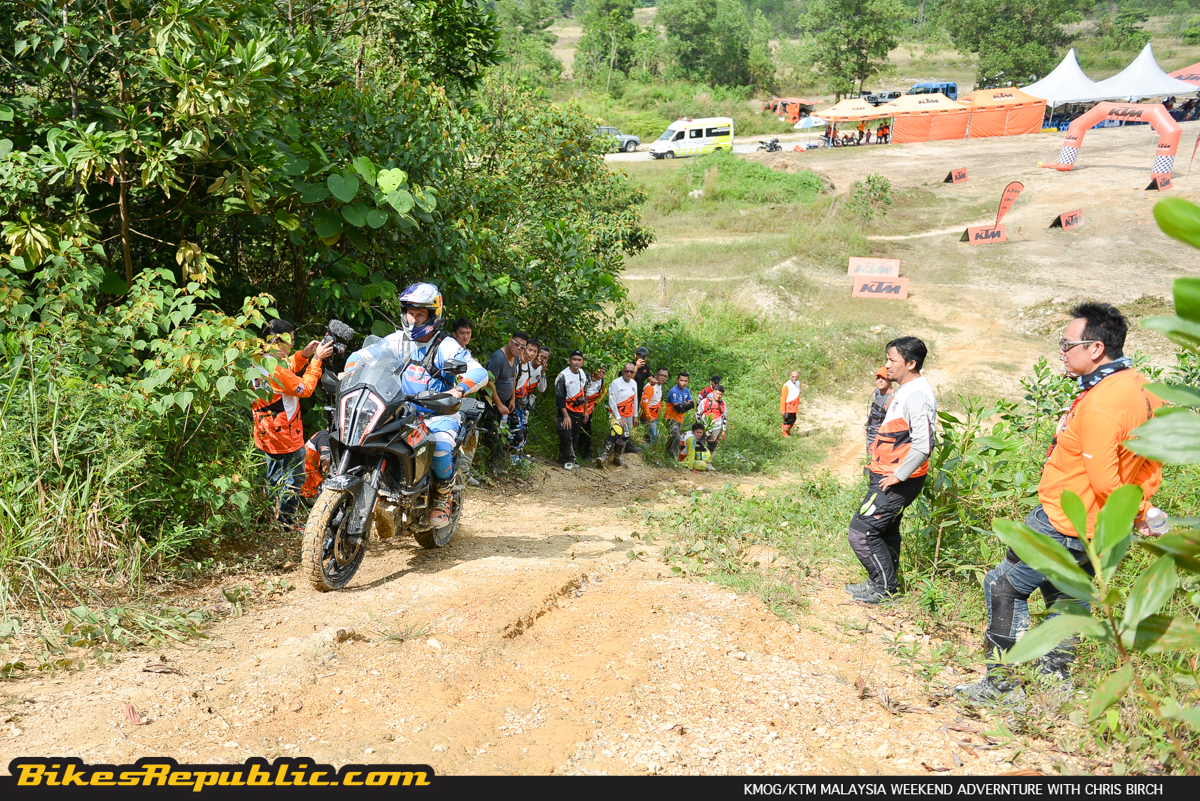
Day Two of the KMOG/KTM Malaysia Weekend Adventure with Chris Birch saw us going for an offroad ride.
The objective was to consolidate the lessons from yesterday’s clinic into real-world riding situations.
The participants soon learned how good were the lessons and that their KTMs could withstand great abuse without even one breaking down.
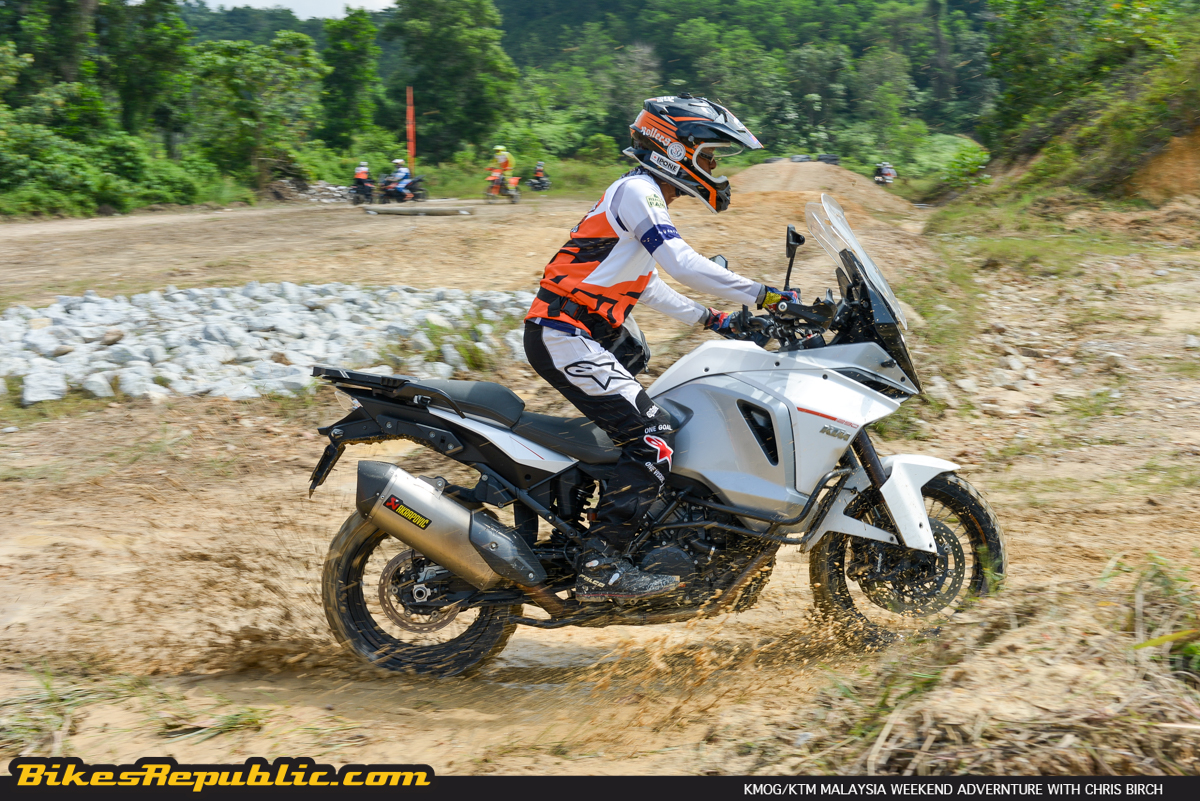
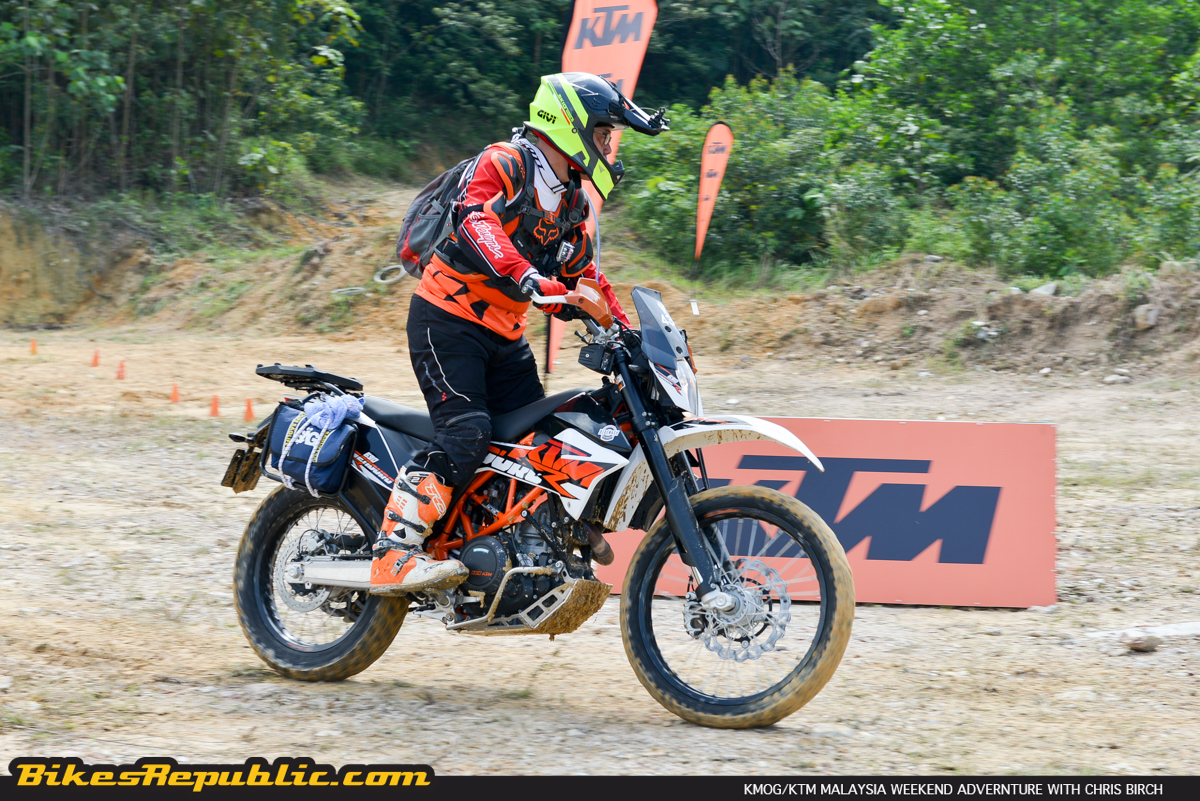
Although am not proud of it, I’ve done well so far in this KMOG/KTM Malaysia Weekend Adventure with Chris Birch event. I wasn’t as fast as the fast guys, to be honest, but I wasn’t that slow either. I’ve always had a phobia for deep mud, but Chris’ advice to keep looking forward, while leaving body, core muscles and arms loose paid dividends. The bike wiggled around underneath but it went where I placed it. The KTM 1050 Adventure proved that it could hack it in offroad conditions.
We’ve now arrived at a deep laterite mud (what we commonly call “red mud”) section. It was 500 m long, wide and flanked on both sides by young oil palm plants that were about metre high. I saw the marshals up ahead signaling to our trailing group to stop and wait. Having tackled deep mud all day, I had good feelings, so I dubbed it a friendly name as the “Mud Spa.”
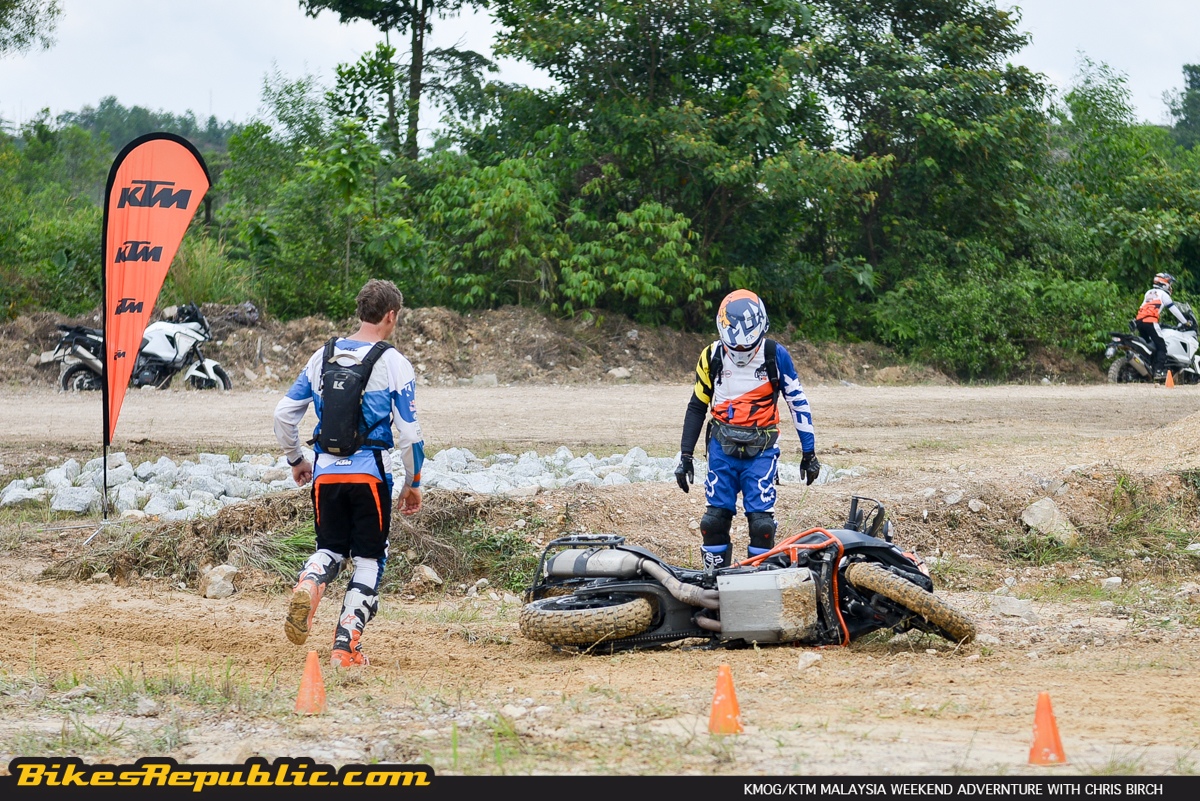
The BMW R 1200 GS Adventure went first. Just 3 metres up and its front wheel deflected fully to the left, dumping the rider into the dirt like a sack of potatoes. He got back on to his feet while the marshals lifted the bike onto its wheels. He got on and tried again but was promptly back in for another “treatment.”
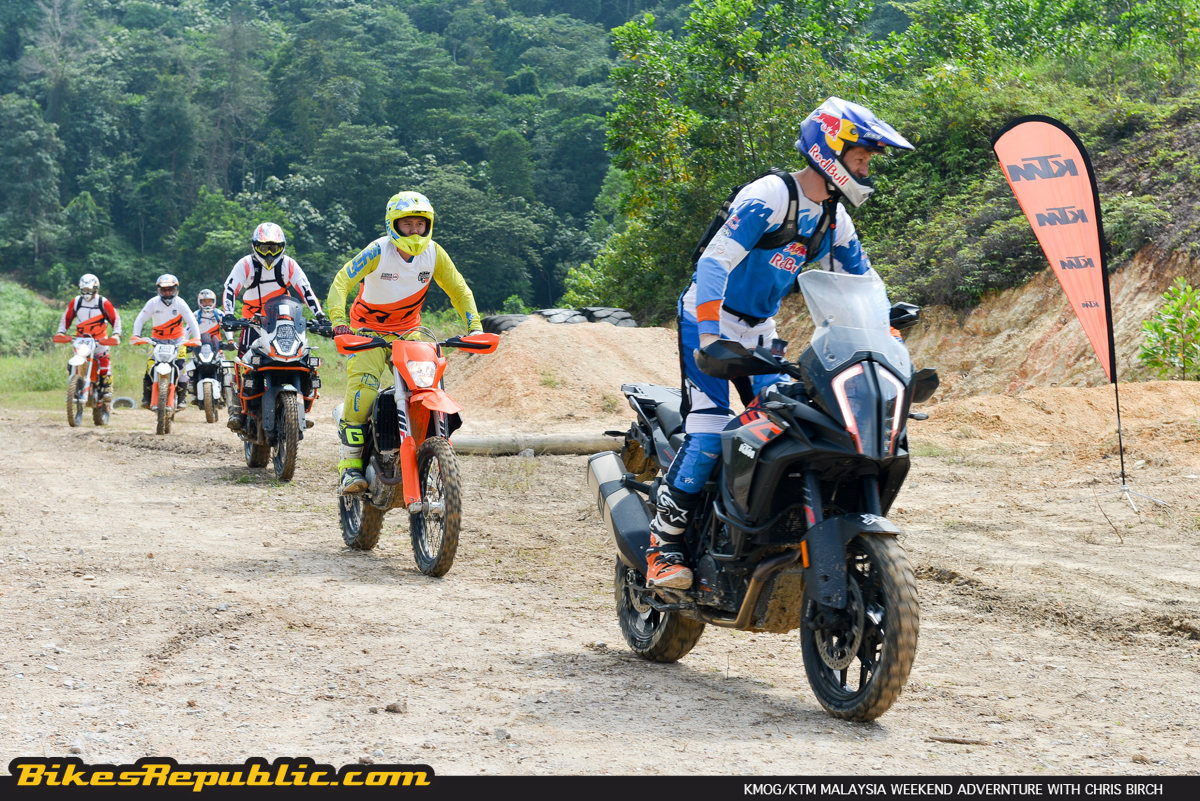
Before I could move, a KTM 690 Adventure hopped ahead. Chris Birch was now beside us at the “start line” and he called out “Full gas. Keep it pinned.”
The KTM 690 rider did just that, but his forward momentum disappeared almost instantly when the front wheel was swallowed by the ochre monster. Still, he kept it pinned. The spinning rear wheel pirouetted around to the left in slow motion, pointing the bike perfectly facing up a steep hillside. He stopped, put more weight on the left side of the bike and gassed it. Now the rear slid around to the right, pointing him directly into the wide plantation area on what had earlier been his left. However, he kept trying while the rear slid right, left, right, left up the trail. He made it through without dropping it.
It was my turn now. Seeing how a bike with offroad tyres could do it boosted my confidence. Chris Birch advised, “Aim for that rut, once the front tyre gets in there, just follow it and keep the throttle open.” I nodded and headed out.
The front went full right lock in just 2 metres later and the rear tyre went sideways. Instead of keeping the throttle on and slipping the clutch slightly, I chickened out closed the throttle. The bike almost toppled over but I somehow kept it up. I straightened the front wheel and tried again.
But I had misjudged it and the front tyre went past it and into deeper mud. It snapped to full left lock in the blink of an eye and my stupid survival instinct intervened to chop the throttle. I went down faster than a KO’d boxer, and the bike trapped my left foot underneath it. Thank goodness Iman from KTM Malaysia had advised me to wear motocross boots instead of adventure-touring ones, otherwise my left foot would’ve been crushed to a pulp.
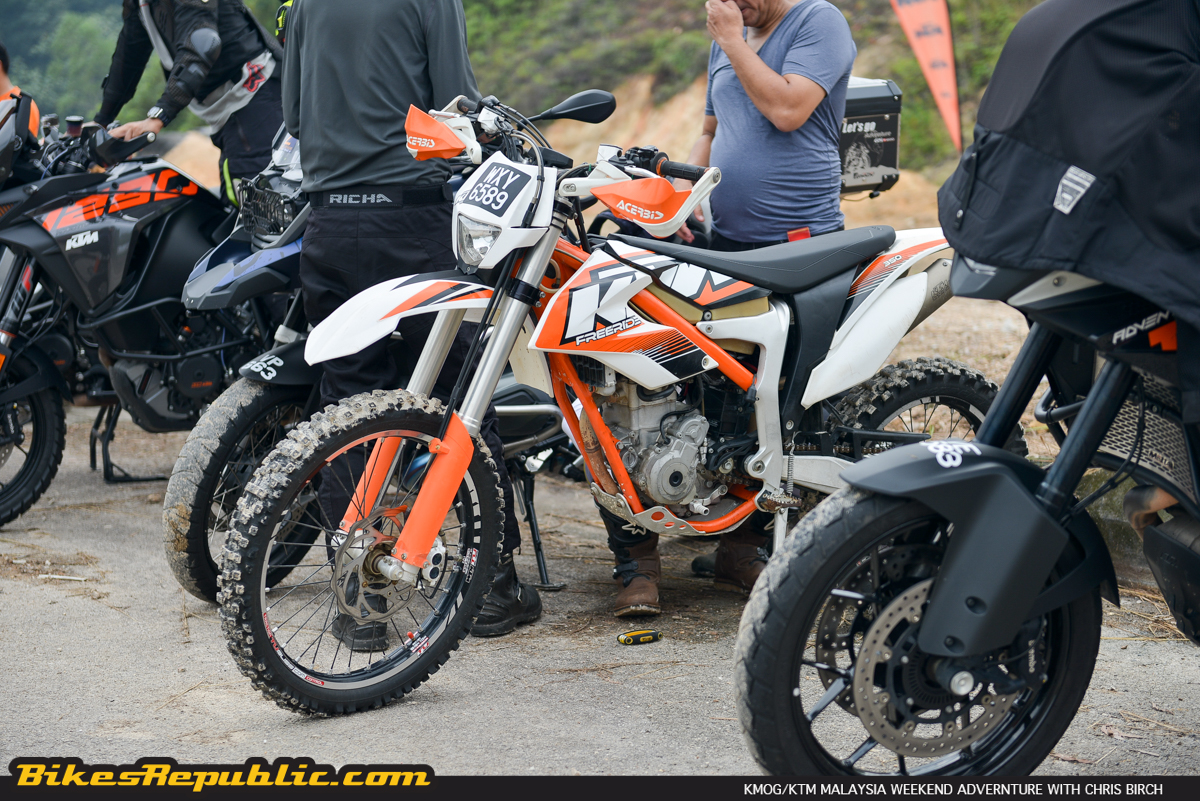
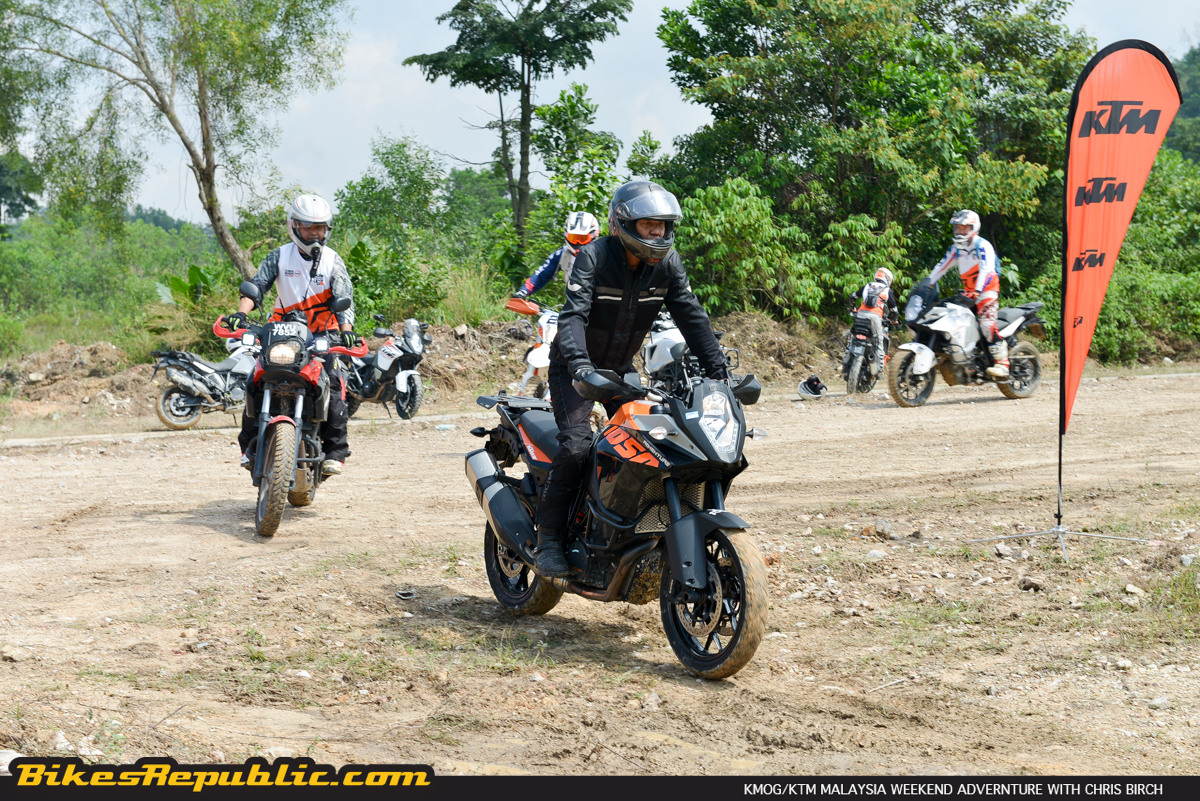
Following the intensive offroad clinic coached by Chris Birch and Chris Whitehouse the previous day, the KMOG/KTM Malaysia Adventure Weekend with Chris Birch headed into the offroad trails surrounding Bukit Beruntung and Serendah, for er… adventure. It was a much-welcomed follow-up as we could practice what we learned. (Click on the link below for the Day One report.)
The morning started with us leaving the Ratu Rening Residency for Bukit Beruntung to rendezvous with the marshals. They were all riding KTM’s off-roaders including the KTM 250 EX/C-F, 350 EX/C-F, 450 EX/C-F enduro bikes, while Gabit Saleh rode the KTM 1290 Adventure T as he had to ferry the official photographer/videographer.
Iman presented the briefing, saying that we had an 80-km ride ahead of use, almost all of it off-road. The offroad regulars smiled while we neophytes stopped. For me it was a mix of excitement and trepidation. You see, I popped my off-road cherry riding a Benelli Trek 1190, during the GIVI Let’s Get Dirty Adventure Ride in 2014, coached by Rob Armstrong. Not only was it heavy, it had large panniers and a top case on. If that’s not bad enough, it had half-worn Pirelli Angel ST sport-touring tyres! But I somehow survived that day without a single fall, so the KTM 1050 Adventure equipped with Metzeler Karoo 3 fully offroad tyres ought to do way better!
Despite the previous night’s heavy rain, the trail started easy, with light and loose sandy surface with the occasional patches of water and mud through an oil palm plantation.
The fast guys flew, sometimes splashing water on us poor slow guys while making their way to the front. It was good fun. Keeping vision as far up ahead the trail as possible and standing up the way Chris had thought, the bike just flowed. We were a having a braaping-good time.
Offroad riders have long told me about the many beautiful sights when riding off the highways and trunk roads. It was certainly so as we rode past small lakes, fish cultivation ponds, lifestock and water buffalos.
Soon, we arrived at the first challenge. It was a small downhill trail which led downhill to the right and back to the left to cross a small stream and back up the other side onto another trail. Everyone made it through safely, although there were a few small spills.
We rode on as the sun was fully up by this point, however, we were lucky that overhead branches shaded us pretty much of the way.
Further on, we crossed a rickety wooden bridge, a metal bridge and rode adjacent to a river and lake. We noticed a few locals fishing.
The trail started to get muddier as we went on. Sand gave way to reddish brown mud and it got progressively deeper and softer, until we reached the super challenging section in the aforementioned above.
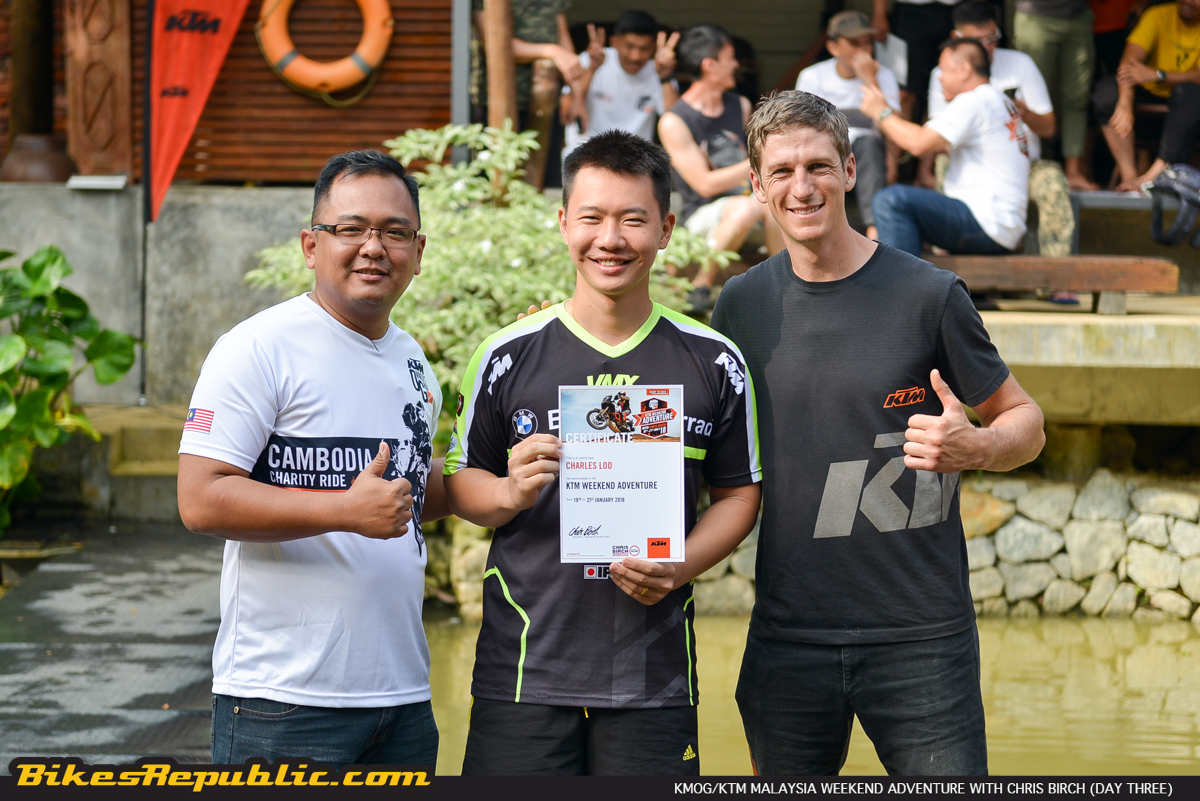
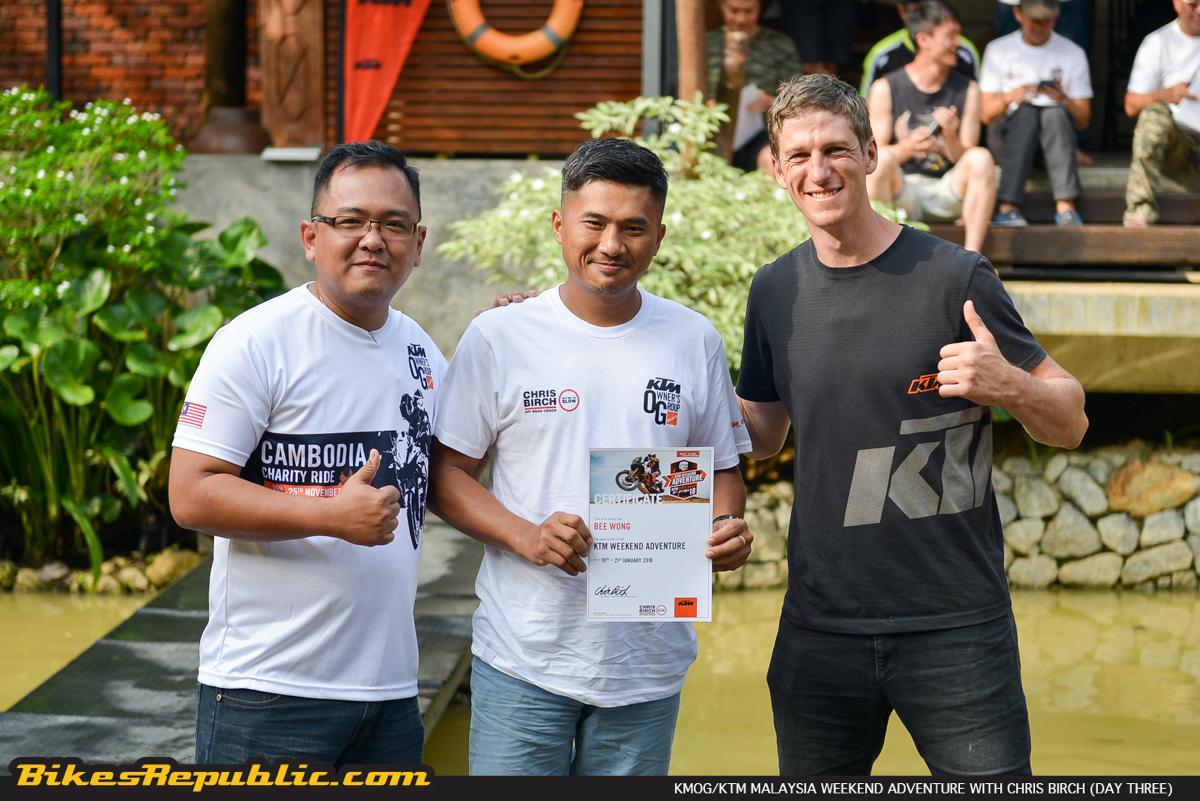
We finally made it through after the hardworking marshals including Gabit and a number of more experienced riders like Charles Loo (Seng) of CA Cycle and multiple Rimba Raid winner Bee Wong, assisted in riding out the few bikes where the riders had found it just too daunting.
Compared to the earlier parts, this area was wide open and the sun started to bake us. We continued onto a much narrower trail passing a beautiful large lake. The surface was now hard packed so the speeds picked up. A few participants took this opportunity to also remain seated to rest their tired bodies, especially the thighs and backs.
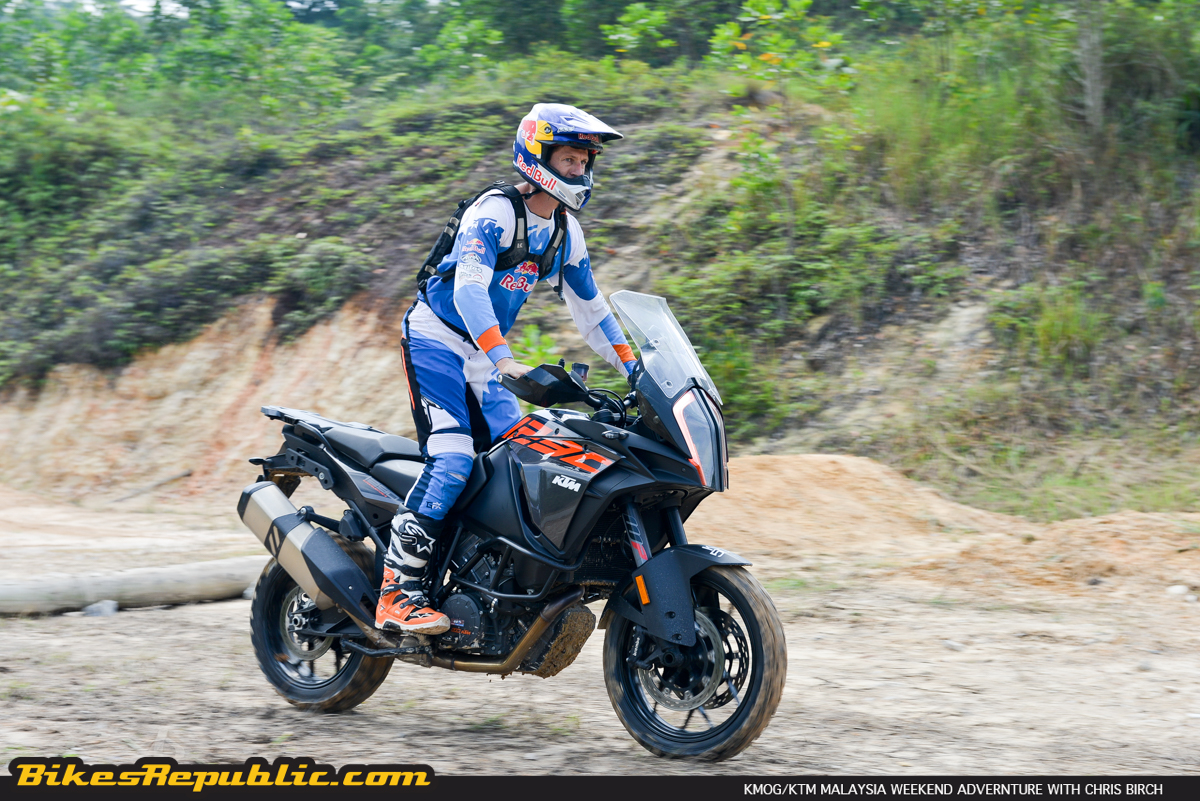
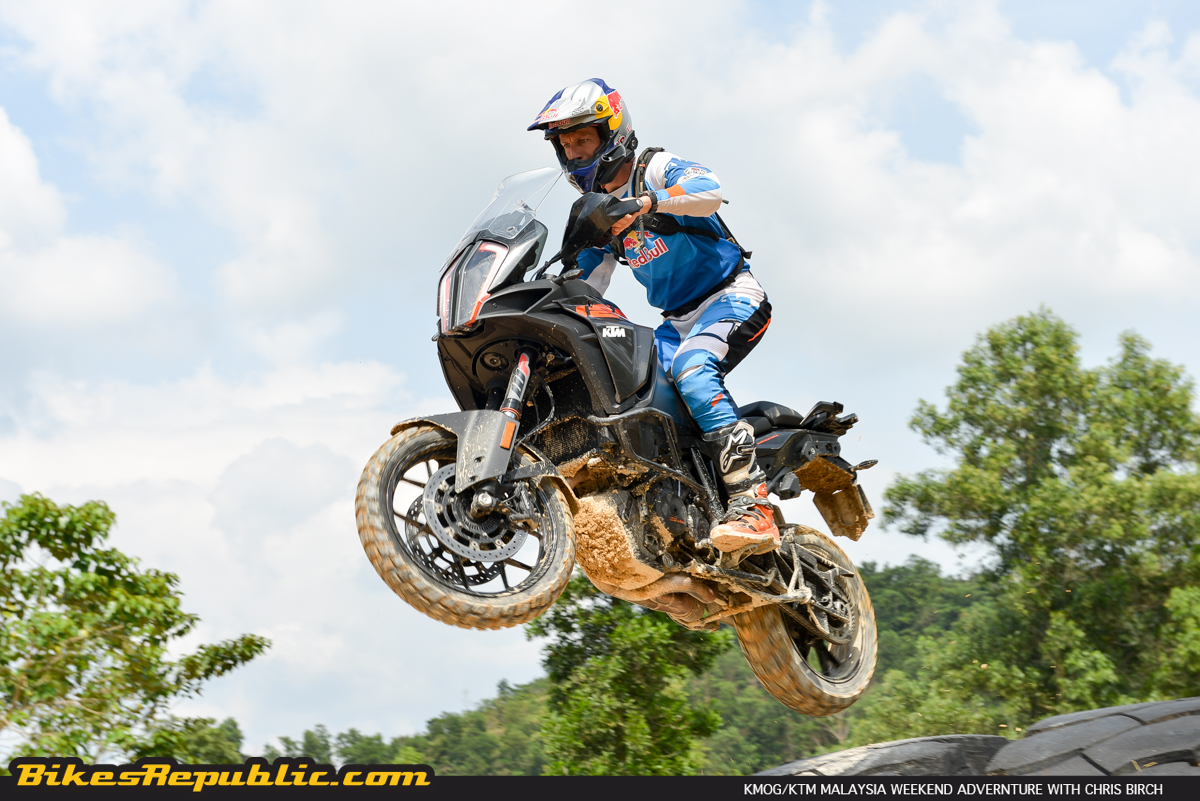
While the forward group stopped for a break, Chris performed powerslides and powerslide U-turns on his 2017 KTM 1290 Super Adventure Sto everyone’s amazement. He made it look so effortless.
The convoy turned back into a narrow trial, once more under the shade of oil palm trees, and we soon encountered uphill and downhill sections. Although appearing reddish brown, we were glad that the surface was more hard-packed instead of being muddy. Parts of the trail was covered with crushed granite, too. Again, the going was made bearable by Chris’ instruction to keep looking to where we wanted to go, instead of just a couple of metres in front of the bike. Doing so avoids surprises, thereby increasing confidence and ultimately resulting in smoother riding. Besides that, we covered the clutch with two fingers and the front brake with one. Heading downwards, all I needed to do was to allow the bike’s engine braking to control my descent. If it started to go too fast, a little dab of clutch and front brake kept the speed in check. The rear brake was used to stabilize the bike, or to lock and drag the rear wheel down the steep slippery slope to bleed off some speed.
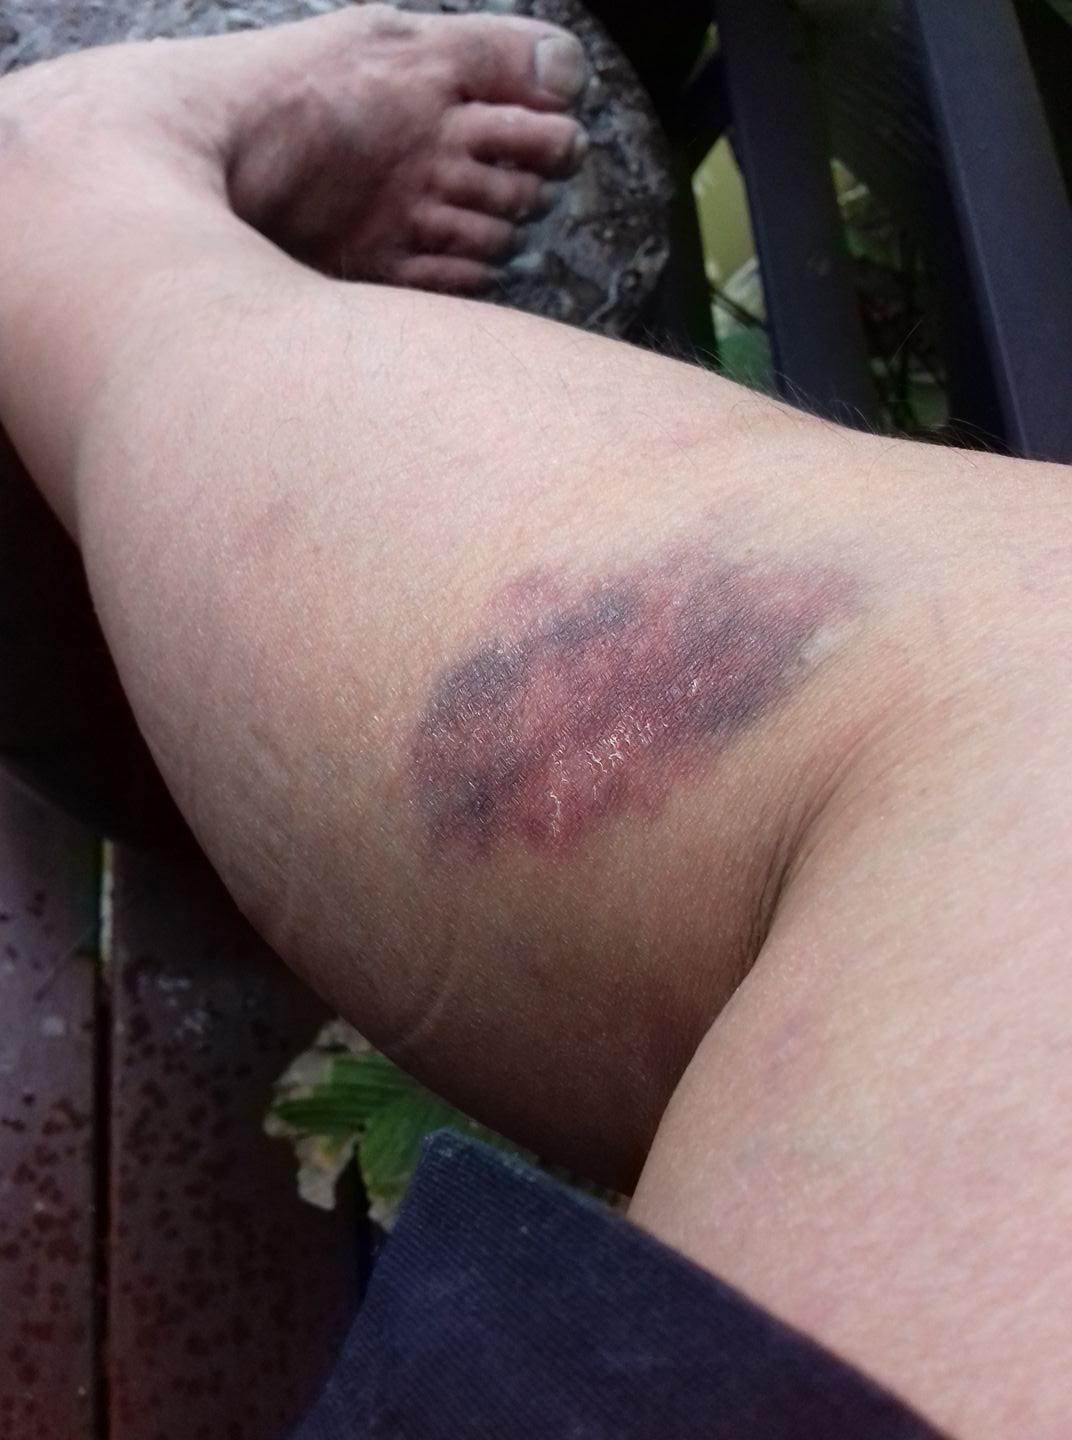
But as we headed up a steep hill, the bike immediately ahead of me slowed suddenly. I steered to the right to avoid him and the rear wheel dropped off the side of the trail. The soles of my boots were still covered in mud and the shock of the drop cause my right foot to slip off the footpeg, leaving me hanging over the right side of the bike like a MotoGP rider who’s about to DNF spectacularly. “The look ahead, give gas” advice kicked in and I did just that up the slope. I managed to pull myself up when I reached the top. There was however, a sharp pain in the right leg just above the top of the boot.
It hurt like heck but I just kept going. (It turned into a huge bruise when we got back. Badge of initiation, I called it.)
The trail connected to a tar road, where we parked at the sides for a short break. Most participants were hungry and thirsty at this point. A few faces were so red they looked like they had just left the sauna. One of the marshals had ridden ahead to look for a place for refreshments and called back that he had found one. He jumped back on and rushed to a small community sundry shop and food stall.
We parked our bikes in a hurry and almost raided the shop like a horde of Vikings. We proceeded to clear out the fridge! We had covered half the distance thus far. We had only stopped for a too-short 15 minutes before hitting the road again.
We arrived at an area which seemed to have been logged in the past and was told to ride on an uphill footpath. It looked benign from afar, being covered in thick foliage, however the ground was soft mud. The progress was slow-going as many had to either spin their rear wheels vigorously or risk tipping over, while being grabbed by the plant branches and leaves on either side. Chris Birch demonstrated that he could just blast his way up by using his higher momentum. The hot sun bashing down on us started to take its toll as more and more guys started making uncharacteristic mistakes.
It was the last challenge of the day, thankfully. The group stopped for a few moments when they arrived at a tar road. As with throughout the day, both Chris’s found themselves surrounded by participants who wanted to learn more as soon as the engines ticked off. But both guys never minded sharing their skills, thoughts and some hilarious stories of their adventures.
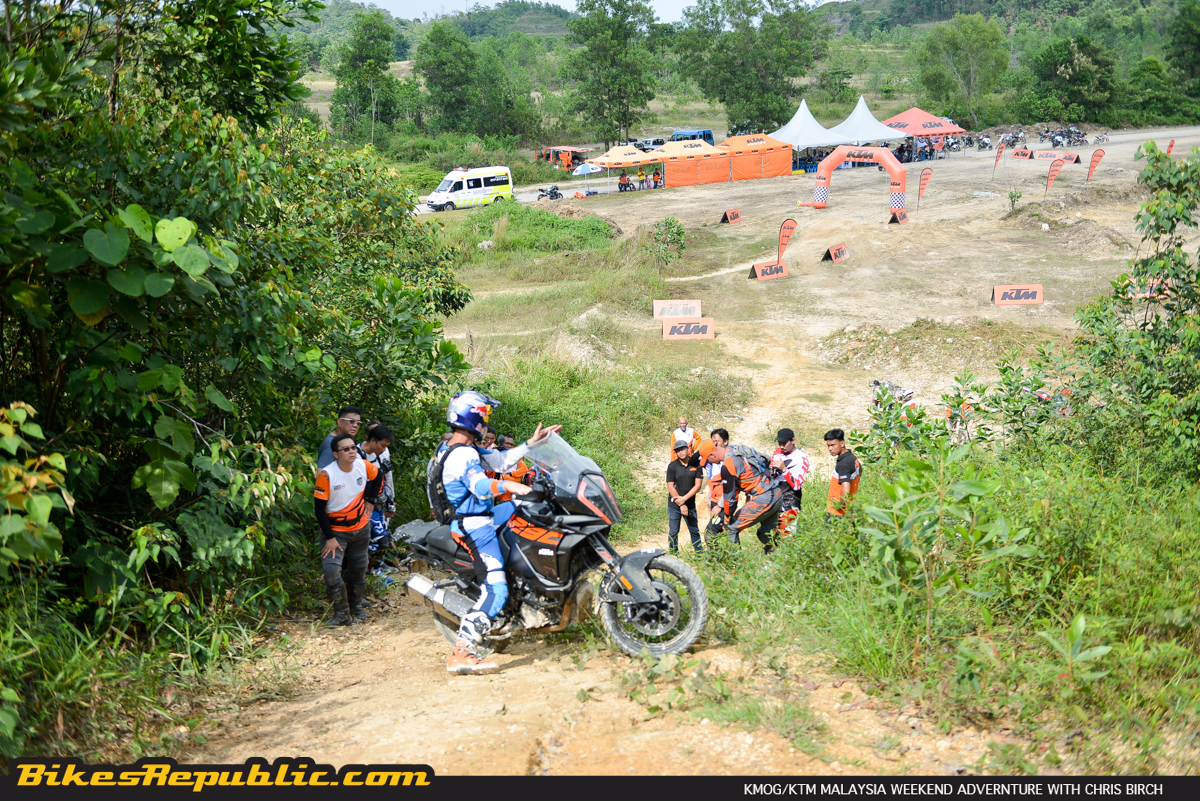
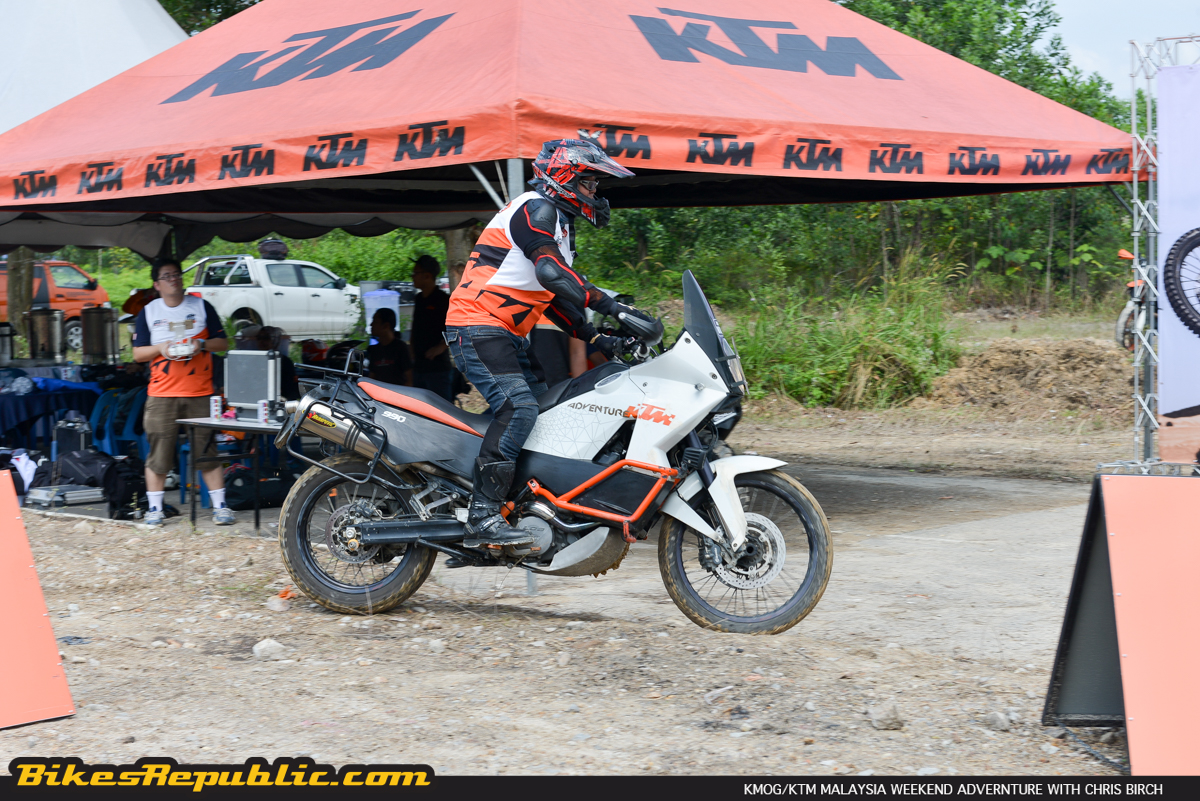
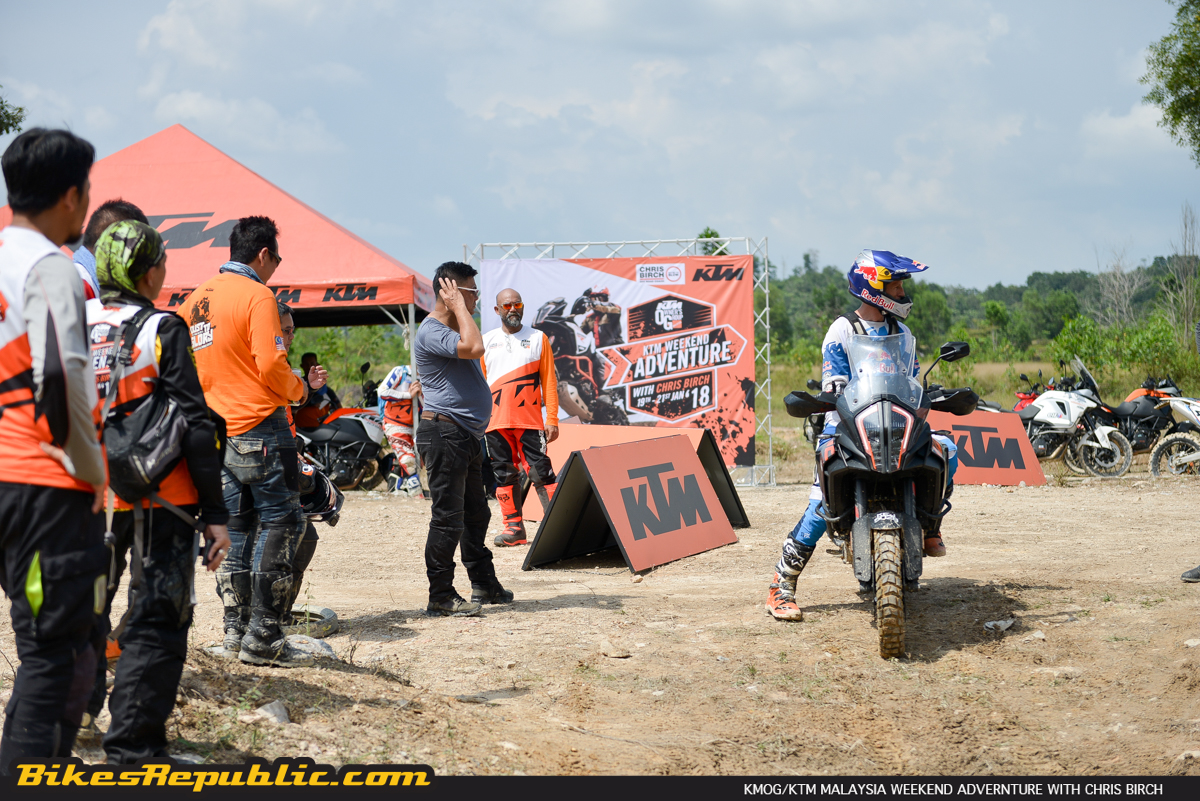
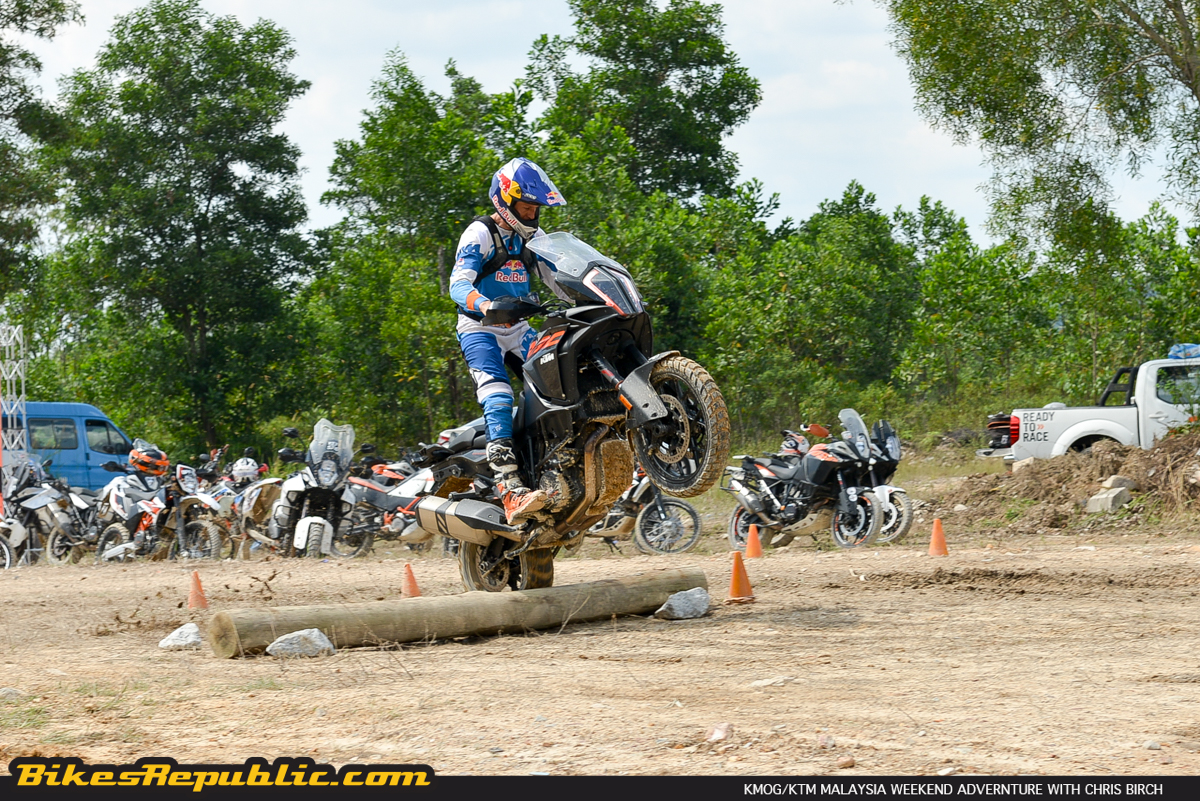
We adjourned back to the track at Sungai Buaya for lunch. After short speeches from Chris Birch, Chris Whitehouse and Iman, the participants demanded that Chris perform one last riding demonstration. Chris isn’t one to show off, that’s for sure, but the crowd started chanting, “Chris! Chris! Chris!”
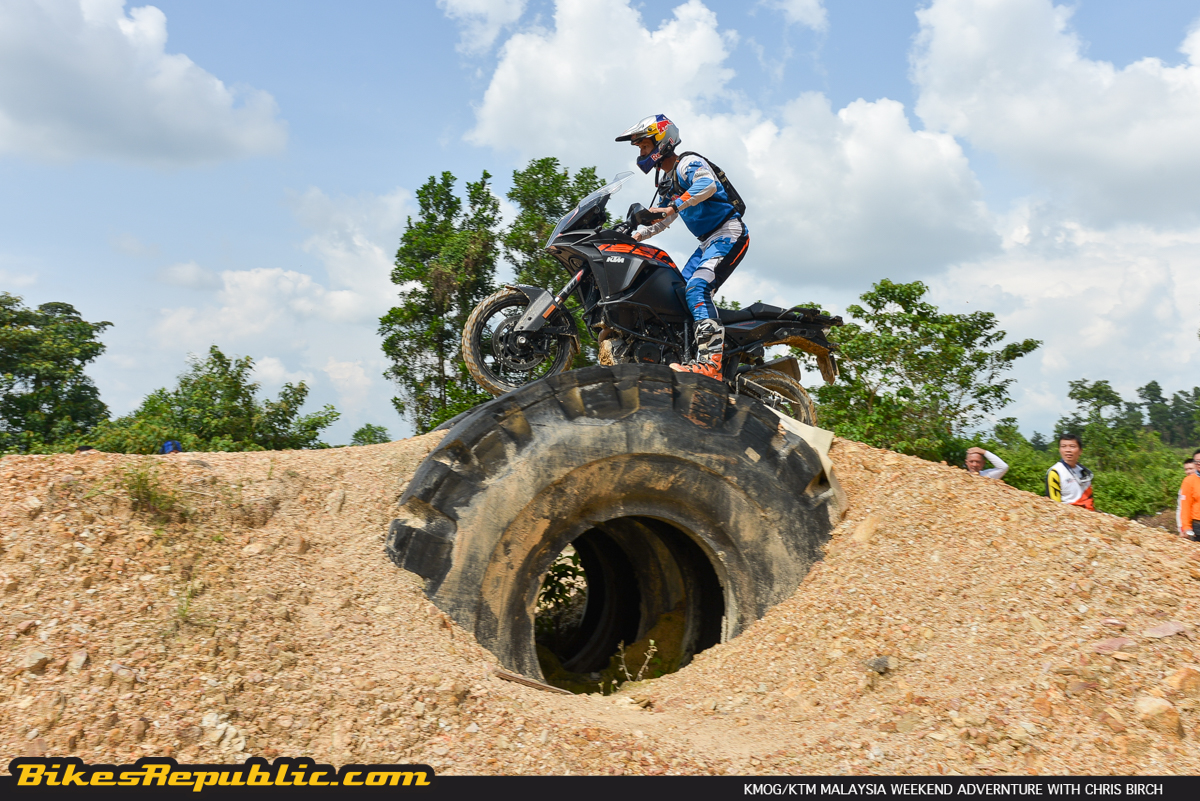
How could he say no. He suited up, grabbed the 450 EX/C-F ISDE Six-Days and went off to pull steep hillclimbs, powerslides and unbelievable climbs over a large boulder!
With that over, he headed back to the resort for dinner. Everyone was so pumped from the day’s experience. With adrenaline suppressing whatever discomfort, as they jested with each other, sharing their experiences.
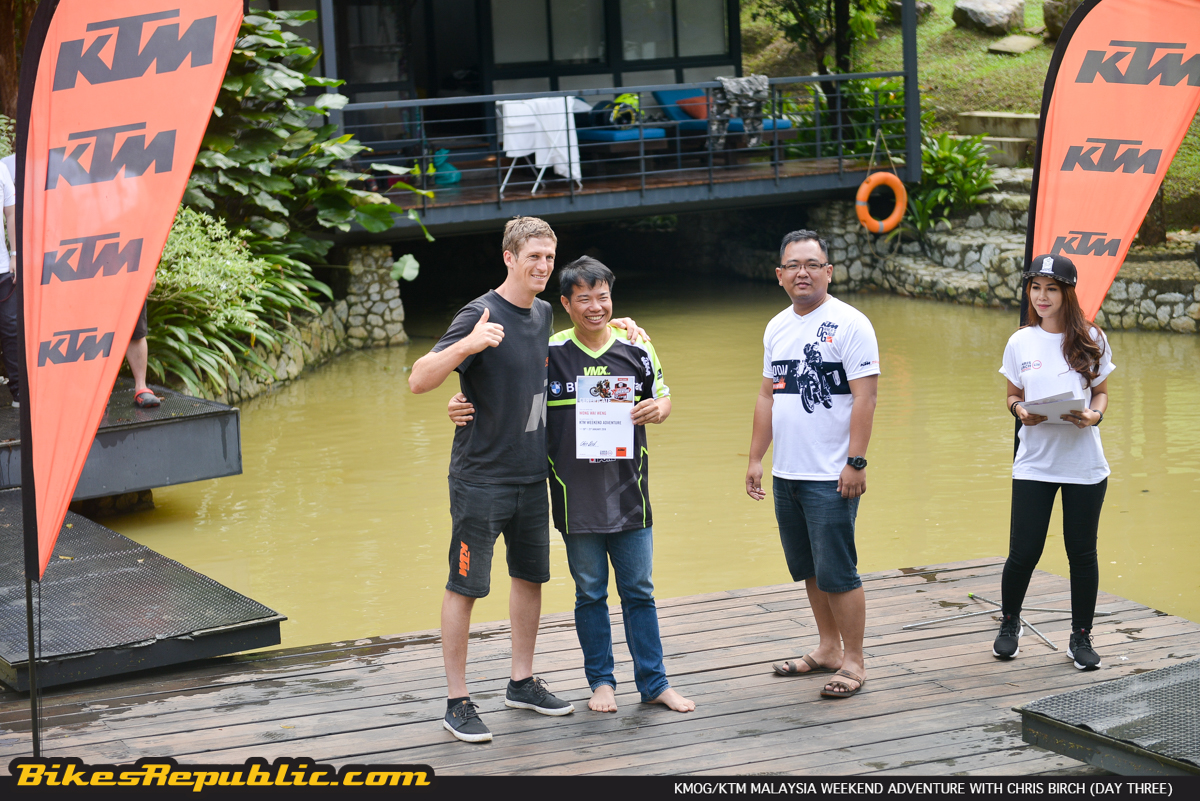
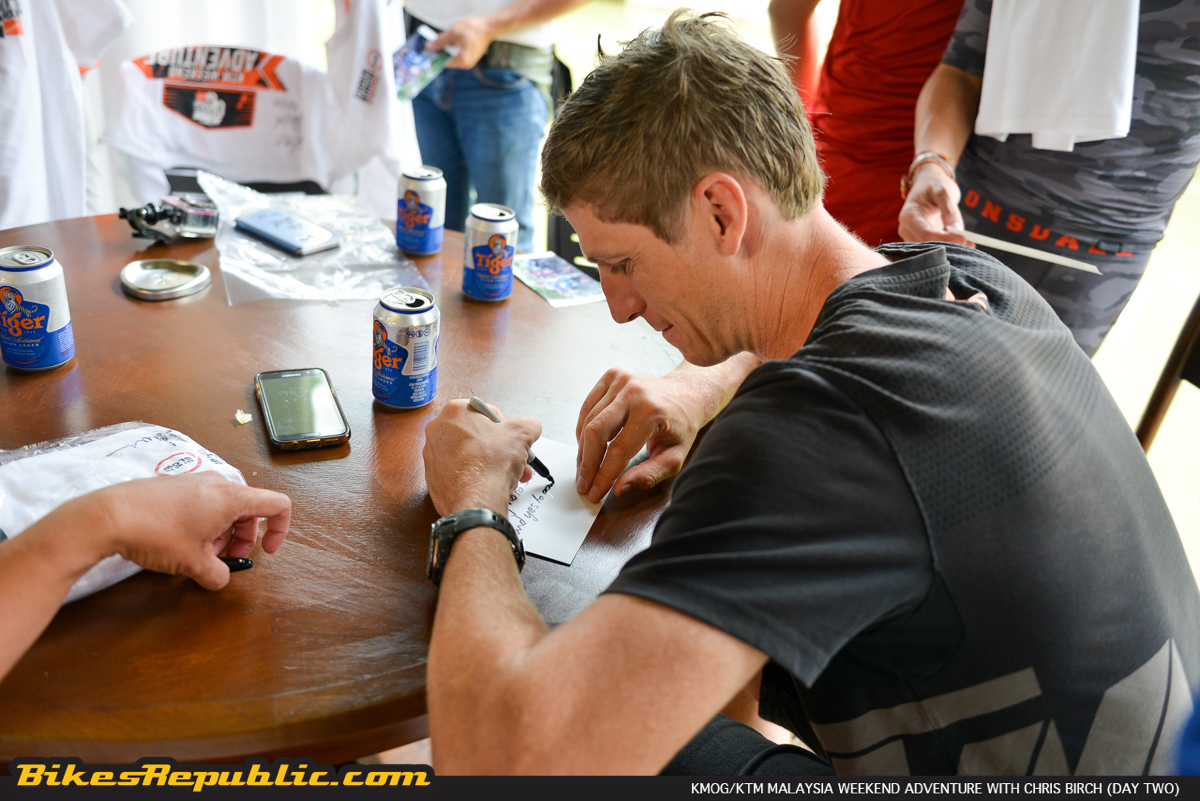
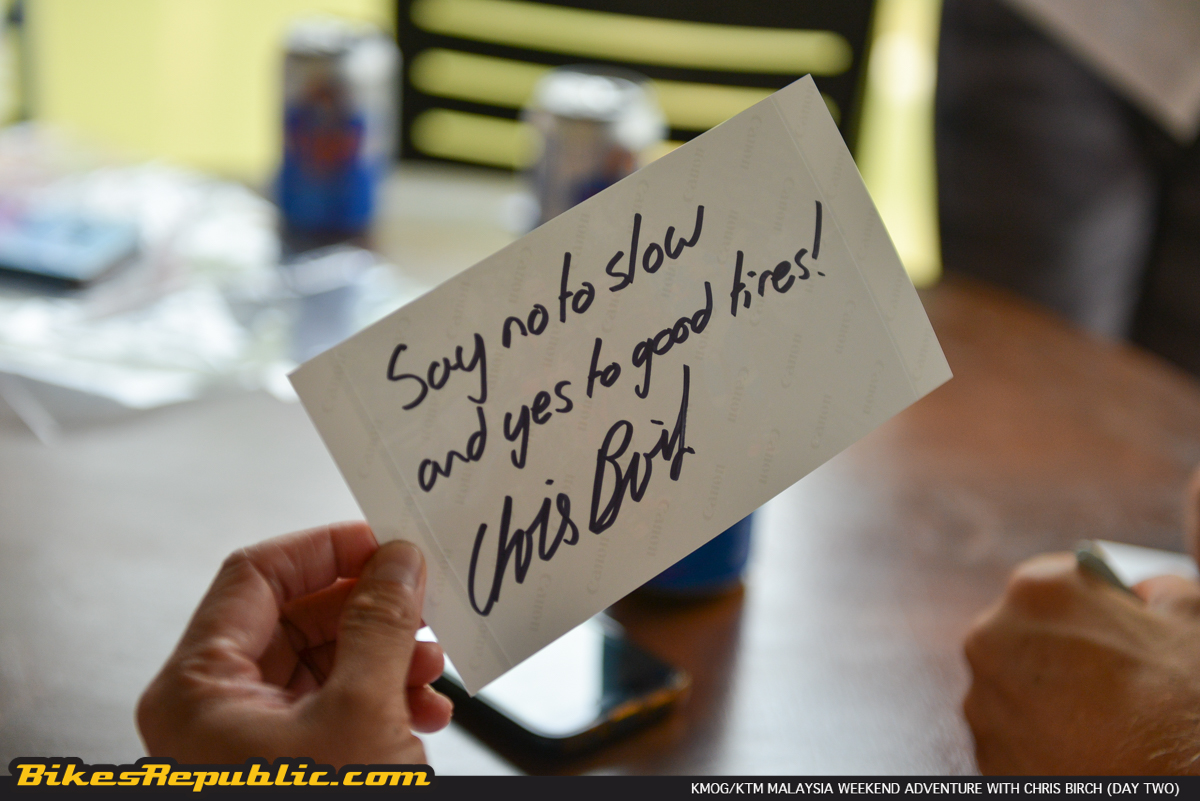
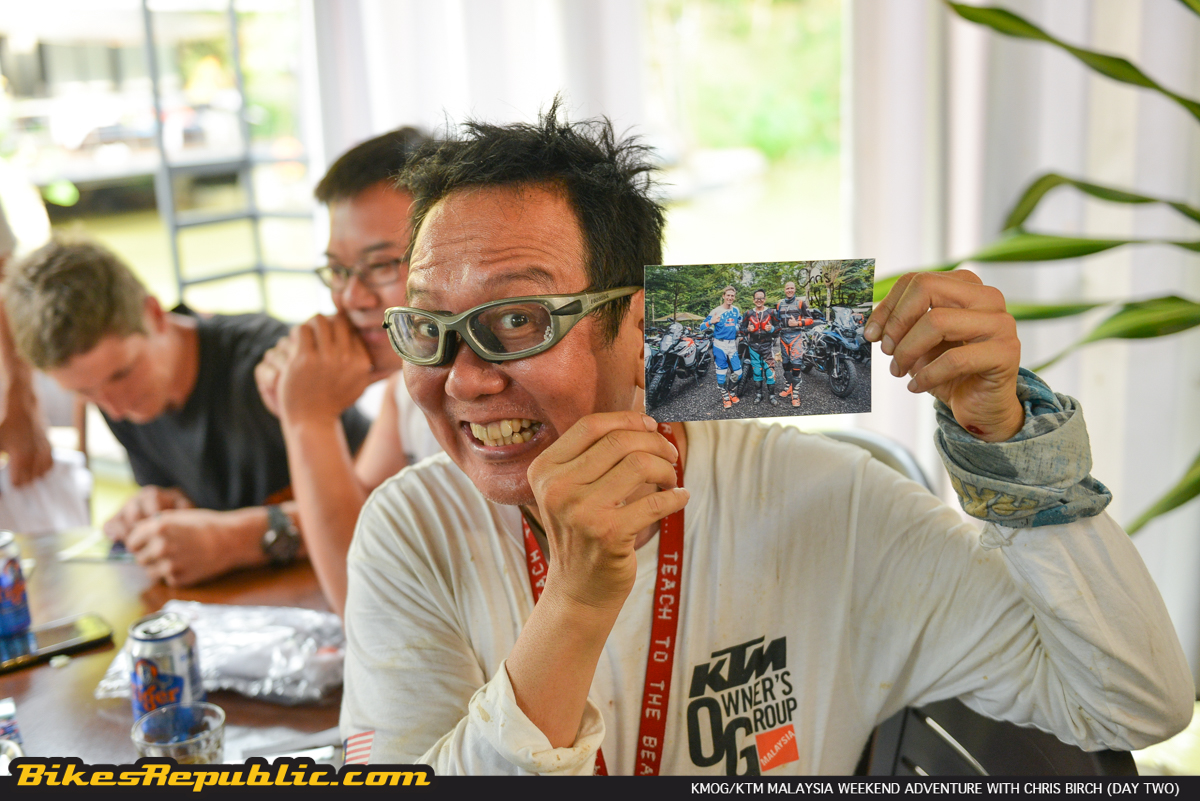
A line formed leading for Chris Birch’s autographs on pictures, T-shirts and helmets with him and Chris Whitehouse.
It has to be said that those who spotted us riding large-sizes covered in mud stared in disbelief, but the owners themselves were no less impressed to discover that their large KTM adventure bikes could withstand the rough and tough stuff, without breaking down into a million pieces.
Through the many spills, no one was hurt and that was a testament to offroading being vastly more enjoyable and fun without the need for huge speeds. Besides that, being able to overcome obstacles and get away unscathed definitely hoisted confidence and moods to a new high. If you’re a rider who craves gratification, go offroading today. It’ll work its way into developing your riding skills for the road, too, we promise you.
In the meanwhile, however, everyone one of us has become Chris Birch’s greatest fans, thanks to KMOG and KTM Malaysia.
Tune in tomorrow for our exclusive interview with Chris Birch!
Click on the link below for Day One of the KMOG/KTM Malaysia Weekend Adventure Ride with Chris Birch.
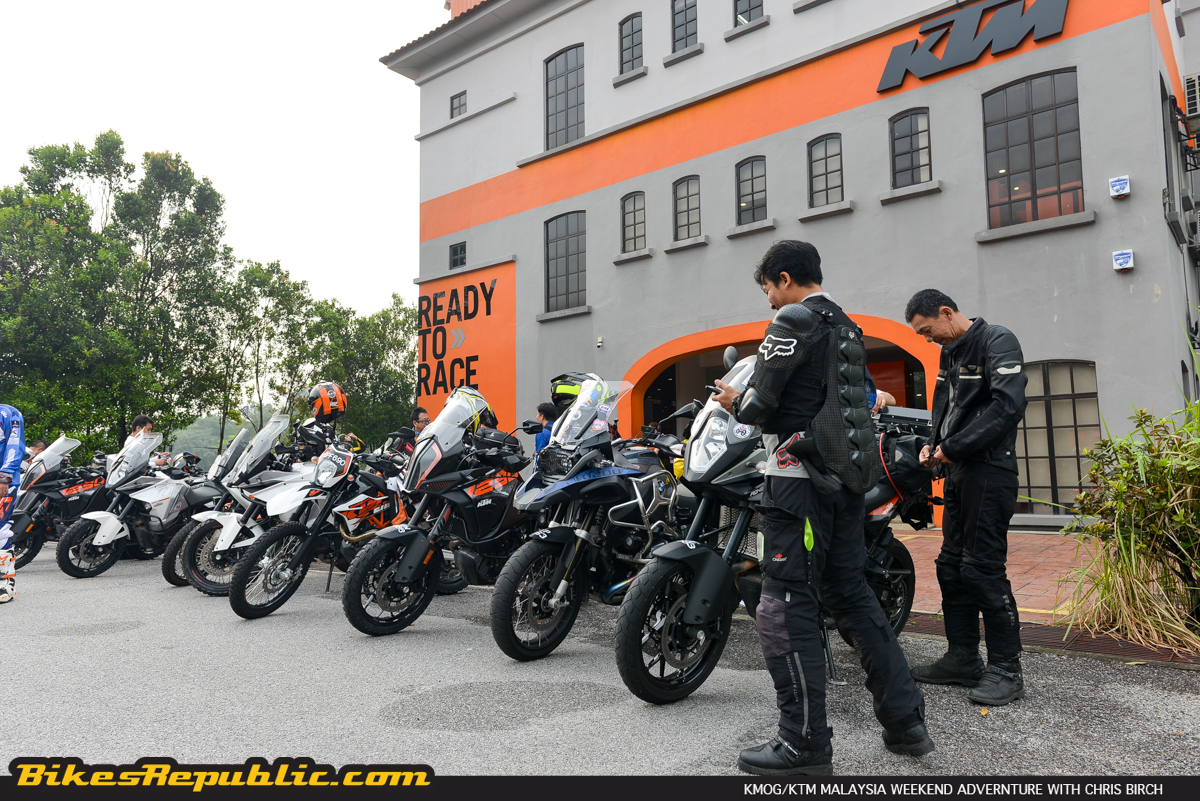
KMOG and KTM Malaysia put together an adventure weekend with world enduro pro and champion Chris Birch.
Day One consisted of an intensive off-road riding clinic coached by Chris Birch ad Chris Whitehouse.
The participants went away with some great wisdom and experience.
Stepping up their charter to bring the best to their members and customers, KTM Malaysia Owners’ Group (KMOG) and KTM Malaysia organized an off-road clinic and weekend adventure ride featuring the world’s enduro pro rider and coach extraordinaire, Chris Birch.
That’s one of the best thing about having a world champion as your brand’s factory rider. However, Chris Birch is of a different ilk which only a small number champions who could teach and impart his experience of many years effectively to plebeians like you and me. Besides that, Chris is still competing actively, ensuring that the experiences she shares aren’t from 1972.
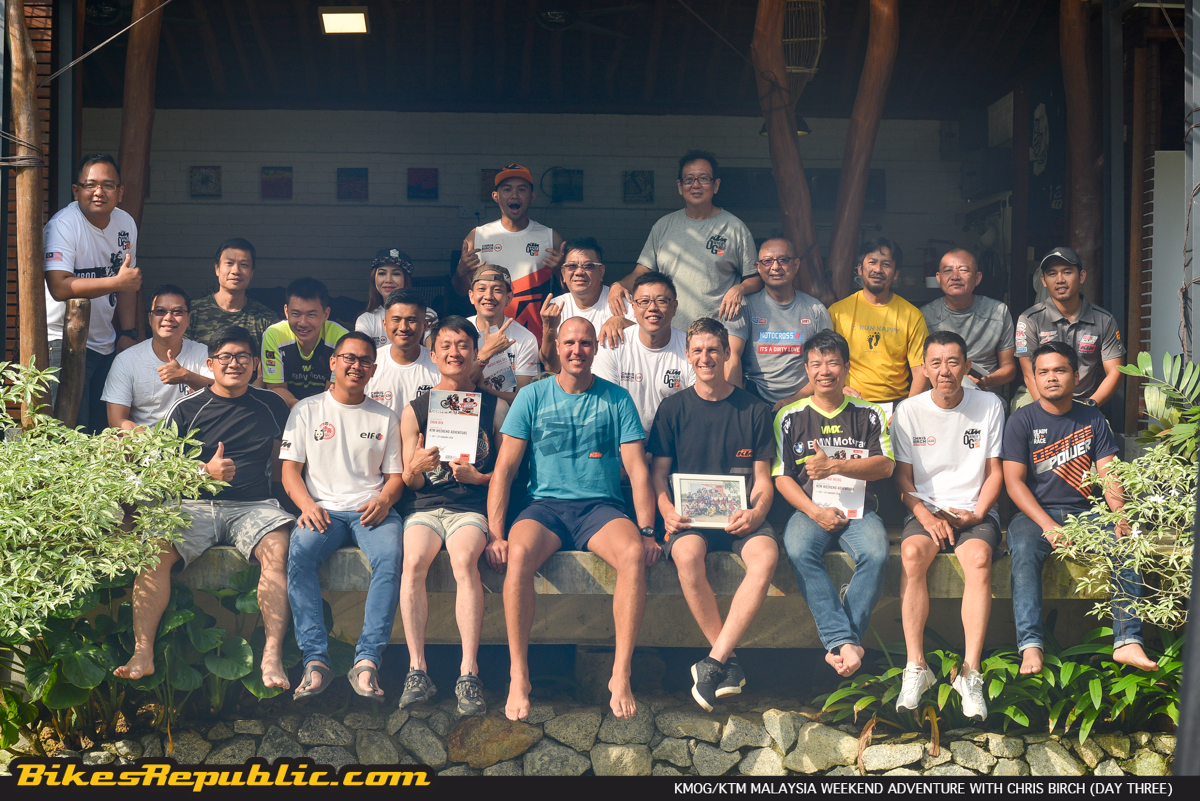
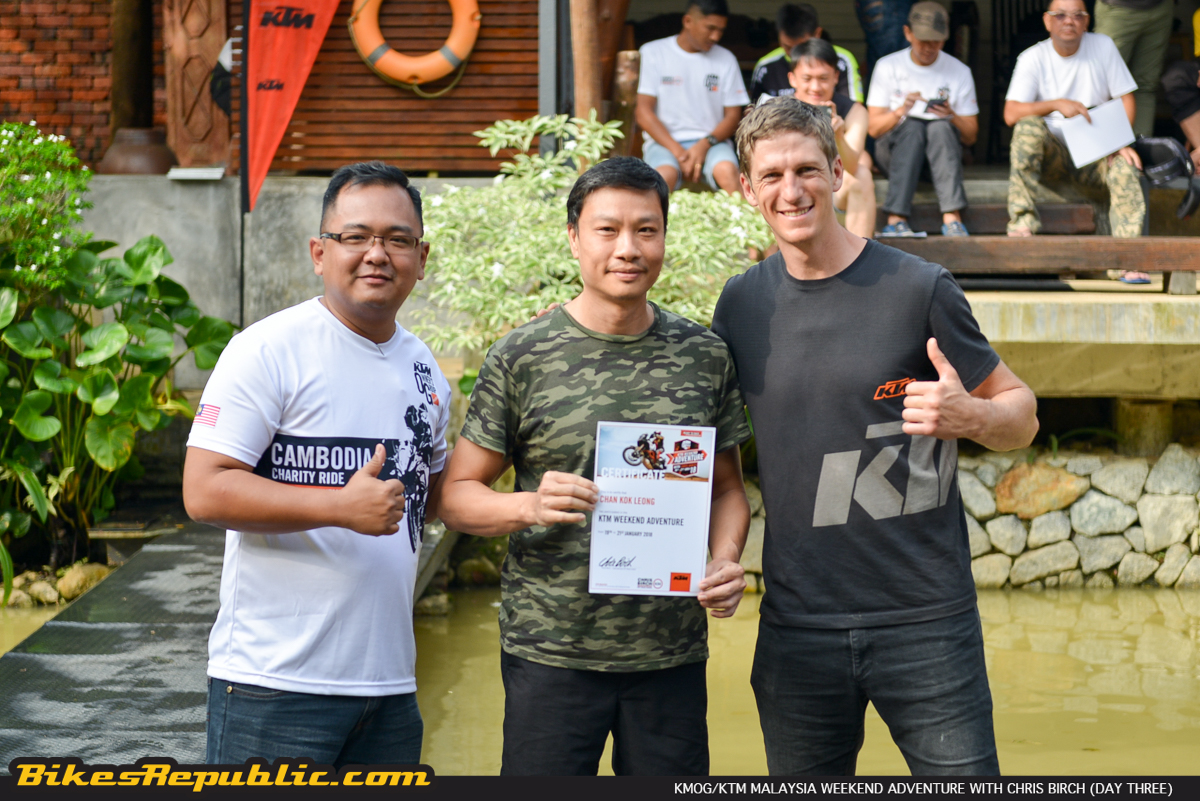
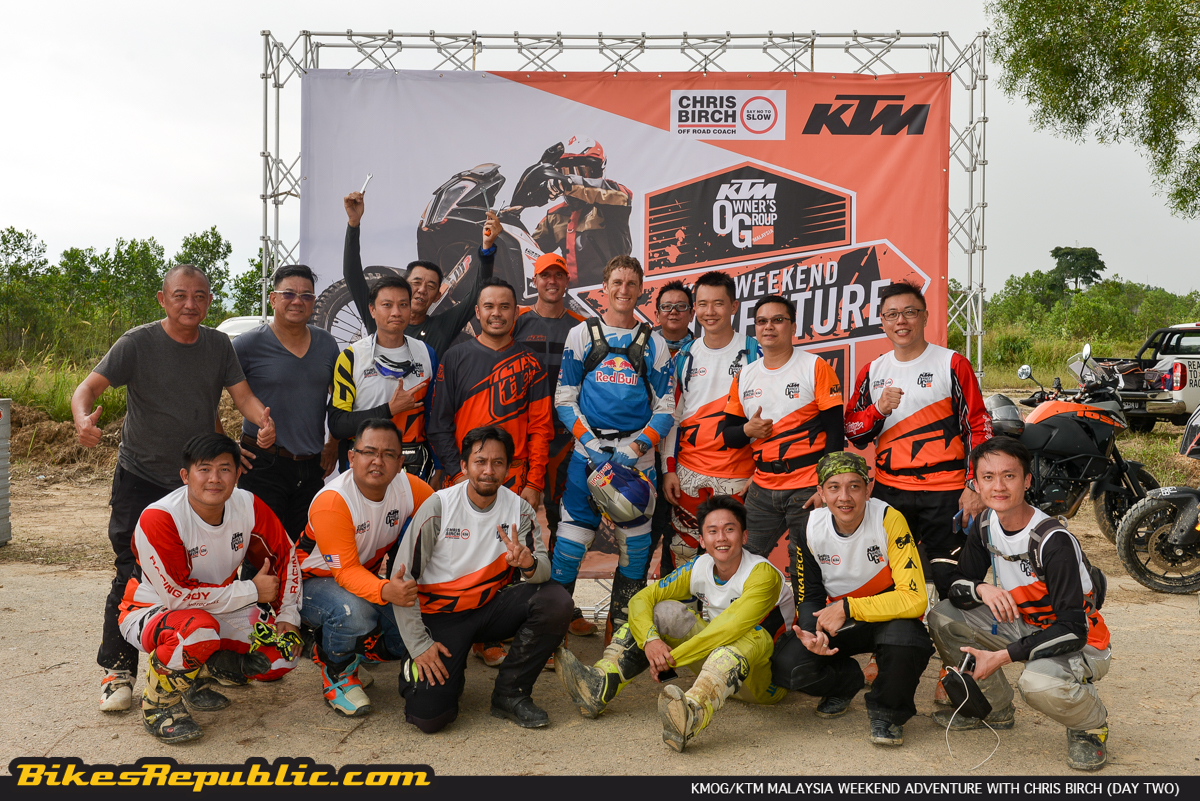
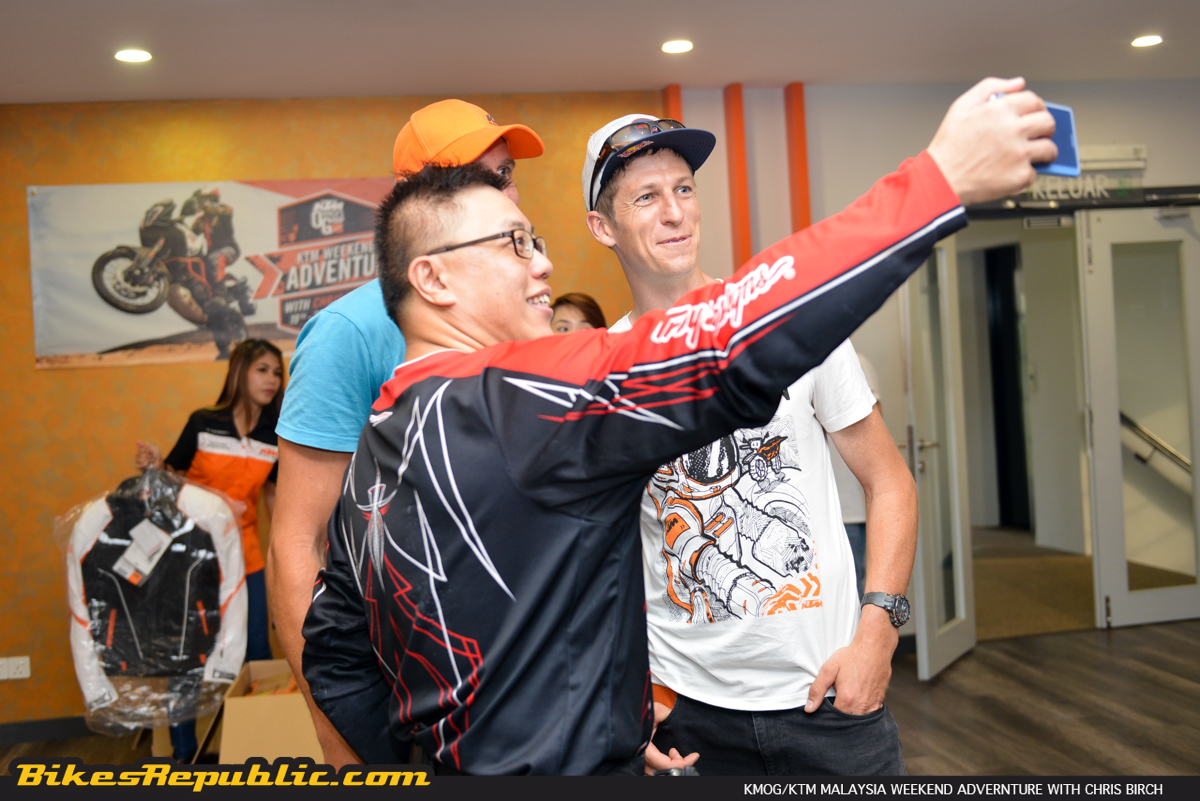
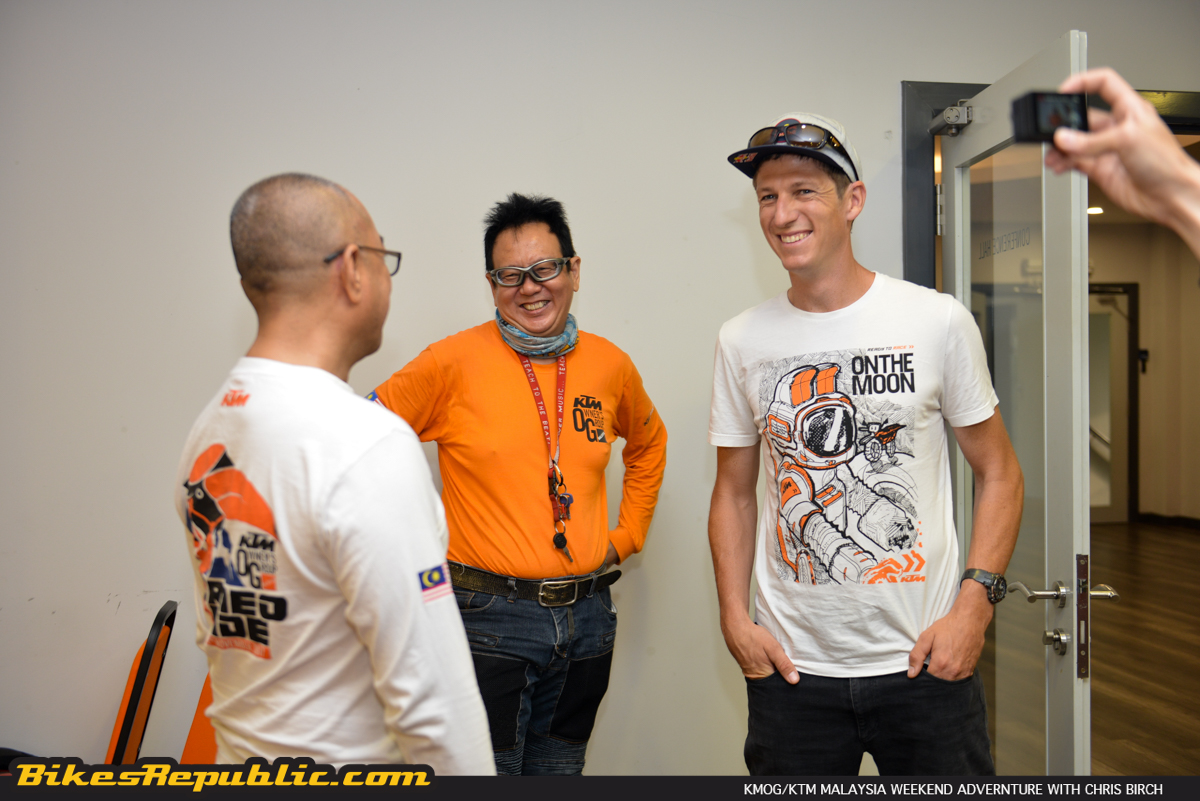
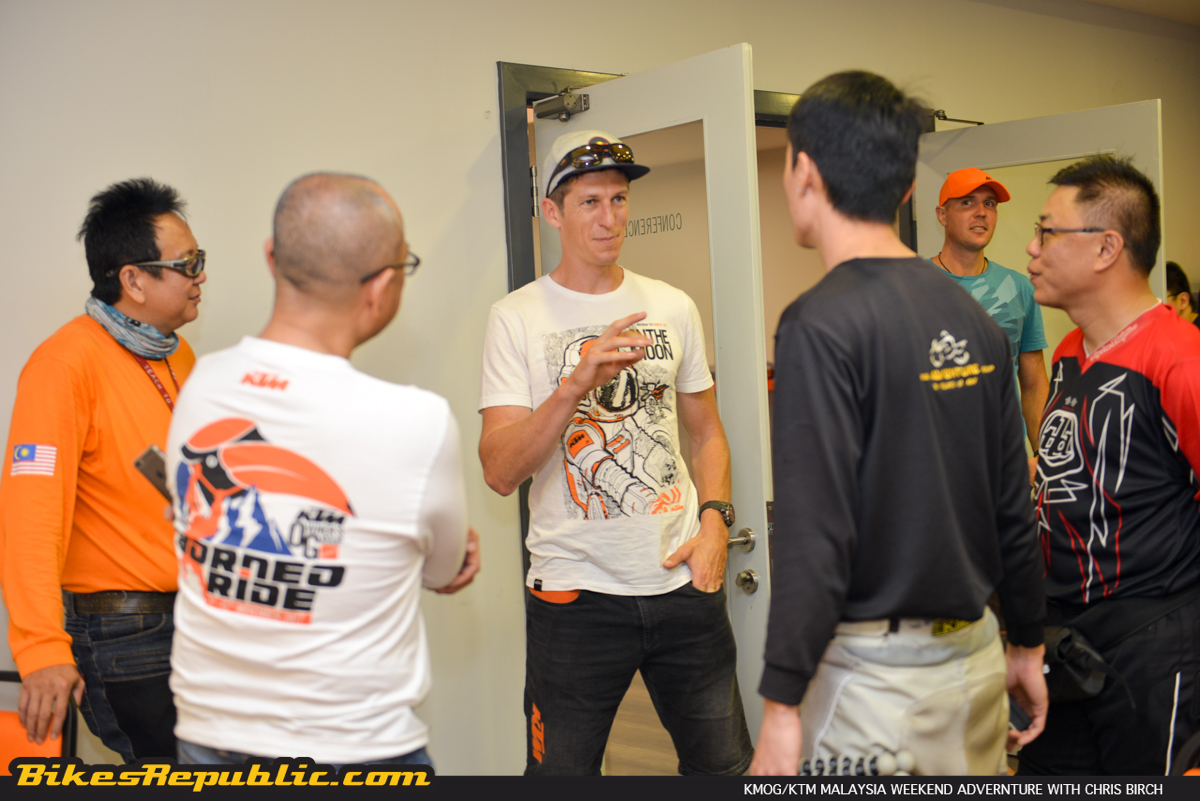
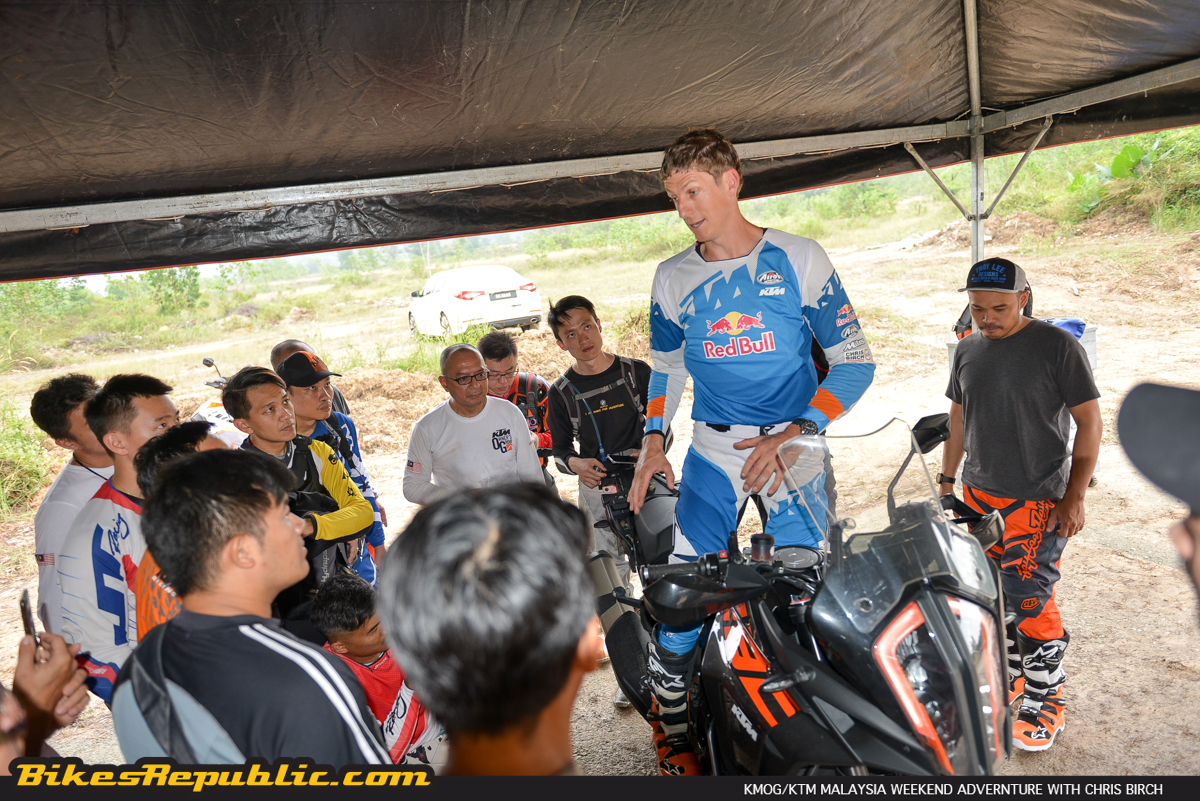
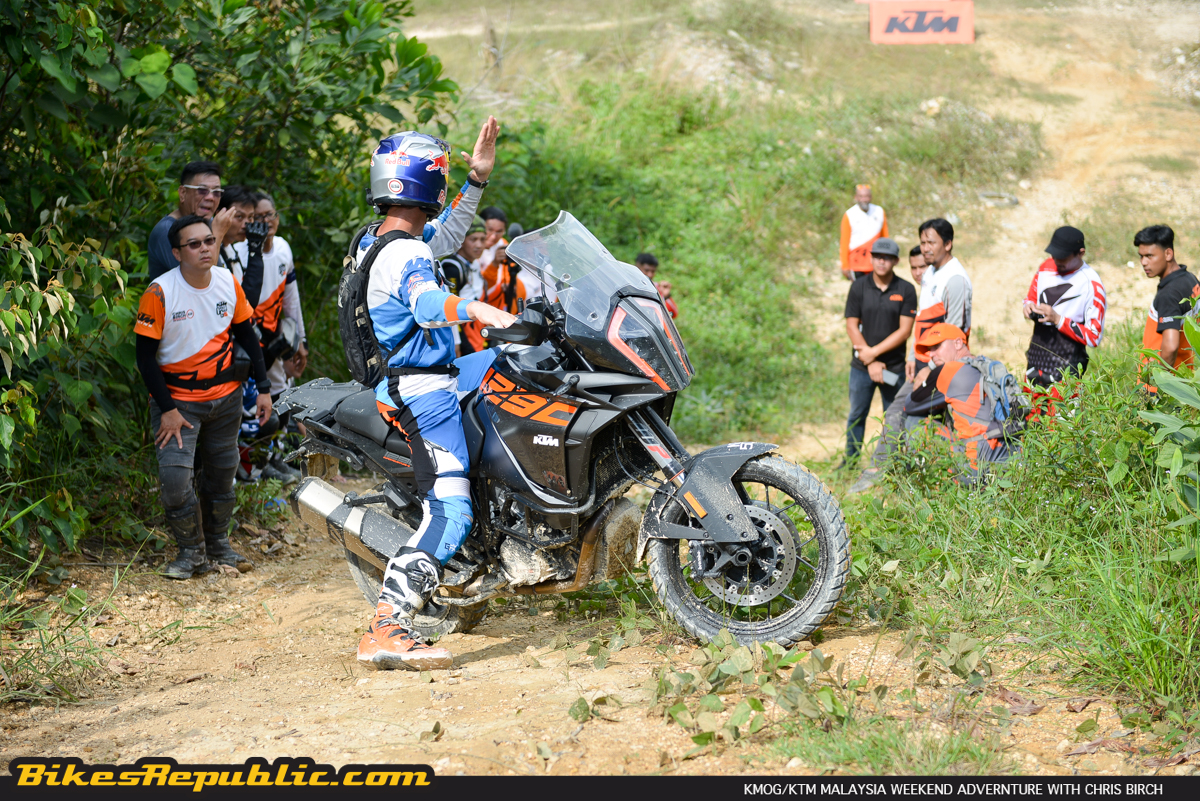
The KMOG/KTM Malaysia Adventure Weekend with Chris Birch event drew at total of 20 participants. KTM Malaysia introduced Chris Birch and his assistant, Chris Whitehouse at Lifestyle Showroom in Kota Damansara to a rousing welcome. Many of the participants couldn’t help themselves but requesting for selfies and autographs with the “rock star.”
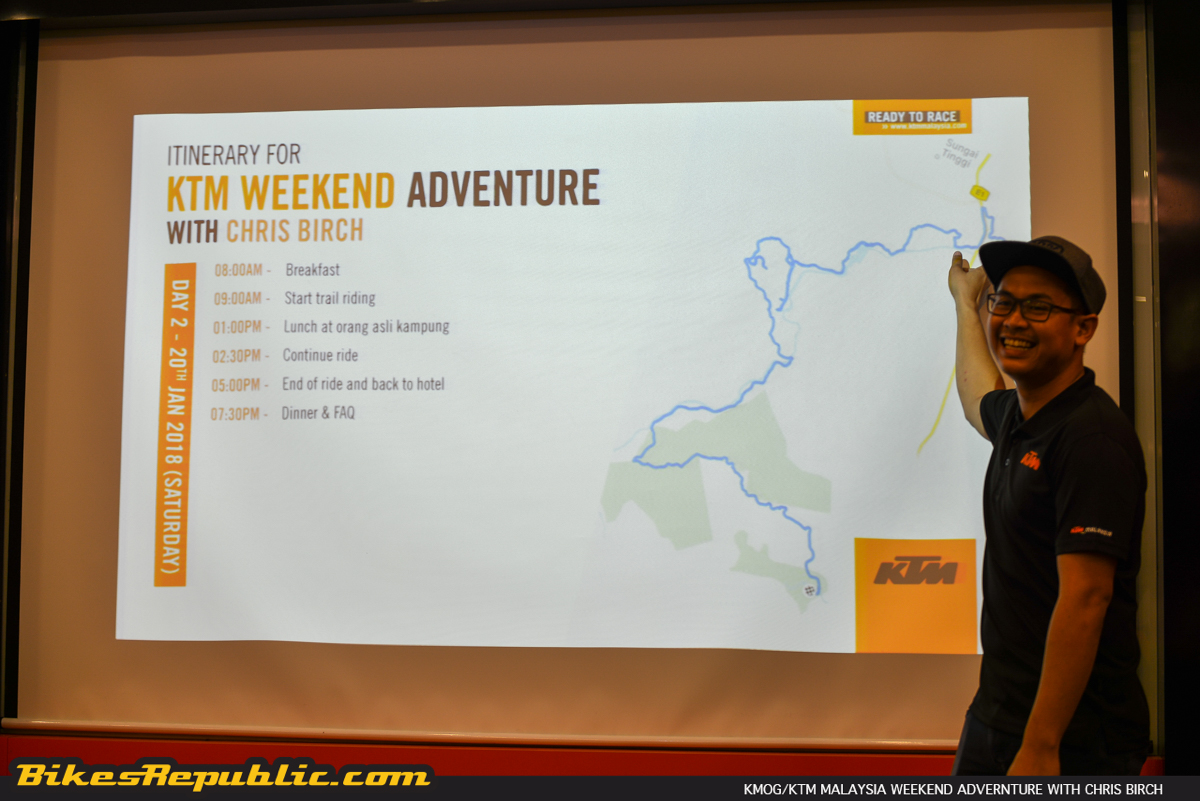
The Chris superduo introduced themselves and KTM Malaysia’s Nor Iman took over to brief the participants on the itinerary of the three-day program. We then mounted our bikes and rode to KTM Malaysia’s off-road and MX course in Sungai Buaya, Rawang.
Day One consisted of a riding clinic coached by Chris (Birch) and assisted by Chris (Whitehouse).
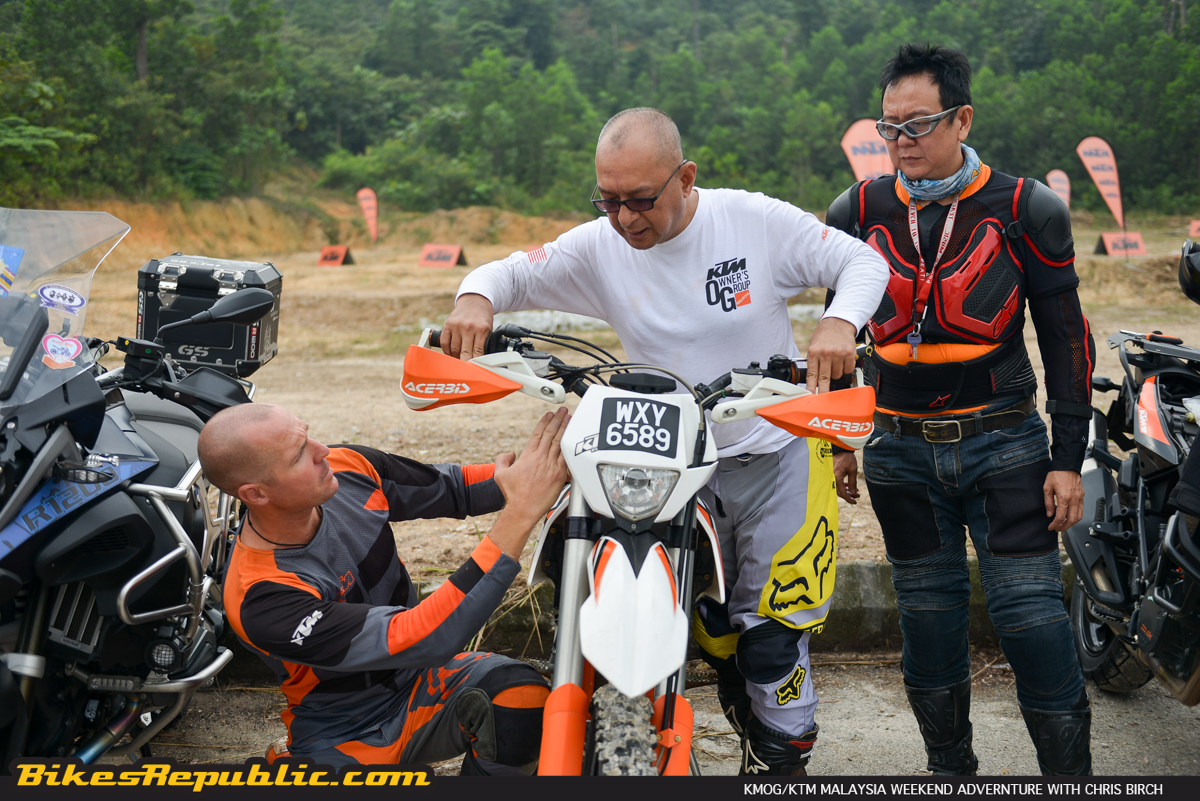
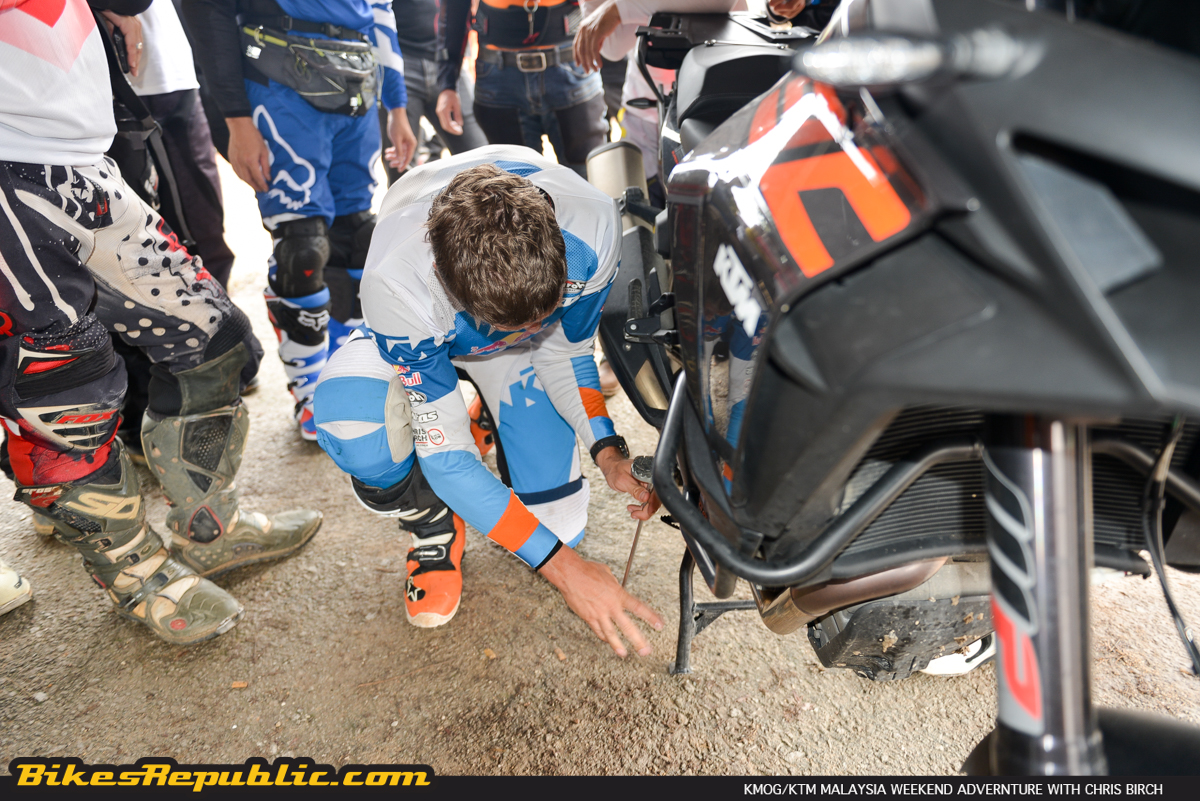
The first lesson taught by Chris was on setting up the bike for offroading. The bike’s controls such as the handlebar, hand levers and foot levers were adjusted to offer better accessibility while riding.
Chris also shared his experience about using the correct tyre pressures for offroad duty. He then adjourned the students to perform the necessary adjustments, but instead of standing by and lording over them, Chris and Whitehouse actually got their hands dirty to assist.
However, before the participants were allowed on track to ride, they were called back to the tent for a briefing about body position, particularly on how to stabilize the lower body by clamping the feet, legs knees and thighs to the bike, while allowing the upper body to ride loose. Standing up the footpegs is the hallmark of off-road riding, so additionally, we were also taught on the correct technique of standing up and how to position the body for optimal weight distribution. Weight distribution affects the bike’s chassis balance hence traction and control.
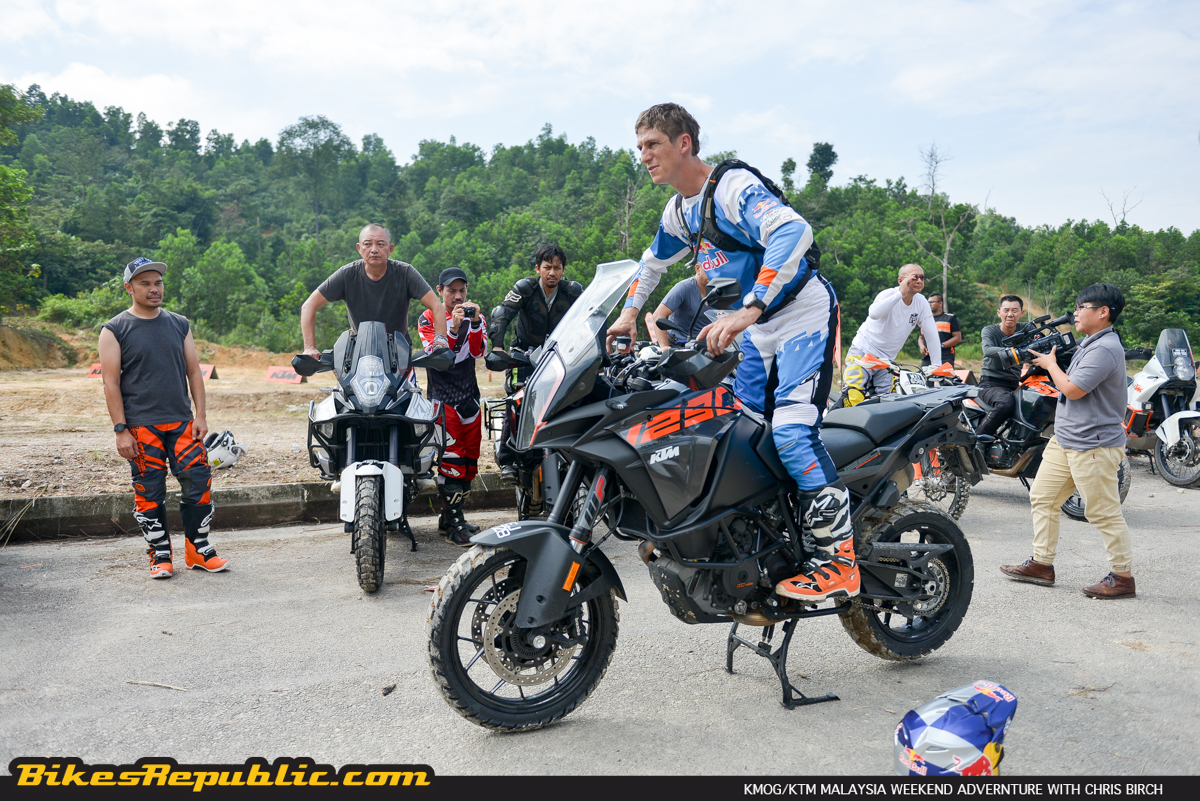
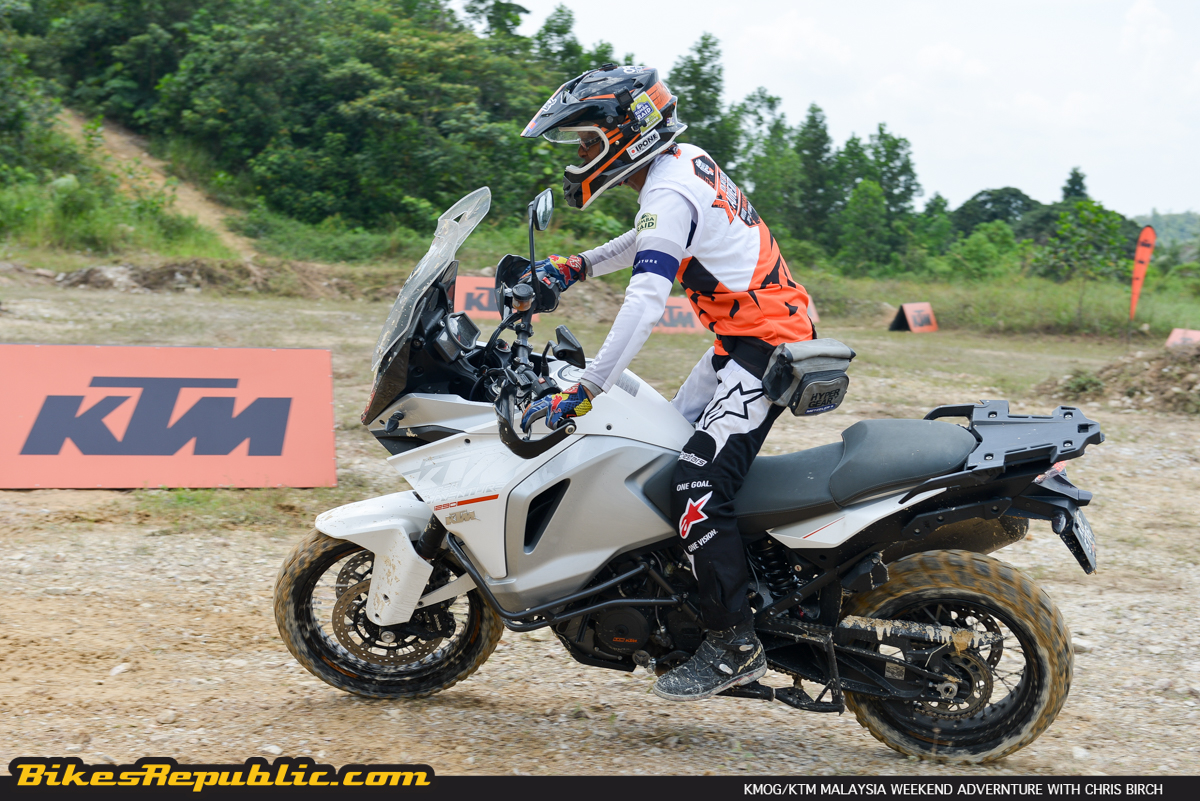
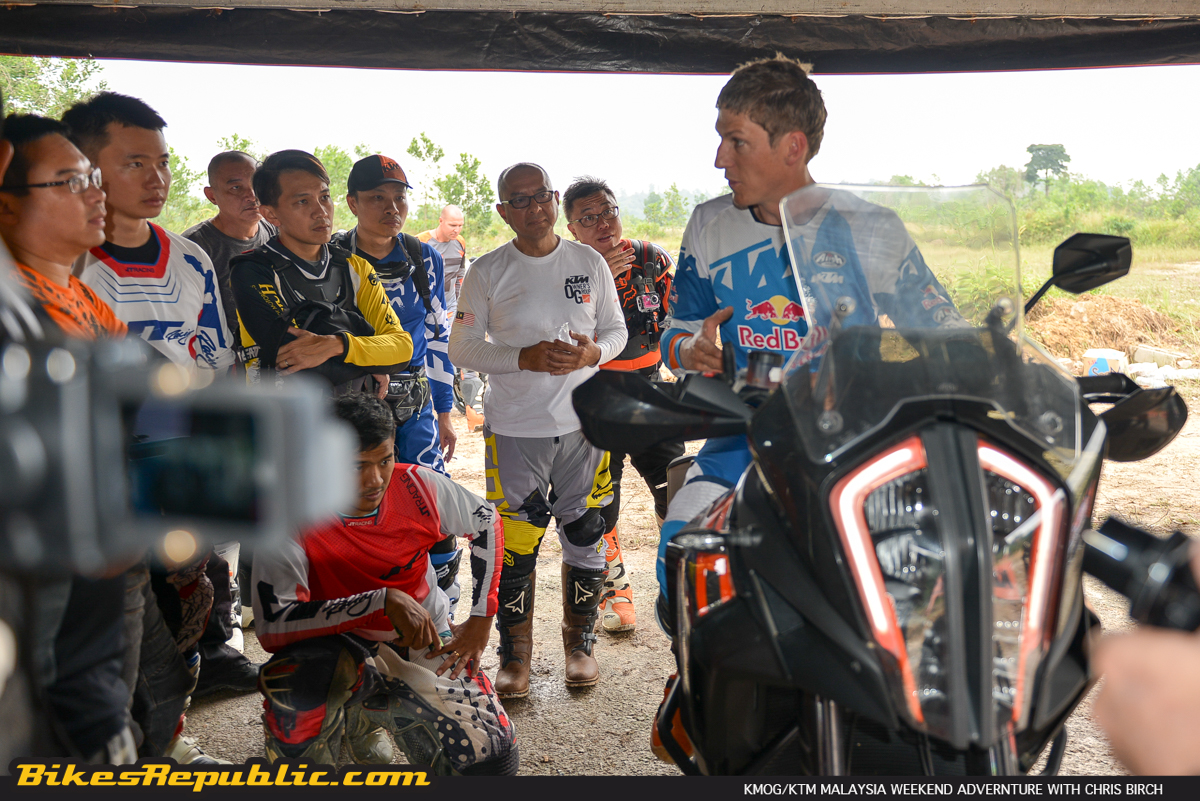
Chris then showed how it’s done by riding on the 1290 Super Adventure S out on the course. He broke the participants easy by having them trail him around the course, before setting them loose while he and Whitehouse instruct from the sidelines. We were called in a for critique a result from what both instructors saw and sent back out again to practice. (The clinic operated this way throughout the day.)
The weather had gotten really hot at that point and the clinic stopped for lunch.
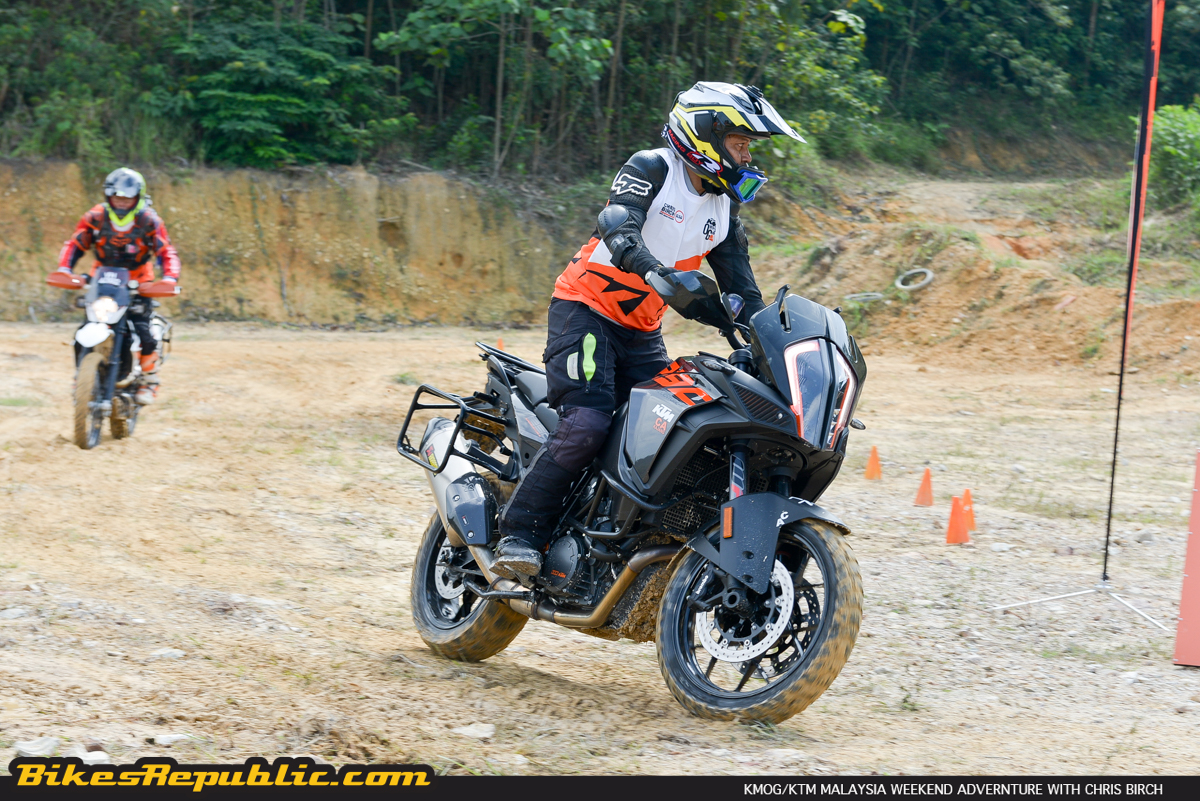
Instruction continued afterwards, moving on the techniques of turning the bike. Getting a bike around a corner in the dirt is different from doing on tarmac. Whereas road-centric riders lean their bodies into a corner, off-roading calls for sitting up on the highside and pushing the bike down into the corner. It’s done so to place the rider’s weight onto the tyres for more traction. Apart from that, it’s much easier to control a slide. By the way, the sharper turns are taken sitting down, while the rider could choose to either sit down or remain standing for the gradual stuff.
But more importantly, Chris stressed on the need to look ahead to where we intended to go, instead of just in front of the bike. Target fixation – whereby the rider keeps staring at an obstruction or dangerous situation – will ironically cause him to hit that very object he wanted to avoid. “Look where you want to go,” is something which every motorcyclist must practice.
Next on the card was how to balance the rider’s weight on the outer footpeg when when standing up to negotiate slow turns and control the bike.
Chris stressed that the rear brake should be used in off-road riding, rather than using the front only. The rear brake is used to stabilize the bike, while the front is used to slow it down.
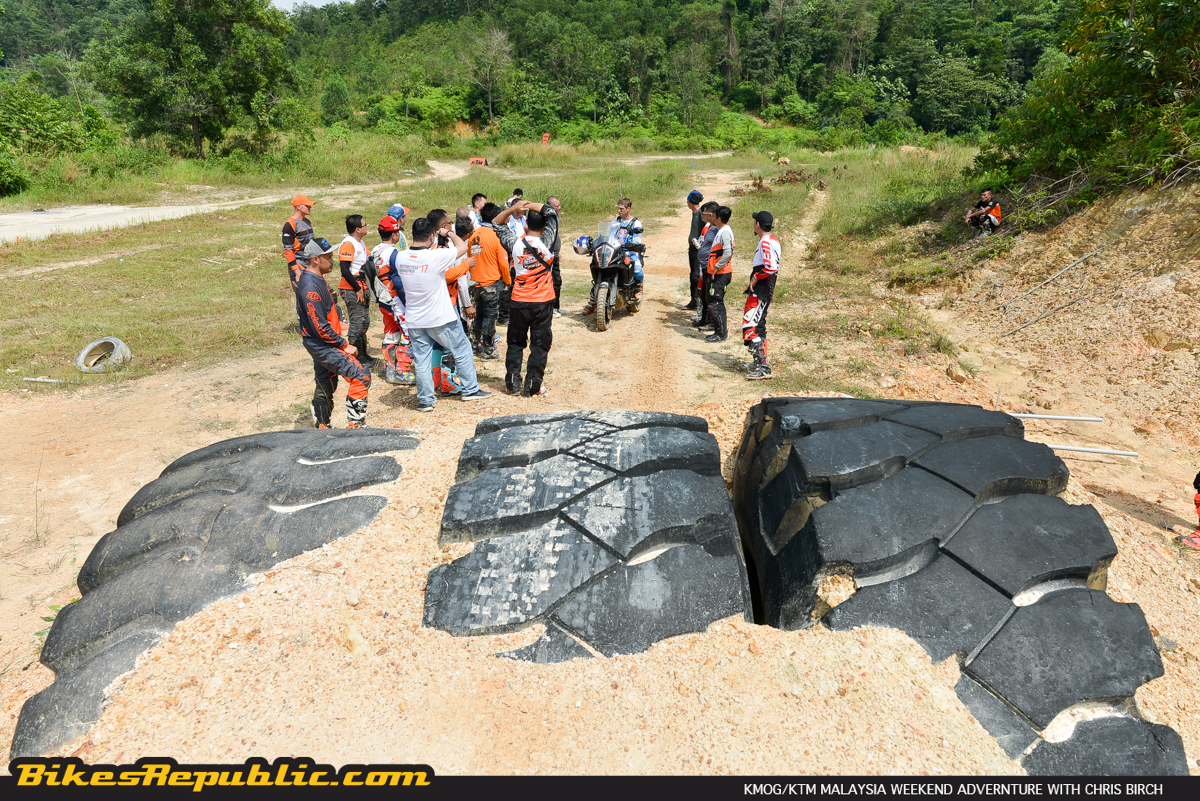
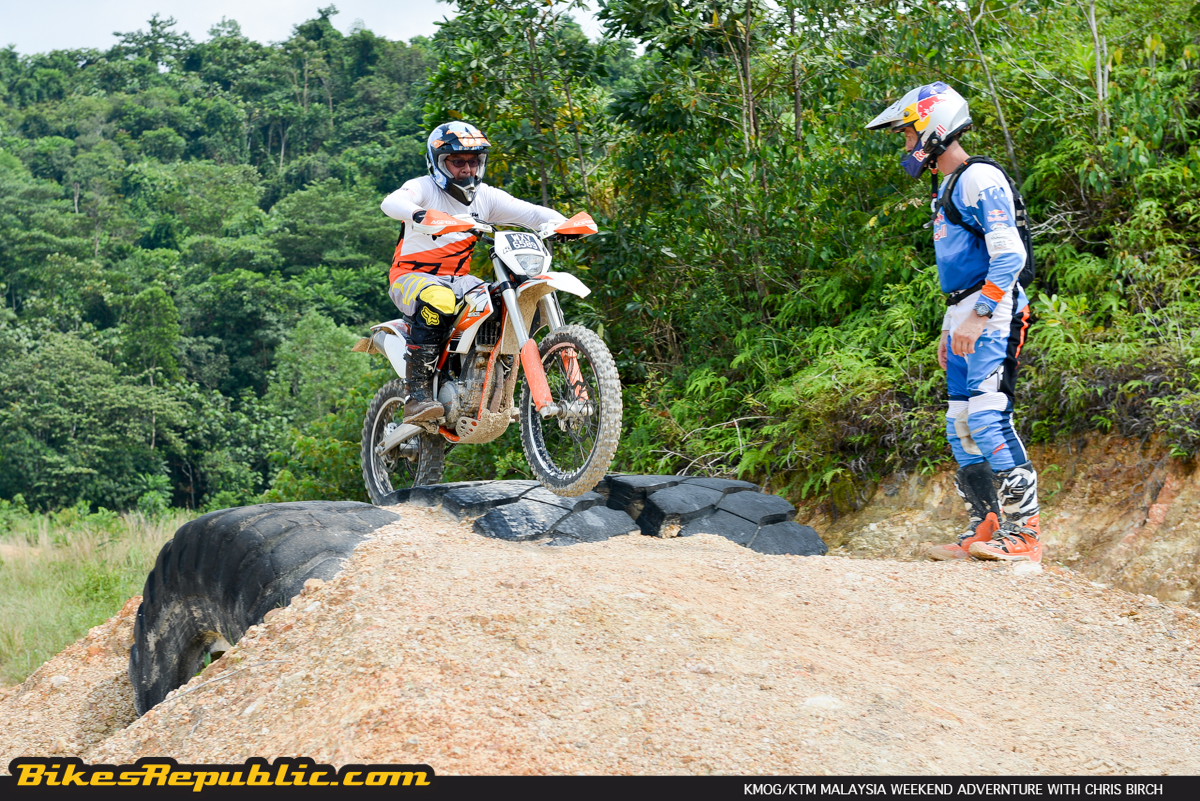
Progressing to the next stage, we were instructed on how to clear obstructions such as an extra slippery (read: muddy) section or logs. The technique is to look as far forwards as possible, then power before the offending section, and rolling off to let the bike’s momentum carry it through. Chris first demonstrated on one particularly deep mud patch before moving over to the tyre ramp.
Participants powered up the leading face then rolled off their throttle just as they’re about to ride over.
With this lesion covered, we moved over to the hill climb. There’s a steep hill at the near end of the Sungai Buaya course. Chris presented four different body positioning techniques that one could use for different situations. However, before letting the participants to ride up, he demonstrated on what one should do if the bike stalled on the way up. It was an eye-opener for everyone from the newbies all the way up to the experts.
The hill climb was the final lesson of the day. There were a few get offs but the paramedics stayed under the tent marvelling at the type of riding everyone did and the bikes.
In conclusion, all the four aspects of good riding habits were taught i.e. body positioning and control, throttle control, brake control, and vision.
We bedded down for the night at the beautiful Ratu Rening Residency resort. Everyone was upbeat, despite having ridden in first hot weather then under heavy rain. Riding with and learning from a multiple champion has a tendency to do that.
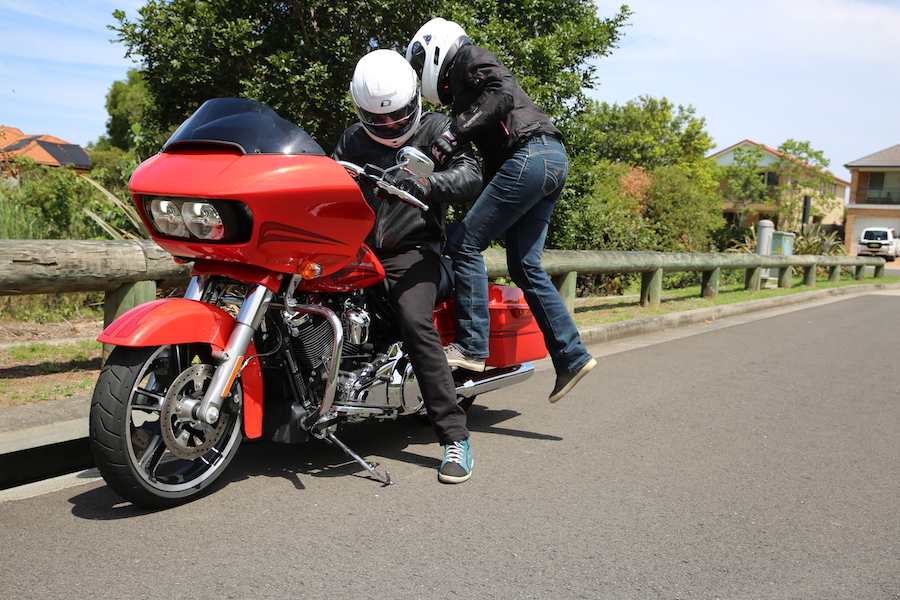
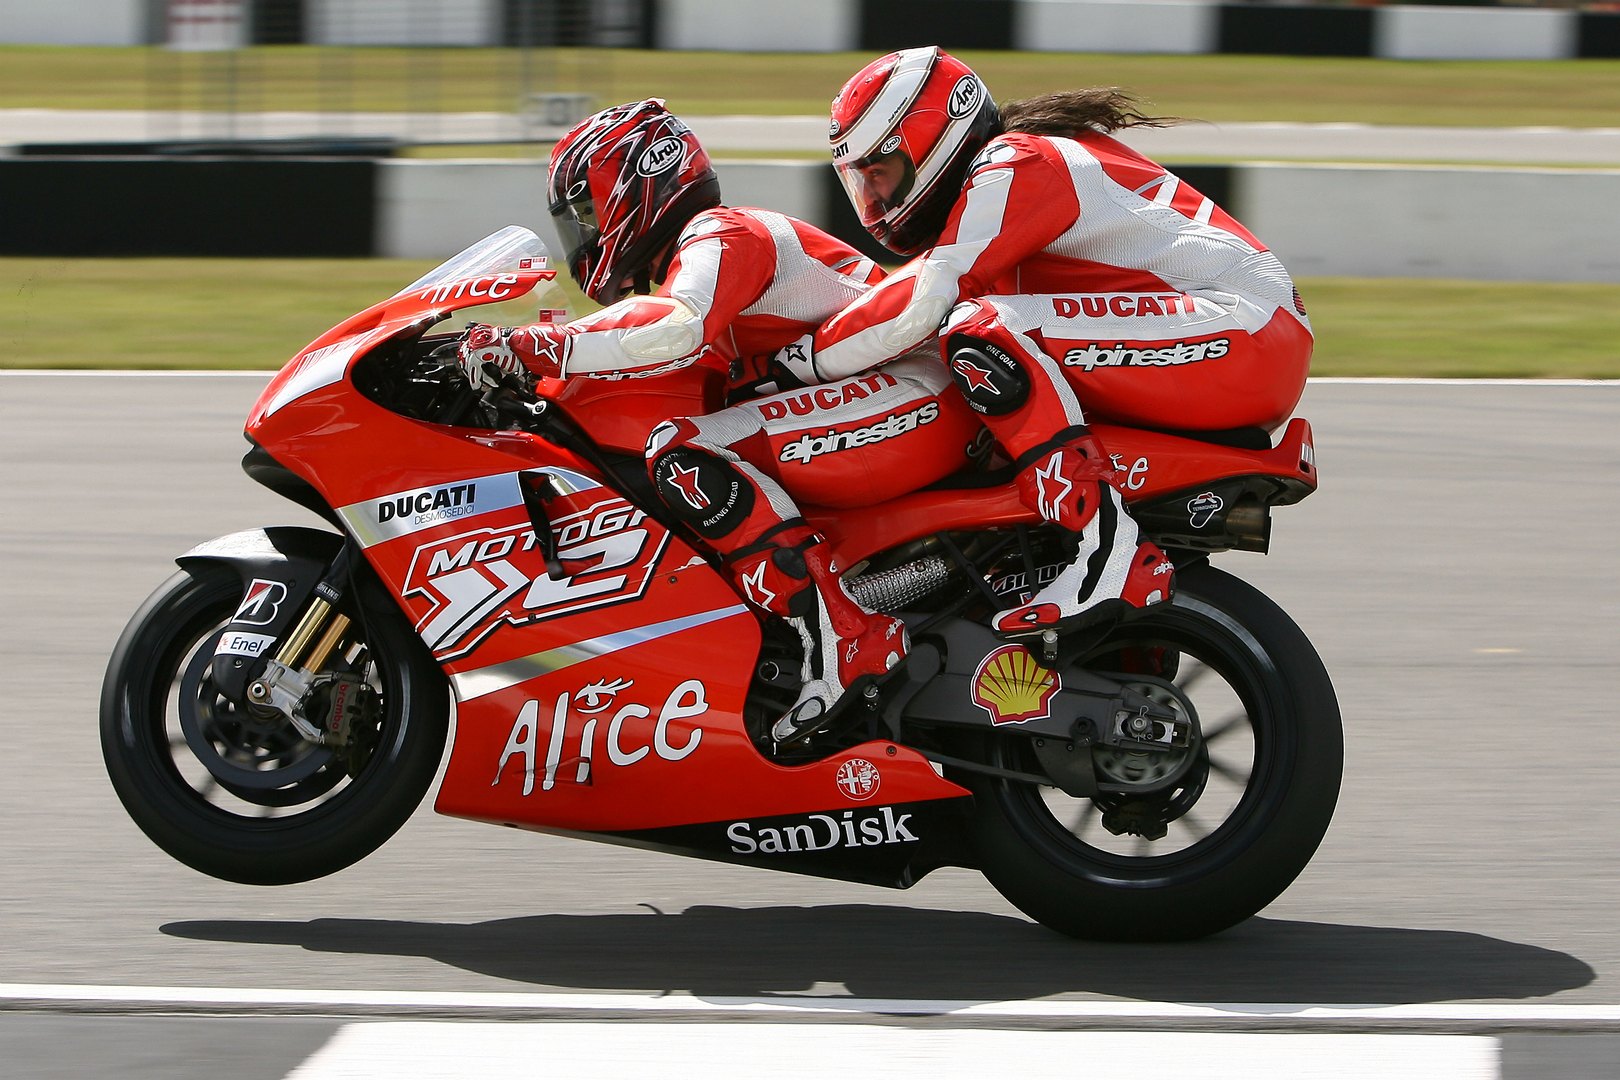
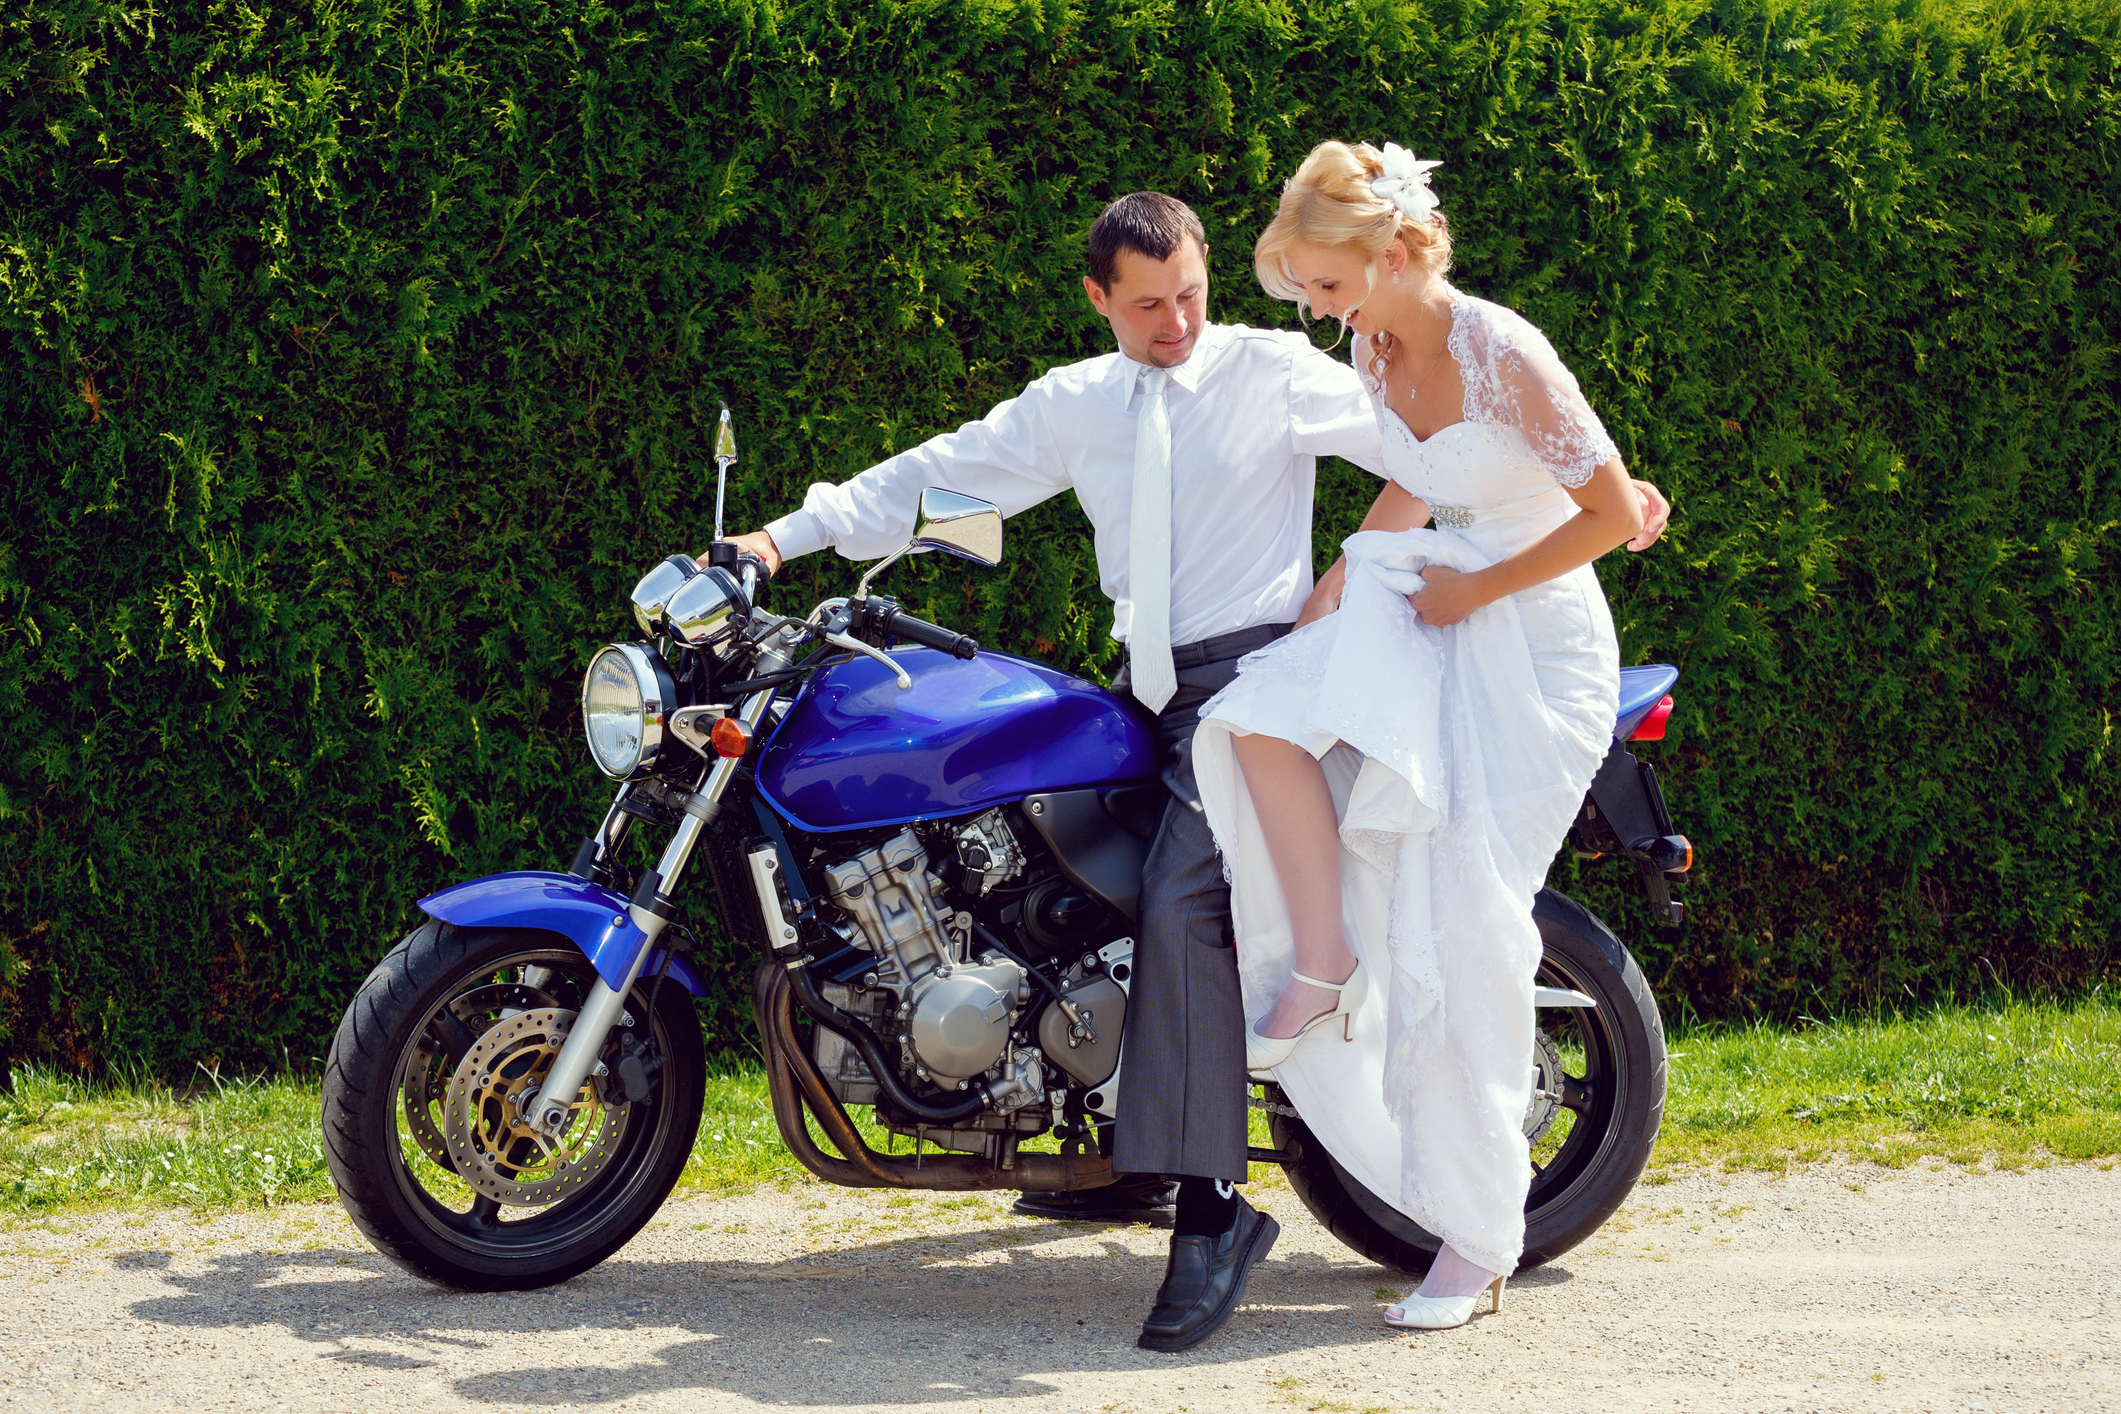
Riding with a pillion is great way to share the wonderful world of motorcycling.
Done right, your passenger will love motorcycles and riding.
It’s best to brief your passenger if he/she is a newbie.
Riding with a pillion is inescapable, especially if you commute by motorcycle. Whether it’s your other half or office buddy, it helps to understand a few tips about carrying a pillion.
Done right, they will enjoy the experience. Done wrong, they’d most likely to think of motorcycles as torture racks, or you’ll see the prospect of your romantic goal disappear. Or worse, touch wood, end up in a heap on the ground.
It helps to ask your passenger if he/she had ever ridden on bike. You could then brief him/her on what needs to be done or need not do. Convince them that you’ll take it easy and keep your word.
Right, let’s ride.
Gear up
We’re sure you’re always geared up when riding. However, do ask your would be pillion in advance if they have any proper riding gear and bring your spare jacket, helmet and gloves if they don’t. Their safety is your responsibility as soon as he/she climbs on.
Getting on
If your pillion is a newbie, take a few minutes to demonstrate how to get on. No, you don’t have to completely climb on, but a few physical pointers will be enough.
Let he/she know to climb on from the left side (away from the traffic), then stand straight up before swinging the right leg over the seat. He/she should then settle down onto the seat as gently as possible, otherwise the abrupt slam-down may cause you to lose balance.
Picture from amcn.com.au
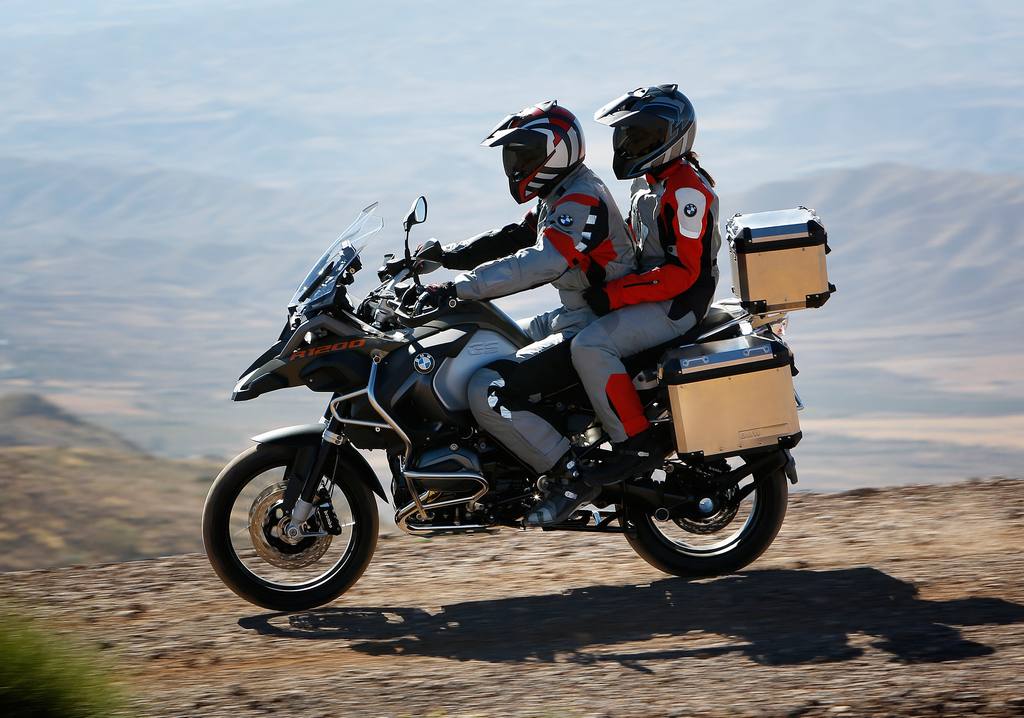
This is especially important if you ride a tall adventure- or sport-touring bike, as they could be top heavy from a full tank of liquid gold, in addition to panniers and top case laden down with durian. Do remember to brief your pillion about the panniers. You should also remember to compensate for some rocking around at the rear while the pillion finds a sure footing.
Do remember to let your passenger know to alight the bike only when you say so.
Picture from pinterest.com
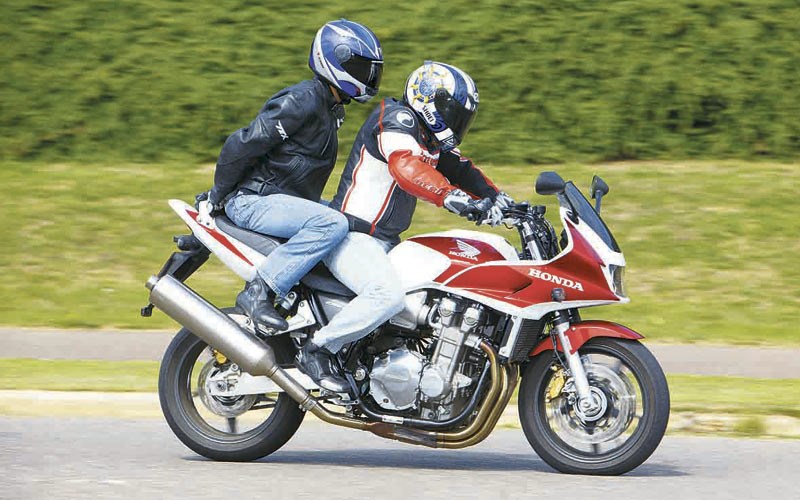
Hold on
Request that your pillion hold on at all times, rather than allowing them to place their hands on their thighs. Your passenger may find it more comfortable to hold on to the grab bar, if he/she doesn’t want physical contact. That’s fine.
Picture by motorcyclenews.com
However, if your passenger doesn’t mind it, request that he/she hangs on to your waist or tug on your pants’ belt loops. The best way to ride is for the pillion to place his/her palms on the fuel tank. That way, both your masses become one for more stability instead of being displaced. He/she will feel more secure too, without the sensation of being thrown off the bike.
Picture by totalmotorcycle.com
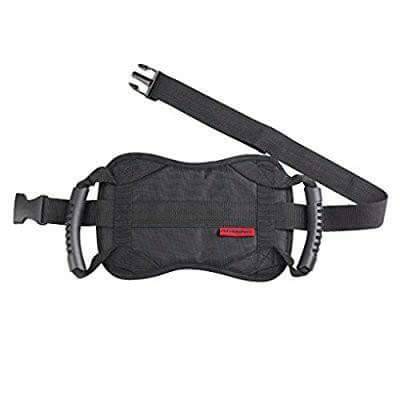
We found a great solution while browsing through Hodaka Motoworld. This Komine Tandem Riding Belt AK-322 attaches to the rider’s waist, while the pillion holds onto the handles. For just RM 180 before 6% GST, it’s a worthy investment.
Let them know to tap you on the shoulder should they need help or to pull over. If he/she holds on to your neck, it means that you’re riding too fast.
Keep both feet up
Do let your pillion know that he/she should keep both feet up unless it’s time to get off. He/she may mistakenly think it’s their job to help keep the bike up at traffic lights and cause a loss of balance.
By the way, you know that you can’t carry a passenger if your bike doesn’t have passenger footpegs right…?
Corners! Charge!
Wait! No, hang on. It may be exciting for the rider, but corners are usually scary stuff for the passenger, experienced or otherwise. Suck it up and take it easy, you still have the opportunity to ride from BHP Gombak to Karak in less than 12 parsecs next time.
Brief your passenger from early on to stay relaxed, especially in the waist and torso, and lean with the bike. He/she doesn’t have to assist by leaning in more, and definitely not by leaning the other way.
However, that also depends on your riding to a greater degree. Take it easy with your corner entry and mid-corner speeds to allow him/her to stay relaxed.
Don’t fidget
Your passenger should be relaxed but not as so relaxed to start squiggling around at the back to take selfies while filtering through the weekend traffic jam at Bentong. Or when riding offroad. Or applying makeup.
Picture from pinterest.com
Adjust your bike
Increase the rear tyre pressure and shock preload to compensate for the extra weight. Too low a tyre pressure will cause the rear to wobble. Too little preload will cause the rear to squat, taking weight off the front.
Also, you should adjust the headlamp should it shoot into space.
Change of performance
Keep in mind that the pillion’s extra weight will also cause a difference in performance, when attempting an overtake and the extra distance required to brake. Additionally, turning and avoiding hazards would also be more sluggish.
Be sensible and smooth
There’s no point in trying to show off your skills to your pillion. Unless of course, you’ve just met an adrenaline junkie.
EEEEEK!!!!
Don’t blast off or chop the throttle abruptly. Fight the temptation to charge through a corner after being inspired by Marquez. Take it easy and the ride will be a breeze.
Let them feel that riding is actually exhilarating and that you’re a cool guy, if you’re trying to woo the opposite sex.
Their technology has advanced much over the years.
Finding out about how they work is just as important as choosing one and maintenance.
There was a point in time when a motorcycle didn’t require a battery to start, relying instead on points and condenser ignition system, but now batteries are getting ever more advanced in order provide power to starter, lighting system, electronic ignition (ECU) and coils, riding aids, other electrical and electronic systems and accessories.
It’s the battery that’s powering all those systems at the start and when the motorcycle’s charging system can’t provide enough power for example when the bike is idling for a long time at the traffic lights.
Furthermore, the battery also needs to protect the delicate electrical and electronics by absorbing voltage surges and spikes.
BASIC WORKINGS OF A BATTERY
What exactly is a battery? To put it simply, it is an electrochemical device which converts chemical energy to electrical energy.
A basic 12 Volt (V) battery is made up of:
Six cells that typically produce approximately 2 volts each (depending on type of cells), producing between slightly above 12.0 to 13.2 volts, in total.
Each cell consists of alternatively charged positive and negative lead (Pb) plates i.e. positive, negative, and so forth. The more plates in a cell, the more current (flow of electricity – Amp) and energy capacity (ampere hours – AH).
Insulators that are placed between the individual cells.
The cells are then connected to each other.
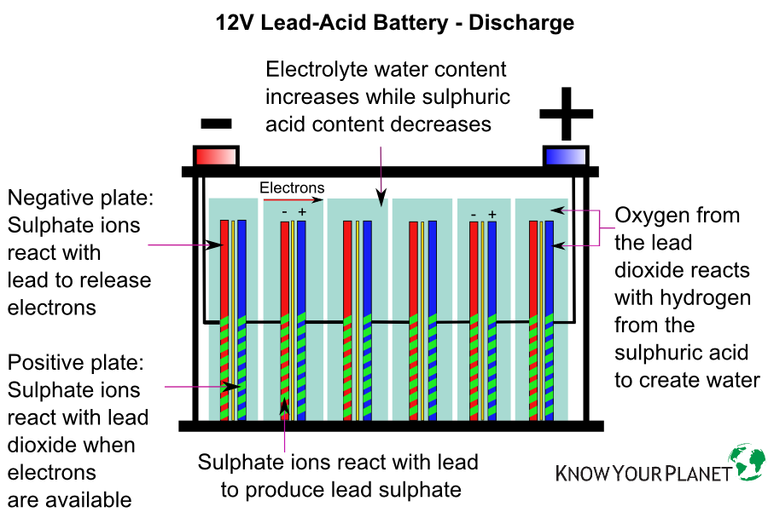
Electrolyte (commonly known as battery acid) which is a sulfuric acid and distilled water solution, is added to the flood the plates.
The lead plates react chemically to the sulfuric acid, lead sulfate, while the acid is turned into water which in turn is split into hydrogen and oxygen.
The chemical reaction releases electrons from the negative plates. The electrons (which are negative in charge) flow to the components they need to and return to the battery’s positive terminal and plates. This is what’s known as the electrical current.
The electrolyte will eventually be diluted through discharge i.e. electrical usage.
Charging reverses the chemical process.
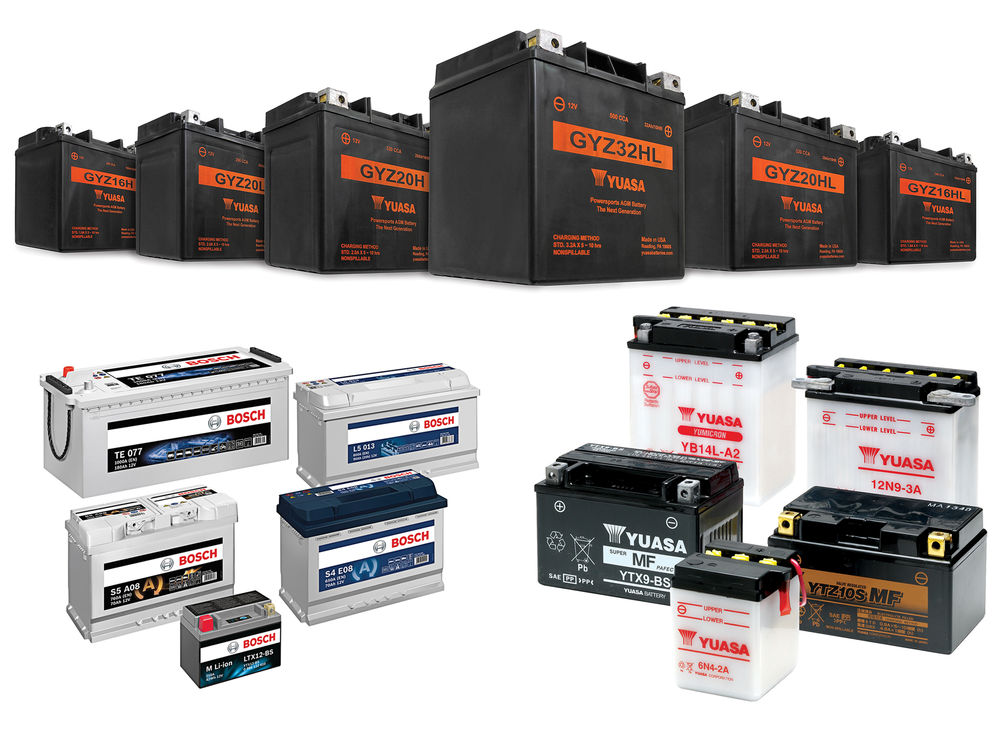
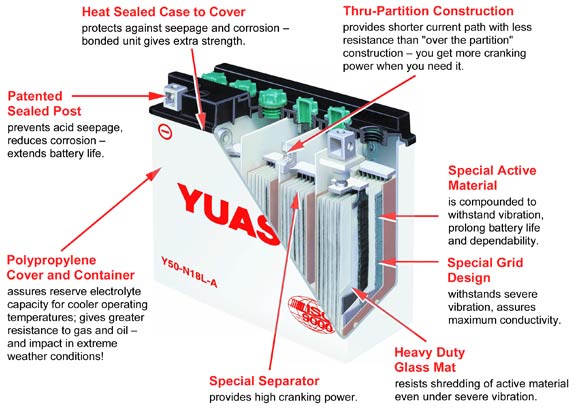
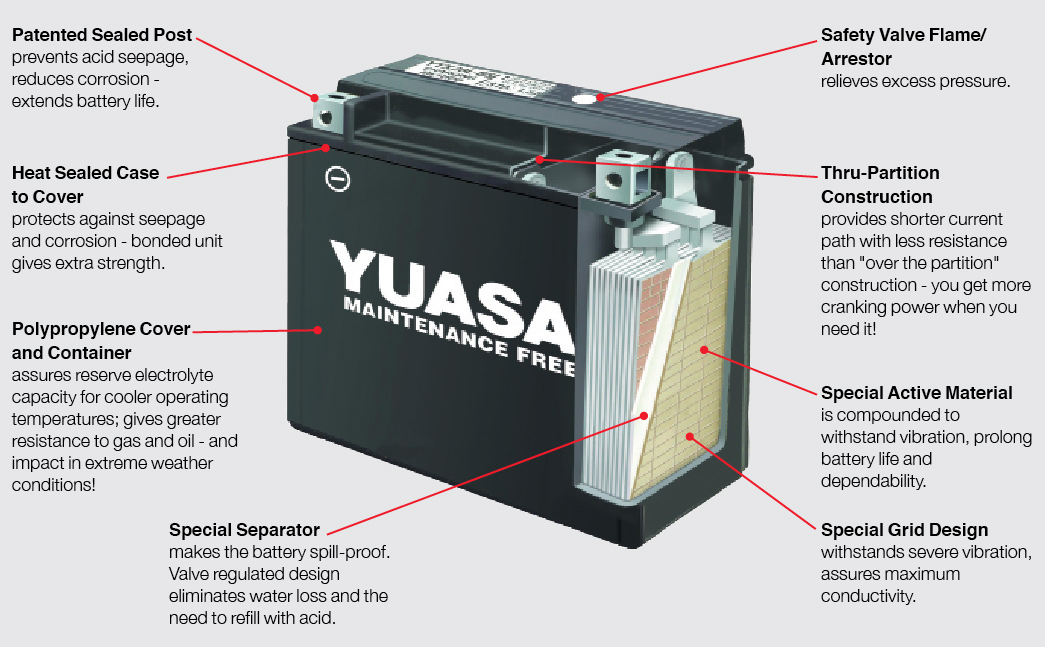
TYPES OF BATTERIES
1. Wet cell
Also known as the flooded lead-acid cells battery, it was invented way back in 1859. As the name suggests, the cells are inundated in electrolyte and needs to be checked and topped-up as required from time to time, especially in our hot and humid weather.
When stored in a discharged state, the heavier acid molecules sink to the bottom of the battery, causing the electrolyte to stratify (separating into layers of water and acid). When the battery is used again, most of the current will only flow around this area, wearing out the bottom parts of the plates.
Adios soon enough.
Being filled with liquid also requires the battery to be fixed in an upright position to prevent spillage. While being gradually being phased out as OEM fitment for motorcycles, they are still widely available due to their low cost.
2. Absorbed glass mat (AGM)
The AGM battery is the most common type of OEM fitment nowadays, usually produced by Yuasa for our market.
If you’ve ever replaced your OEM battery to another “maintenance-free” type, especially if it’s from Yuasa or Koyoko, chances are that it’s an AGM.
In an AGM type, the electrolyte is absorbed by a glass fibre mats that sit between cells. The mats greatly reduce evaporation and doesn’t require topping up, consequently. The electrolyte becomes the separator material, allowing the plates to be compressed together, increasing energy density compared to wet cells or gel batteries.
To reduce gas pressure build up in the casing when overcharged or discharged, the AGM battery includes a one-way blow-off valve. Due to that feature, AGM batteries also belong to the group called “valve regulated lead-acid” (VRLA) designs.
Another advantage of the mats is that the electrolyte is held in place and doesn’t slosh around or stratify like in wet cells, which means the battery could be mounted in different positions.
AGM batteries arguably have shorter lifespans since they have higher acid contents to increase standby voltage and lower water loss rate. If your AGM battery shows more than 12.56 V in an open circuit (battery not connected to anything on the bike), it means there’s more acid content. Again, while this is normal for the AGM type, it may not live long.
3. Gel battery
A gel battery, also known as gel cell, is A VRLA battery uses gellified electrolyte. Sulfuric acid is mixed with fumed silica, resulting in an immobile, gel-like mass.
Since there’s no liquid involved, it doesn’t need to be kept upright, electrolyte evaporation is reduced, there’s no spillage and corrosion problems. Besides that, it is more shock and vibration resisitant.
4. Lithium-Ion
Li-Ion batteries are all the rage now, despite not being fitted on a widespread basis due to cost. To describe the functions of a Li-Ion battery requires an entire article by itself!
To surmise, however, the advantages of the Li-Ion compared to VRLAs are mainly substantial weight savings and better cranking pressure (CCA – Cold Cranking Ampere). Cranking pressure denotes how much stored energy is available for cranking up the engine, besides supporting the electronics and electrical systems and accessories.
Disadvantages of Li-Ion?
A discharged Li-Ion battery can’t be brought back to life unlike a VRLA. Additionally, you need to use chargers that are compatible with Li-Ion batteries, although you may also use that charger for VRLA batteries.
That’s it for Part 1, the basics. We’ll cover the subject of maintenance in the next edition.
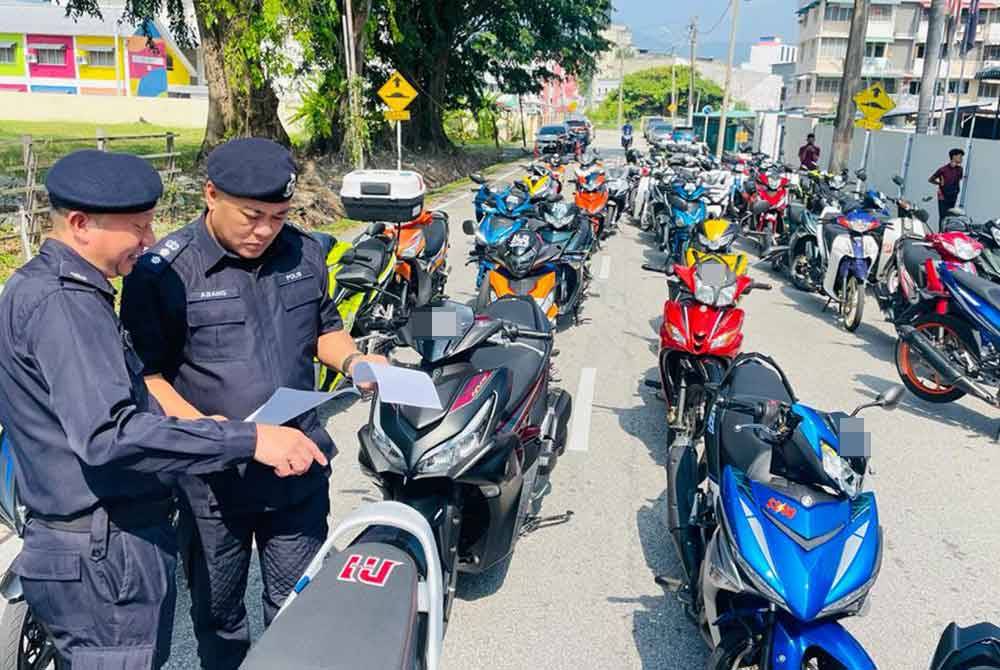
How much do you have to pay if you get pulled over for a traffic offence?
The guide below is standardized among the PDRM, JPJ and DBKL.
Remember that “The more you delay, the more you pay.”
Ever wondered how much is the summons rates you need to pay if you get nicked by the traffic police for an offence? We’ve put together this PDRM Traffic Summons Rates as a general guide. You may always check to see if you’ve been summoned at the Polis DiRaja Malaysia’s (PDRM) official site or through portals such as MyEG.
First category offence
Vehicle type
Standardized summons rates (RM)
Examples of offences
1 – 15 days
16 – 30 days
31 – 60 days
Offences relating to primary cause of accident, safety or road users, traffic congestion and public safety.
All types of vehicles incl. motorcycles below 250cc
300
300
300
1. Driving above 40 km/h faster than speed limit.
2. Failure to stop at red light.
3. Using mobile phone
4. Not wearing a helmet.
5. Going against traffic.
6. Using the emergency lane except for emergency purposes.
Second category offence
Vehicle type
Standardized summons rates (RM)
Examples of offence
1 – 15 days
16 – 30 days
31 – 60 days
Offences relating to negativve behaviour of driver and vehicle technical problem that activelu contributed to the accident, traffic congestion and public safety.
All type of vehicles
150
200
300
1. Driving below 40 km/h faster than speed limit.
2. Perforing U-turn where it is prohibited.
Motorcycles below 250cc
100
150
300
3. No driving license.
4. Stopping inside the yellow box.
5. Not adhering to “No Entry” sign.
Third category offence
Vehicle type
Standardized summons rates (RM)
Examples of offence
1 – 15 days
16 – 30 days
31 – 60 days
Vehicle technical problem which passively increases the risk of an accident, traffic congestion and public safety.
All type of vehicles
100
150
250
1. Lights not working.
2. Brake light not working.
Motorcycles below 250cc
50
100
150
3. Light is not turned on.
4. Side view mirror not installed.
5. Transporting unsuitable object on vehicle.
Third category offence
Vehicle type
Standardized summons rates (RM)
Examples of offence
1 – 15 days
16 – 30 days
31 – 60 days
Other offences not contained above that did not contribute to accident, traffic congestion and public safety.
All type of vehicles
70
120
150
1. Expired driving license.
2. Did not change vehicle ownership.
Motorcycles below 250cc
50
100
150
3. Not displaying “P” sign.
As you can see, traffic offences are divided into four main categories. However, certain offences don’t appear as clear cut. Take for example if a motorcyclist is riding a 1000cc motorcycle without a B (full-B) bike license and a full-B “L” license either. His offence is categorised as “having no valid motorcycle license.” If he has an “L”-license but didn’t display the L-stickers, his offence should fall under Category Four.
Another offence motorcyclists should take not is about not riding on the motorcycle lane where available. The offence is considered not adhering to a no entry sign.
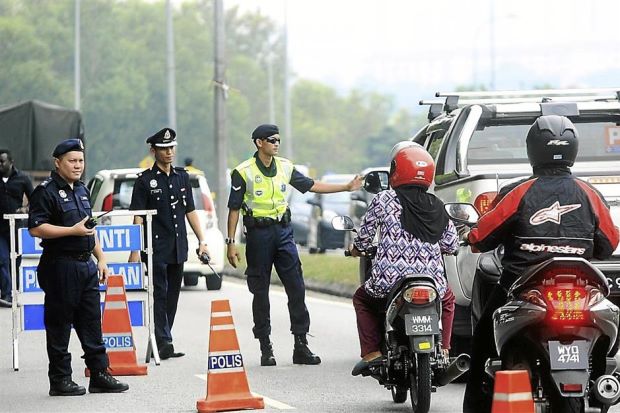
Image by thestar.my
There are non-compoundable offences, of course, such as riding with expired road tax. That would automatically mean that one is riding without insurance coverage. It’s an offence that sends one straight to the Majistrate’s Court and subject to the judge’s mercy.
Driving under the influence of alcohol or drugs could result being fined up to RM 5,000, a jail term and your license being revoked.
However, what kind of offence also depends on the issuing officer. So be nice if you get stopped.
Another thing to note is that the rates are standardised among PDRM, JPJ and DBKL. To encourage quick settlement of outstanding summons, the government has put the “The more you delay, the more you pay” initiative in place since 1st July 2013.